Friday, December 31, 2010

Favorite Crocheted Hot Pads


I picked up this free pattern in a favorite craft store. The pattern was called “Grandma Leona’s Hot Pad” and the sample was fabulous. It was nice and thick. It looked simple. However, the directions were really poor. It was as if Grandma Leona dictated them from memory, over the phone, when she was half asleep! Because that sample looked so good, I tried to figure out the directions and gave up a number of times. But I persisted long enough to finally figure out what Grandma Leona meant, and this hot pad really is as great as something from a grandma ought to be.

Here are better directions, I hope! I think you’ll probably see why it was hard to figure out. It doesn’t sound easy, but the pictures ought to help.

Materials: 2 balls, worsted weight, cotton yarn. (each ball makes 1 hot pad) Size G crochet hook.


Gauge: 4 sc = 1"; 6 rows = 1" (When I use a G hook with 26 chain foundation, the hot pad usually measures about 6 3/4 inches. If you like your hot pads bigger, use 28 or 30 chains in the foundation. Then you would be counting 27 or 29 sc stitches in each row)

Foundation: Chain 26.


Row 1: Sc in the second chain from the hook, then sc in each chain across. (25 sc) Chain 1 and turn.

Row 2: Pick up the back loop of the first sc and the bottom loop of the foundation chain opposite, at the same time. Yarn over and pull through the two stitches on the hook, then another yarn over and pull through the two loops remaining on the hook. This makes the first sc of row 1.

Continue to work in both the back loops of the previous row and in the bottom loops on the opposite side. Sc in each st across. (25 sc.)

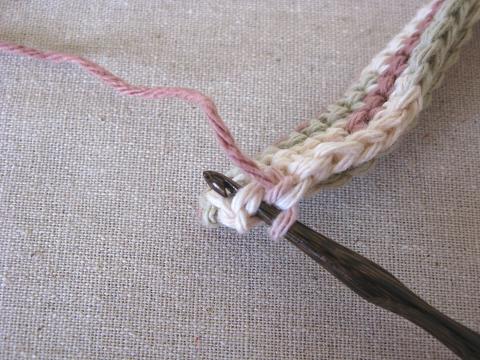
The last stitch is critical. In the picture, you can see the turning chain from row 1 at the very end of the row. Count to make sure you have 25 sc.

Again, chain 1 and turn.


Row 3 and continue: Working in the back lps of the stitches in the last row and in the front lps of the stitches of the row before the last row, at the same time, continue to sc in each st across, chain 1 and turn. Continue working the rows in this way until the hot pad measures square.

As you add rows, you will see that the bottom is rounded and that you are making the hot pad double. Each row lays halfway across the previous row. This makes the hot pad nice and thick. Once you get the hang of picking up both stitches, it is as simple and relaxing as most single crochet is.

As I mentioned, you need to be careful to pick up the last stitch in each row. It is small and tight and sometimes difficult to see. If you look carefully at the picture, you can see  the last two threads that I need to pick up to make the last stitch. Sometimes, I have to pull the turning stitch of the previous row aside to see where to put the last stitch.


The picture above shows the last stitch on the hook. If the hot pad is not squaring up, it could be that you are not catching that last stitch. Count the sc in each row and you should be okay.

Measure the hot pad as it progresses. When the hot pad is within one row of being square, work the final row.

Final row: Work in both loops of the sc stitch in the previous row as well as the front loop of the sc stitch opposite on the row before the last one, all at the same time. (3 loops and 1 loop on the hook.) Yarn over and pull through the three stitches, then yarn over and pull through the remaining two loops. This makes the sc. Sc in this manner all the way across and complete the last stitch. Do not make a turning chain. If you don’t want a hanging loop, fasten off the yarn and weave in the tail.

Make a hanging loop: Do not fasten off. Directly from the last stitch, chain 12. Work a sc in the last sc in the last row. Chain 1, then slip stitch in each chain of the hanging loop. End with a slip stitch in the last sc you made. Leave about 6 inches for sewing and cut the yarn.  Use a yarn needle to sew the yarn end through the bottom of the hanging loop a couple of times to stabilize it and then weave in the remaining yarn.

Wednesday, December 29, 2010

Hot Pad Gifts


These are my favorite hot pads. I make lots of these as gifts and usually put a dishcloth with them. These three sets were made for Christmas gifts. I just wanted to show how pretty they turned out.

Tuesday, December 21, 2010

Have a Very Merry Christmas


Miss Abigail is very happy that we've had some Christmas snow. She is loving it! I am also glad, but loving it a little less. :o) I'm having fun planning new posts for the blog, but am going to take some time to celebrate Christmas. I'll be back soon. I hope you all have a very, merry Christmas!

Saturday, December 18, 2010

"Merry Linens" Gift Set


I finished the "Merry Linens" gift set and wanted to show you all what it all looked like in the end. I crocheted a set of hot pads and a dishcloth and sewed rick-rack on two hand towels as well as embroidering the dishtowel. A recipe book, published by my ladies club, was also part of the gift. I think it all turned out really well.


I think its fun to use special linens like this for holiday cooking and baking. An apron would be nice too! If holiday linens are prepared ahead of time and placed in the hope chest, it would surely make those first holidays away from home more merry.

Wednesday, December 15, 2010

Victorian Lady Ornament


This ornament was made for Abigail's hope chest last year, but I was defeated by how to attach a hanger. So, she has been sitting all year long, waiting for some kind of inspiration to strike. While browsing among the jewelry findings in the bead aisle at the craft store, I saw what is called a "bead cap." It had just enough of a cupped shape to hide the knot in a hanging thread. Perfect! I just used a dab of super glue and she is now finished.


She's very pretty, isn't she?

Saturday, December 11, 2010

Holiday Books for the Hope Chest


I think holiday books and stories are a wonderful addition to a hope chest. Our family enjoys a story time in the evenings during the holiday season. We have a nice book of compiled Christmas stories and poems, and we've collected several individual holiday story books. It really would not seem like Christmas without hearing the story "Christmas Every Day." Some of these stories and books will be part of Abigail's hope chest. Having heard these same stories, year after year, I hope Abigail will have sweet memories as she reads the same stories to her family in years to come.

Thursday, December 9, 2010

A Hope Chest Gift


This is a younger Abigail on Christmas morning with an extra special hope chest gift from her brother. In the coming years, I know absolutely that she will come to treasure the gift more and more.

I'm so pleased that she has an actual place to collect things. I always wanted a cedar chest. In my community, a cedar chest was the traditional gift for girls who graduated from high school, but my parents just couldn't afford one for me. One of the most tender conversations I ever had with my father was on the night of my high school graduation. He came to me and tried explain why I shouldn't expect to receive a cedar chest. Of course I really had only hoped. I actually understood the situation without his explanation, but I have a sweet memory of my father's wish to give me what I wanted, even if it could not be done. And so, as soon as Abigail was reasonably old enough to start learning about a hope chest, I started looking for one. I understand the position my parents were in, cedar chests are really expensive!


Our son Cameron took a woodworking class in college and needed a project. Cameron knew that I wanted a hope chest for Abigail and he offered to make it for her. Of course I was thrilled. My only requirement was that it be made from pine. He took some real hits in the class from his instructor and others who were sure that I wanted cedar in there somewhere and a nicer wood like oak or something. But I knew what I wanted and Abigail wasn't old enough to have an opinion.

So why did I want pine? Because I plan on helping Abigail fill her hope chest completely. I know it will be heavy. When she moves from apartment to apartment in those early married years, I can promise that Abigail's future husband will not want to lift and carry an oak chest filled to the brim with linens and other hope chest paraphernalia! Pine is the lightest wood. I know it is soft and gets dinged and battered more easily, but I like pine, and I think it is sturdy enough. Poor Cameron had to keep explaining to his teacher that he really wasn't just cheap!

I also didn't want cedar in the chest. Cedar isn't actually a great idea for use in a hope chest. It does work to repel bugs in wool fiber, but it also yellows and actually deteriorates fabric over time and it can be lethal to photographs. The scent is very strong. We can add cedar panels in the bottom if we ever want to have cedar, or use loose cedar in sachets. I wanted to have the option of NOT having the negative effects of cedar. Pine is a wood with resins that repel bugs also, it is just not as strong as cedar.

I think Cameron made a wonderful chest. He followed my instructions to a T. It is big enough, but not too big. He put in a nice hinge that holds the lid open. He left it unfinished because I asked him to. This hope chest was as much a gift for me as it was for Abigail and I am so thankful that I have such a thoughtful, talented son.

Monday, December 6, 2010

Current Project - Crocheted Lace Edging


From thread lace to afghans, pillows and potholders, learning to crochet gives a girl the means of producing many wonderful items for the hope chest. I think crochet is an immensely satisfying craft. It is old-fashioned, and yet still useful and versatile.

I always have several projects going at one time. Right now I'm running a hot-pad/dishcloth factory because they make such useful gifts. But I also usually have an ongoing thread project of some kind. This yellow lace edging is the project I'm currently working on. I have one length finished and am working on the second length. I'll sew them on a pair of pillowcases and add them to Abigail's hope chest.


The pattern comes from a vintage Lily thread crochet booklet and is called "Shell Parade." The directions call for a teensy hook and the thinnest thread, but I'm using a size 9 steel hook with size 10 thread. This makes the lace about three-fourths of an inch wide, which is just what I want to go on the pillowcases. It is lacy, but still sturdy enough to withstand everyday use.


Sunday, December 5, 2010

Chain Stitch Project - Holiday Ribbon


Making the crocheted bookmark a yard long turns it into ribbon! This is another way to practice the chain stitch and have something useful and pretty in the end.


Friday, December 3, 2010

Crocheted Bookmarks


Everyone who learns to crochet has to begin with the chain stitch. Finding simple, yet beautiful and useful projects for beginners can be a challenge. And if the beginner happens to be young, it also helps if the project is quickly finished! I helped Abigail begin to crochet with easy crocheted bookmarks. Almost everyone she knew got a bookmark as a gift. :o) The easiest bookmark is a simple chain, made just a little longer than the pages of an average sized book. Leave the tails dangling at both ends.


With just a bit more skill, Abigail learned how to add a tassel to each end. Pull three or four short lengths of yarn through each of the end stitches and tie them together near the top with the same color of yarn. I used the red yarn in the picture only as an example of where to put the tie. Trim the tassel evenly.


Using a smaller hook takes more skill, but a thinner yarn adds a bit more sophistication.


Adding buttons and beads gives the bookmarks some style, and at this point the only limit is imagination. These bookmarks would make a great gift for an older sister or a younger brother. Bookmarks also make great teacher gifts or party favors, or gifts for the reading club kids.


Being able to quickly complete an actual project gives a beginner confidence. They are more likely to progress to other stitches and continue in the craft. Anyone would be pleased to receive a bookmark, particularly one made especially for them.

Wednesday, December 1, 2010

December Pattern - Embroidery


Here is the pattern for the whipped stitch post. The other designs are a bonus. I hope you'll try it out. I will figure out how to make a better copy next time. Perhaps I need to investigate how to share pdf files.
Related Posts Plugin for WordPress, Blogger...