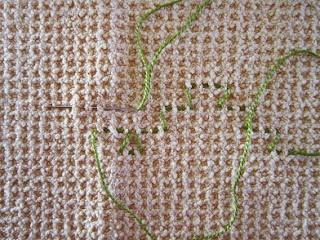
Swedish Weaving is a classic technique for embellishing tea towels for the hope chest. Swedish Weaving traditionally uses embroidery floss to decorate the borders of huck tea towels. Due to the unique nature of the vertical thread “floats” in the huck weave, the stitching shows only on the top of the piece. If you turn the towel over, there are no threads showing on the back. Usually, the designs for Swedish Weaving are mirror images, both top to bottom and side to side. This technique became quite popular in the 1940's, and you might still find many examples of these beautiful towels in antique stores.
Unfortunately, huck towels are hard to come by and the fabric for huck toweling is also somewhat hard to find. Luckily, the small waffle weave microfiber towels available today lend themselves well to thread weaving techniques. So these towels give me an opportunity to modify the technique of Swedish Weaving. Because the waffle weave is different than the huck weave, the same design on a waffle weave towel will spread a bit more openly than on a huck towel. But I think the result is still lovely.
The design begins in the center of the towel and is worked one row at a time from the middle out to each end. For this pattern, cut six 40-inch lengths of embroidery floss. You'll use all six strands together, so don't separate them. I used Perle cotton (size 5) for these towels. Thread a #24 tapestry (blunt) embroidery needle. Identify the middle “ vertical float” on the towel to begin the design.
When I refer to a vertical float, I am intending the threads that rise to form the tops of the waffles and that run vertically in the weave. If you catch the tops of these threads, the colored floss will follow through and lay atop the threads at the bottom of the waffles, making a perfect running stitch until you move up with a “slant stitch.” The combination of running stitches and slant stitches create the design.
Stitches are made always from the right to the left (or always left to right if you are left handed). This consistency is very important. A slant stitch is made by moving up two rows and catching the stitch indicated, again always from the right side of the threads. Follow the pattern, beginning at the bottom middle of the pattern, indicated by the arrow. Working right to left, catch the two floats indicated and pull the thread through the floats until you have an even amount of thread on both sides of the float. Each row of stitching will begin in this same way, with an even amount of thread on both sides of the middle. Immediately form a slant stitch two rows up from the starting point and directly above the left stitch. Please note that I'm giving these directions as a right-handed individual. If you are left handed, simply think opposite – left to right.
Continue to work the first (bottom) row of the pattern across to the left side of the towel, repeating the same pattern across. Do not cut the floss end.
Now come back to the middle, re-thread the remaining floss. Turn both the towel and the pattern upside down. Continue to work the first row (now the top row on the pattern) to the opposite side of the towel. Look carefully at the row to catch any mistakes. Do not cut the floss end.
Follow the chart to stitch all the rows in the design. Always begin at the center of the row and work right to left. Do not cut and finish the ends until the design is complete. You will see the wisdom of this instruction the first time you find a mistake and have to pull out the row (or rows) to correct the mistake. It is also tempting to begin at the side instead of the middle. One important reason for working from the middle is that the slanted threads are not as easily distorted and seem to lay prettier. Also, the threads are not worn out from being pulled through so many times. And, there isn't as much to pull out if you make a mistake.
After all the rows are stitched, again check the design for mistakes and correct any mistakes that you see. With some designs, mistakes are hard to see until the pattern is finished, or nearly so. Don't feel discouraged by mistakes. The stitches are easily pulled out and then you have the fun of weaving them in again!
Now you'll need to address all those floss ends. There are a couple of ways to finish the ends. With each thread end, take a small back stitch in the side hem or into the serged edge and bury the thread along the edge of the towel. Clip the thread and tug the end back into the hem. If there is a side hem on the towel, simply run the thread through the fabric and come out at the side edge. Do this with each of the thread ends and then machine stitch from the top of the rows to the bottom approximately ¼-inch from the side edge. This stitching will secure the threads. Clip floss ends as close as possible to the towel.


Beautiful. Will try it as part of a gift for an upcoming wedding. Thank you.
ReplyDelete