I really like the vintage dish scrubby that I posted about here. However, that pattern calls for thread and is so ruffly that the scrubby has a hard time drying. If you try to make the pattern with a worsted weight cotton yarn, you'll end up with a HUGE problem. (See this funny post on a website called Pinstrosity!) [edit--and this one in response to this post-km] I still like the idea of the ruffly scrubby so I rewrote the pattern to better fit the more common thicker yarn. The scrubby is a little less ruffly than the original but still cute and, more importantly, better able to dry out before mildew sets in. I have made a number of these now and enjoy using them. I think they are just the right size. Just hang the scrubby over the faucet to dry.
Materials: worsted weight cotton yarn (such as Peaches and Cream) and a size "H" hook. I used two colors, but you can use just one if you wish.You can see that I've used all the leftover bits from the crocheted dishcloths made for the Retro Set.
Chain 8 and join with a slip stitch to form a ring.
Round 1: Ch 3. (counts as first dc now and throughout) Make (dc, ch 1) 21 times in the ring. Join with a slip stitch in top of ch 3 at beginning of round. You should have 22 dc and 22 ch-1 spaces.
Round 2: Chain 3. Make (dc, ch 1) in the first ch-1 space. (this is the space between the beginning ch-3 and the next dc stitch). (Dc, ch 1, dc, ch 1) in each ch-1 space around. Join with a slip stitch in top of ch-3 at beginning of round. (44 dc) and (44 ch-1 spaces)
Because you are doubling the number of stitch groups you put into the spaces, you are beginning to see a bit of ruffling in the fabric. That's just what you want!
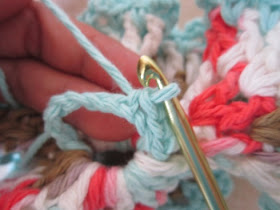
Round 3: Ch 3. (dc, ch 1) in first ch-1 space. (Dc, ch 1, dc, ch 1) in each ch-1 space around. Join with slip stitch in top of ch-3 at beginning of round. You should finish this round with 88 dc and 88 ch-1 spaces. Fasten off with this color and weave in the ends. In this picture you can more clearly see the ch-3 "rise" at the beginning of the round. This ch-3 is the partner to the single dc in the first space. Every other space in the round should have a (dc, ch-1, dc, ch-1) group of stitches.
Each round doubles the number of stitches, creating the cute ruffly effect. It might get a little awkward as the yarn starts to fill up your hand. Just keep pushing it all to the side and keep going.
Edging Round: Cast on in any ch-1 space with the contrasting color and chain 4.*sc in the next ch-1 space. Ch 4. Repeat from * all around. (88 sc and 88 ch-4). Join with a slip stitch in the bottom of the beginning chain 4. Fasten off.
Hanger: Attach the contrasting colored yarn to original loop between stitches. Chain 9.
Join with a slip stitch around the original loop (between the stitches) on the opposite of the hole.
Turn and slip stitch in each chain of the hanger, reinforcing along the length. Fasten off. Tie the ends and then weave them in. Finished.
Here is the pattern without the tutorial breaks.
Ruffly Dish Scrubby
Materials: worsted weight cotton yarn (such as Peaches and Cream) and a size "H" hook
Chain 8 and join with a slip stitch to form a ring.
Round 1: Ch 3. (counts as first dc now and throughout) Make (dc, ch 1) 21 times in the ring. Join with a slip stitch in top of ch 3 at beg. of round. 22 dc and 22 ch-1 sp.
Round 2: Ch 3. (dc, ch 1) in the first ch-1 space. Make (dc, ch 1, dc, ch 1) in each ch-1 space around. Join with a slip stitch in top of ch-3 at beg. of round. 44 dc and 44 ch-1 sp.
Round 3: Ch 3. (dc, ch 1) in first ch-1 space. Make (dc, ch 1, dc, ch 1) in each ch-1 space around. Join with slip stitch in top of ch-3 at beginning of round. 88 dc and 88 ch-1 sp. Fasten off with this color and weave in the ends.
Edging Round: Cast on in any ch-1 space with the contrasting color and chain 4.*sc in the next ch-1 space. Ch 4. Repeat from * all around. (88 sc and 88 ch-4). Join with a slip stitch in the bottom of the beginning chain 4. Fasten off.
Hanger: Attach the contrasting colored yarn to original loop between stitches. Chain 9. Join with a slip stitch around the original loop (between the stitches) on the opposite of the hole. Turn and slip stitch in each chain of the hanger, reinforcing along the length. Fasten off. Tie the ends and weave in.


This pattern looks super cute. Besides the colors you used make it much more cute. Thanks for writing the tutorials.
ReplyDeleteI am just about finished with my first one! It is such a cute pattern- I am going to make more to put back for next year's Christmas presents. Thank you for sharing!
ReplyDeleteSo glad you are liking it. I think it's cute too!
ReplyDeleteSo very cute! I love the colors, too. Thanks for stopping by my blog! I hope you come by for a visit, again! :-)
ReplyDelete