Showing posts with label simple sewing. Show all posts

Wednesday, April 29, 2020

Table Runner with Crocheted Trim

I finished this neutral colored table runner to use for simple everyday meals and it would look great under an easy buffet meal on the kitchen counter. I used my own pattern for the crocheted lace - here is the photo tutorial for the Scalloped Net Edging.


This runner also matches the Granny Round Soup Mats for a fun winter soup party.

Monday, April 13, 2020

A Peek Inside - A Simple Printed Tablecloth

I haven't made a lot of table linens for the hope chest, but this is a small everyday tablecloth that matches Abby's pretty white dishes. The fabric was purchased in the home decor section of our local fabric store and then just hemmed around the edges. Very simple sewing.


Tuesday, August 9, 2016

Tutorial: Tucked Tea Towel


This post is a tutorial for another very easy tucked tea towel. The towel requires only straight stitching. Although it is simple and unadorned on the front, it does have a surprise on the back with a finished faced hem using a matching printed cotton fabric.

Materials: 7/8 yard of 100% cotton "bottom weight" or decorator fabric, (2) 1/8 yard of matching 100% cotton print fabric, basic sewing supplies, measuring mat and ruler, disappearing ink pen.


Cut the towel fabric into two pieces and square up ends and edges. Cut the printed facing fabric into 4 strips 2.5 inches by the width of towel.


Pin one strip to each end of the towel, right sides together. Sew 1/4-inch seams on each end.


Press all the seams open.


Fold the long sides in 1/4-inch and press. Fold over again to form a hem. Press and pin.


Stitch close to the edge to finish the sides.


With the towel facing up, use the measuring ruler and place the 2 1/4-inch marking line directly over the seam separating the print facing fabric from the towel fabric. Draw a mark across the width of the towel. If you don't own one of these wonderful rulers, just use a regular ruler and yardstick to measure and mark a line 2 1/4-inches up from the seam.


Turn the towel with the back side up. Fold the facing toward the back with the raw edge towards the middle of the towel. Press carefully. Fold again, completely enclosing the facing within the fold. This step will allow you to catch the raw edge of the facing, making a nice finish on the back. Press along the previously marked line, across the width of the towel. Pin and repeat this step for both ends of each towel.


Decide how large you want your tuck to be and make a mark on the throat plate of the sewing machine in order to guide your seam. I just used the 5/8-inch marking. Sew the tuck across the width of the towel. If you sew with the right side of the towel down, you may want to check your tension before you start sewing to make sure the bottom stitching will look good on the right side of the towel. Repeat for both ends of each towel.


Open up the towel and press well again. The raw edge of the facing will be enclosed in the tuck, making a nice finish on the back of the towel.


Finished!


Saturday, February 6, 2016

Sew on Saturday: Valentine Hand Towel


I quickly hand-stitched this holiday towel for the Valentine kitchen set this morning. I like the simple running stitch across the plain bands in the terry cloth. The trims for the heart came out of my scrap basket. While this towel is intended for the hope chest, I think it would be just as pretty as a guest towel in the powder room. Hmmm. A different motif maybe...I think I will make another one...

Saturday, January 23, 2016

Quick Valentine Ragged Edge Dishtowel


I love using pretty dish towels, especially around holidays! This cute Valentine dish towel is such a quick and easy project that you can be done in less than 30 minutes! You could make it for the hope chest or keep it for your own kitchen. I love hope chest projects like this for a couple of reasons.

First, the technique is simple and fast. Just cut a ragged edge shape and quickly applique to the towel with the straightforward running stitch. Second, there are no complicated materials or tools. All you need  is a plain cotton dish towel, an embroidery needle, cotton thread to contrast with a scrap of cotton fabric, and pinking shears or regular sewing shears to cut the shape. The cost is minimal. If you keep a fabric scrap bag, the cost is limited to the towel and the thread. Nice. Finally, the most inexperienced sewist can make this project, so it's a great project for someone needing to practice using a needle and thread.

Many of you won't even need instructions for such a project, but I'll give them for those who do. First, determine how big you want your applique and cut a heart shape from paper. Use the towel and adjust the size if necessary.


Press any wrinkles out of the fabric scrap. Use a pencil to trace around the shape on the wrong side of the fabric. Use pinking shears (or regular fabric scissors) to cut the shape from the fabric. Pinking shears will give a nice evenly ragged edge after washing. Regular shears will give a more primitive ragged edge that will take several times washing to achieve.


Arrange and pin the fabric heart to the dishtowel. You can place it in the corner, as I did, or in the center of one side. Pin the shape well so that it doesn't shift as you do your stitching. If you are using this project for a child, you might use many small safety pins rather than straight pins so that little fingers don't get poked! Measure the cotton embroidery thread so that you have enough thread to go all the way around the shape, plus five or six inches more. Divide the thread so that you have two lengths with three strands in each length. Then thread the needle and knot the thread at one end. Start at the bottom and use an even running stitch all around the heart, keeping about 1/8 - inch or so from the edge. You want to be far enough away from the edge that it frays a little in the wash, but close enough that the shape is securely sewn.


When you reach the beginning point bring the needle out on the back of the towel. Take three small back stitches to secure the thread and then tie a small knot. Pull the knot through the towel fabric, pull the towel back just a bit to clip the thread and then "lose" the end of the thread in between the towel and the applique. This will keep the back of the towel neat.


Thread the needle with the second length of thread and tie a knot at one end. Push the needle into the towel between the towel and the applique at some point away from where you want to begin stitching. Again, pull the knot through the towel to "lose" it under the fabric. Then push the needle through to the front where you will begin a second row of stitching.


Make a second row of stitching about 1/4 - inch away from the first row. Try to keep the stitching evenly spaced.


Once you've completed a second row of stitching, tie off your thread and you're finished! The back of the towel should look as neat as the front. Wash and dry the towel to fray the edges.


Tuesday, September 8, 2015

Yellow Ruffled Towels


I recently made these cotton plain weave hand towels for a kitchen set that has been almost finished for a few years now. I have several sets for the kitchen that just need embellished hand towels or the apron sewn or crocheted dishcloths to match or a set of hot pads that are not crocheted! (I'm thinking Abigail might want a little variety in her kitchen linen drawer.) There is always a reason the final set isn't finished. Maybe I can't find a cotton yarn to match the rest of the set, or I can't think of a good way to fancy up the terry hand towel.

Take the yellow, blue and green set, for example. I had purchased the fabric for these towels quite a while ago because it was the perfect color to match the set and it was 100% cotton and it was just begging to be made into towels. You know how that is! Abigail embroidered one of a set of two dishtowels for the county fair a few years ago, but hasn't been interested in finishing the second one. The apron for this set is now sewn, but it still needs a pocket. I have planned to do one in filet crochet, similar to an apron my grandmother made for my hope chest, but I've needed to design the pattern and that just gets put off. So it goes.

I've decided to be disciplined. (Hah! We'll see how if that works.) I've made a list of all the unfinished items languishing in the kitchen sets that are otherwise finished. Naturally, this list is in my hope chest planning book! I am dutifully working on these projects before other, more mentally inspiring projects and methodically crossing things off as I finish them. This process has been good for me because, in some cases, I've just decided to eliminate items that I had planned for certain sets. The number of kitchen linens has become such a joke between my husband and Miss Abigail, that I think I can just call some of the sets finished.

I think I'm making good progress on the list. These towels are now crossed off the list. Now, if I can just turn my head when I see cute ideas on Pinterest or lovely fabric or darling tea towels...

Thursday, July 16, 2015

Tutorial: Simple Tea Towel


Here is another simple tutorial for a handmade tea towel. Choosing to make a towel from scratch gives me control over the fabric, size and color. These factors can be important. The styles of purchased towels are sometimes not very appealing to me, and I often can't find the color I need, so I like being able to make my own. This tutorial gives directions for a very simple hemmed towel. You may already know how to do it, but just in case you don't, I'll illustrate the steps.

Start with 7/8 yard of fabric that is 100% cotton or linen. Natural fibers are more absorbent and release stains more easily. I've used a "bottom weight" cotton ticking stripe fabric. Bottom weight is thicker than a regular cotton print. The term describes fabric that is heavy enough for a skirt or pants (garments worn on the bottom.) Cut a piece of fabric 20 inches by 31 inches. This will make a finished size of 18 by 28, a common size for kitchen hand towels. Fold the long side of the fabric over 1/2-inch and press. Repeat with the other long side.


Fold the fabric over again 1/2-inch. Press and pin.


Fold and press 1/2-inch along both of the short ends of the towel.


Fold up 1-inch on each end of the towel and pin.


Sew close to the edge all the way around. The closer you can get to the edge, the more professional the towel will appear.


If you wish, attach a trim such as this pretty cotton Cluny lace. Cut a length that measures the width of the towel plus 1-inch. Measure up 1 3/4-inches from the bottom edge and align the trim with this measurement. Pin to secure it to the towel. Turn the ends under so that the trim is flush with the edge of the towel.


Sew carefully near the edges of the trim.


Press the towel and you're finished.

Friday, July 10, 2015

Tutorial: Folded Fabric Hot Pads


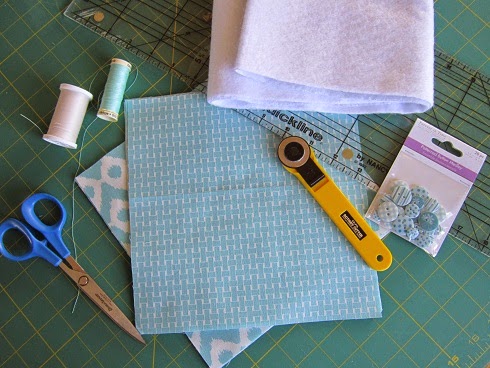
I stumbled on a sample of these pretty folded fabric hot pads and thought they would be a perfect quick project for the hope chest. They are really easy. You'll need: 1/4 yd of color/print A, 1/4 yd of color/print B, 1/4 yd of Insul-Brite, thread to match primary fabric, 2 buttons to match, rotary cutter, ruler and mat. This is a great project to use with scraps as well, as long as they are at least 9" square. Five different fabrics would be just as cute as the co-ordinated pair I've made here.


Once you have your materials, cut 5 (8 1/2-inch) squares from each fabric and 2 (8 1/2-inch) squares from the Insul-Brite. Iron 4 squares from each fabric in half, making a total of 8 rectangles.


Now you'll make a stack. Place the square of Insul-Brite batting on the bottom. Place an 8 1/2-inch square with the right side up on top of the batting. Place one folded rectangle (A) across the top of the stack, with the cut edge to the top and the fold toward the middle. Stack a second folded rectangle (B) with the cut edge toward the right of the stack and the fold toward the middle. Place the third rectangle (A) on the stack with the cut edge to the bottom.


Place the last (fourth) rectangle (B) on the top of the stack with the cut edge facing to the left. Tuck the top of the fourth rectangle under the left edge of the first rectangle. The rectangles will appear woven together with the cut edges on the outside and the folded edges coming to a point in the center.


Pin the edges and corners well.


Make sure to pin carefully at the point where the folds come together. They shouldn't overlap.


Sew carefully all around the edge of the hot pad, using a 1/2-inch seam allowance. You can use a walking foot if you wish - I didn't.


Cut the excess fabric from the corners and trim the seams so that the corners will turn more easily.


Turn the hot pad right side out. Use a point to make sure the corners are pushed completely out.


Press the hot pad so that it lays nice and flat. Topstitch 1/2-inch around the outside edges and sew a button at the center to help secure the center folded point.


Related Posts Plugin for WordPress, Blogger...