Saturday, November 26, 2011

Chirstmas Workshop


Our Christmas workshop is now officially open! When I ask Miss Abigail what she likes most about Christmas, she always mentions making crafts together. I like this activity too. I think we would have to call it a tradition now, but it certainly didn't start out to be anything as formal as a tradition. It seems like I spend quite a lot of time making things at Christmas and Abigail was always saying, "That looks fun." So I began including easy decorations or simple handmade ornaments that she could work on also. Every year she makes a handmade sign that sits on the table to indicate that the workshop is open. When we clean up for the day, the sign goes in the box of supplies until next the time. Now that Abigail is older and more accomplished in her skills, she can add fun holiday things to her hope chest. When she brings them out at some future time, I hope she will remember our fun workshop days.

We've been working on ornaments the last couple of days. Miss Abigail is making a beautiful sequin ornament and I completed a very easy spiral beaded Christmas tree ornament. I made a tutorial because I know you'll want to make one too. Watch for the post on Monday.

Tuesday, November 22, 2011

Thanksgiving Kitchen Set


I finished the Thanksgiving kitchen set for Miss Abigail’s hope chest - just in time! I always seem to run a little behind on my projects, but this one is ready. Thanksgiving is one of our favorite holidays. I love to cook the dinner and Abigail loves to decorate and set the table, so we make quite a team. I even like to wash the dishes, which I do mostly by myself - at my own request. I just like to take my time and admire my pretty dishes and dry them off with pretty towels. I’m not sure that Abigail will ever love to do the Thanksgiving dishes, but at least she will have the pretty towels.


I started this set with the yarn that Abigail liked so well. These hotpads are truly one of a kind. I wanted something different from my usual favorite, so I loosely followed a hexagonal pattern. The term loose would be an understatement. I got a little creative in the middle of things and then somehow had to make it all work together. I wrestled and wrangled and, in the end, these hotpads turned out pretty well, but I’ll never be able to replicate what I did. They are nice and thick, which is the most important factor.


I tried a circular pattern for the dishcloths in this set. These were quick to make, and I’m happy to have another quick pattern. I started out with the #1 pattern found in a Leisure Arts leaflet called "Dishcloths in the Round,"  but naturally adjusted here and there. I really can't seem to help it. The V-stitch works well for dishcloths, I think. This stitch makes a fabric that is close, but not too dense.


I used two designs from Aunt Martha’s #3995 “Monthly Madness” for the embroidered dishtowels. I loved the designs, but thought they were a bit small, so I enlarged them on a regular copy machine and then traced them with a transfer pen.


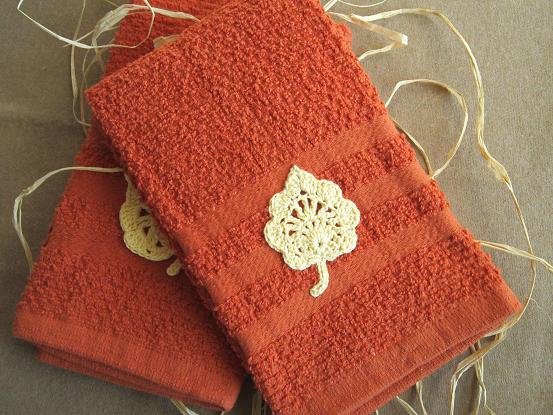
I found a nice color match in these handtowels and added a simple crocheted leaf to the bottom of each towel. The pattern for this scallop-edged leaf comes directly and without deviation from a lovely book, “Crochet Bouquet,” by Suzann Thompson. I used #3 sized cotton thread.


The pattern for the apron is the “Sassy Little Apron” by Cabbage Rose Quilts. Cute.


The last item in this set is another fabric embellished dishtowel. I had extra fabric from the apron and quickly sewed up a towel using the “Retro-Fun” tutorial from Sew4Home. This is a great tutorial. I think I’ve found another dishtowel favorite. I added a simple monogram with chain stitch and lazy daisies.


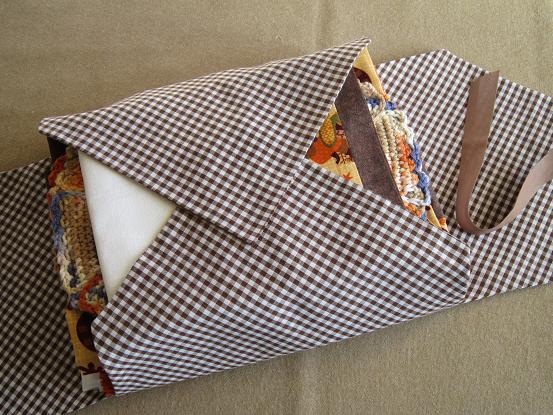
Finally, I made a cover to keep the items together inside the hope chest and then made a tag from the apron fabric to identify this set.


Happy Thanksgiving! I hope you all have a wonderful holiday.

Friday, November 18, 2011

A Peek Inside - "Home" Quilted Wall Hanging


This quilted wall hanging was made by Miss Pat, another of our special lady friends in the Stanley Homemaker's Club. Pat has been a quilter extrordinaire, but has now almost given it up in a new passion of dollmaking. So, I'm extra glad that Miss Abigail has this in her hope chest. It will be so pretty hanging somewhere in her home someday. It is lovely, isn't it?

Tuesday, November 15, 2011

Current Project - Thanksgiving Kitchen Set


Miss Abigail fell in love with the colors in this yarn, so naturally I wanted to make something from it. Since Thanksgiving is in the air, I decided to make a holiday kitchen set for her hope chest. I have the designs transferred to the dishtowels and will make a set of potholders from the yarn - of course I will make potholders ;o} and a dishcloth or two. We found an appropriate print to sew an apron and I will look for a couple of handtowels to complete the set. I'll post again when I get it all done!

Saturday, November 12, 2011

My Favorite Craft Store


A trip back home to Idaho ALWAYS includes a trip to Porter's craft store. I just love going there. I look at all the demonstrations and samples. I wander and spend time dreaming of all the fun craft projects I could make. I love how Porter's feels so old-fashioned to me. Maybe that is because it is located in a very old building and I grew up with this store. It used to be a wonderful bookstore with toys in the basement. As a small child, I stalked the aisles of toys and made my Christmas wish-list. I was the "story lady" here for the children's hour when I was in high school, and I worked as a clerk for a short time before I was married. Sometime after I left home, Porter's discontinued the books completely and changed over to selling crafts. This store is not at all like the big chain craft stores. They carry all the same stuff, but there is still that old-fashioned feel, with creaking wooden floors and little side nooks and spaces. It is just the most wonderful place. I can find things here that I just can't find elsewhere and I love it. I took pictures on this trip, so that you could see my very favorite craft store, and see what I bought this time.


Porter's carries all the usual craft supplies, but they have things organized into sections based on projects, with everything you need to complete the project located nearby. I like being able to think about projects, and not just see random supplies.


Just look at this section devoted to hair bows, of all things! The little girls in Rexburg, Idaho must be the cutest and most bedecked of any on earth. There are also some pretty sophisticated hair accessories for big girls, as well.


Porter's has THE best selection of scrapbook supplies. The possibilities are just endless.  I have to be sooooo careful here.


My favorite part of the store is the fabric and fiber section. Many Mormon women are expert quilters and the selection of quilt patterns and fabric in this one fabulous place is marvelous. Plus, they have all the colors of Cebelia crochet cotton and beautiful hemstitched kits for baby blankets and burp cloths.


I always head for the display of Dunroven House tea towels. There are so many colors and patterns to choose from and cute project samples to view.


This is my pile of goods from this trip. It seems kind of small pile, considering how much I love this store. In the end I restrained myself. ;o) The brown and aqua tea towels are for a particular kitchen set for the hope chest, the red ones are for a Christmas project. I'm experimenting right now with old fashioned chicken scratch and gingham embroidery and these towels are the best. I found two sets of printed pillow cases to embroider and fun transfers for other embroidery projects. I couldn't pass up all the patterns in the apron nook and chose the classic "Church Ladies Apron." The two little Santa bear ornaments are for my sweet grandsons for their first Christmas and I loved that rusty doorknob hanger. The feathered owl is for a really great Christmas project I have imagined. You'll have to wait to see.

I just love places that inspire creativity and I especially love places that seem to speak to my own style. Porter's is that place for me. Visit them online here.

Sunday, November 6, 2011

A New Grandson

I've been in Idaho for the last couple of weeks, to attend the birth of our second grandson. Blaine Rockne Mower was born on October 29th at 10:47 in the evening. He weighed 6 lbs. 12 oz. and was 20 inches long. He has plenty of cute dark hair, but there is also some blonde hair mixed in, which comes from his sweet blonde mother. Everyone is doing very well and it has been my joy to spend some time with this new little family. Enjoy the pictures.


Tuesday, October 25, 2011

Tutorial - Yellow Checkered Potholders


I love the way this set of hotpads turned out. I made them to go into the set that includes these dishcloths and these dishtowels. Miss Abigail is also working on this set and has completed this dishtowel, and this dishcloth so far.

Because the first hotpad of the set turned out so well, I wanted to make a tutorial with the second. If these directions aren't clear, please don't hesitate to leave a comment or ask a question that will make me clarify. Begin with two colors of cotton worsted weight yarn. I used a size F hook, but a G will also work fine.

1.  With color A, chain 24.  Dc in the fourth chain from the hook.


2.  Dc in the next chain also, but leave the last two loops on the hook in order to change colors. This is called an incomplete dc. With the last two loops on the hook, drop color A and pick up color B. Simply pull a loop of color B yarn through the two loops to complete the dc.


3.  Lay the loose color A yarn across the top of the stitches you are crocheting into. With color B, dc in the next chain, inserting the hook into the stitch from front to back as usual. This will enclose the color A yarn within the stitch and allow you to “carry” it across the row. Give a little tug on the tail of the new color to tighten up the stitch in the back. With color B, dc in the next two stitches, carrying the other yarn on top of the stitches you are crocheting into.


4. When the third dc is incomplete, with the last two loops on the hook, drop color B and pick up color A again.


5.  Complete the stitch with color A. Color B will now lay across the top of the stitches and be carried until you pick it up again.


6. Now and then you may need to tug gently on the yarn you are carrying, to keep it from bunching up inside the other stitches.


7.  At the end of the row, change colors again. The color change always happens when the last two loops remain on the hook. With the new color, chain 3 to turn the row.


8.  Pull the previous color up and lay the yarn across the top of the stitches as before. Dc in the top of the next two dc, enclosing and carrying the yarn. This checkered pattern is worked in alternating groups of three dc. The last dc in each group is left incomplete in order to change colors of yarn. The yarn not in use is carried and enclosed as you stitch.


9.  Nine rows total should make the piece square.  To make the set of hot pads, crochet 4 separate pieces and weave in all the loose ends.


10.  Attach yarn at the top left corner of one piece and chain 2.  With two pieces together, use a loose sc stitch to crochet the two pieces together down the side.


11.  Put 2 sc around the end dc in each row, with 1 sc bringing the corner stitches together. (19 total sc on the sides) Turn the corner with 2 chain and a second sc in the same corner stitch.


12.  Sc in each stitch across the bottom, both pieces together. (21 stitches across, not counting the corner stitches.) Turn the corner with (1sc, ch 2, 1 sc.) Crochet up the other side with 2 sc in each row and (1sc, ch 2, 1 sc) in the corner.


13.  Sc in each stitch across the top, catching both pieces together.


14.  Sc in the beginning corner space to complete the round. To make the final “trim” round, (ch 3, dc, ch 1, dc) in the same corner space to create the initial corner.


15. Dc in each stitch around the edges. Turn each corner with a (dc, ch 1, dc, ch 1, dc).


16. Complete the round with a slip stitch at the top of the beginning ch 3.


17.  Fasten off the yarn and weave in the end. If you like you can add a simple chain loop before you clip the yarn.


18.  Repeat with the other two pieces to make the second hot pad. Finished!

Related Posts Plugin for WordPress, Blogger...