
I picked up this free pattern in a favorite craft store. The pattern was called “Grandma Leona’s Hot Pad” and the sample was fabulous. It was nice and thick. It looked simple. However, the directions were really poor. It was as if Grandma Leona dictated them from memory, over the phone, when she was half asleep! Because that sample looked so good, I tried to figure out the directions and gave up a number of times. But I persisted long enough to finally figure out what Grandma Leona meant, and this hot pad really is as great as something from a grandma ought to be.
Here are better directions, I hope! I think you’ll probably see why it was hard to figure out. It doesn’t sound easy, but the pictures ought to help.
Materials: 2 balls, worsted weight, cotton yarn. (each ball makes 1 hot pad) Size G crochet hook.

Gauge: 4 sc = 1"; 6 rows = 1" (When I use a G hook with 26 chain foundation, the hot pad usually measures about 6 3/4 inches. If you like your hot pads bigger, use 28 or 30 chains in the foundation. Then you would be counting 27 or 29 sc stitches in each row)
Foundation: Chain 26.

Row 1: Sc in the second chain from the hook, then sc in each chain across. (25 sc) Chain 1 and turn.

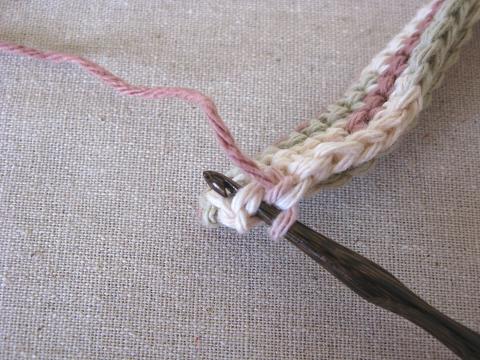
Row 2: Pick up the back loop of the first sc and the bottom loop of the foundation chain opposite, at the same time. Yarn over and pull through the two stitches on the hook, then another yarn over and pull through the two loops remaining on the hook. This makes the first sc of row 1.

Continue to work in both the back loops of the previous row and in the bottom loops on the opposite side. Sc in each st across. (25 sc.)

The last stitch is critical. In the picture, you can see the turning chain from row 1 at the very end of the row. Count to make sure you have 25 sc.
 Again, chain 1 and turn.


Row 3 and continue: Working in the back lps of the stitches in the last row and in the front lps of the stitches of the row before the last row, at the same time, continue to sc in each st across, chain 1 and turn. Continue working the rows in this way until the hot pad measures square.


As you add rows, you will see that the bottom is rounded and that you are making the hot pad double. Each row lays halfway across the previous row. This makes the hot pad nice and thick. Once you get the hang of picking up both stitches, it is as simple and relaxing as most single crochet is.

As I mentioned, you need to be careful to pick up the last stitch in each row. It is small and tight and sometimes difficult to see. If you look carefully at the picture, you can see the last two threads that I need to pick up to make the last stitch. Sometimes, I have to pull the turning stitch of the previous row aside to see where to put the last stitch.

The picture above shows the last stitch on the hook. If the hot pad is not squaring up, it could be that you are not catching that last stitch. Count the sc in each row and you should be okay.
The picture above shows the last stitch on the hook. If the hot pad is not squaring up, it could be that you are not catching that last stitch. Count the sc in each row and you should be okay.

Measure the hot pad as it progresses. When the hot pad is within one row of being square, work the final row.
Final row: Work in both loops of the sc stitch in the previous row as well as the front loop of the sc stitch opposite on the row before the last one, all at the same time. (3 loops and 1 loop on the hook.) Yarn over and pull through the three stitches, then yarn over and pull through the remaining two loops. This makes the sc. Sc in this manner all the way across and complete the last stitch. Do not make a turning chain. If you don’t want a hanging loop, fasten off the yarn and weave in the tail.
Make a hanging loop: Do not fasten off. Directly from the last stitch, chain 12. Work a sc in the last sc in the last row. Chain 1, then slip stitch in each chain of the hanging loop. End with a slip stitch in the last sc you made. Leave about 6 inches for sewing and cut the yarn. Use a yarn needle to sew the yarn end through the bottom of the hanging loop a couple of times to stabilize it and then weave in the remaining yarn.
Those are the EXACT hot pads that I learned to crochet! I never had a pattern, either. My mom's friend taught my how to do it when I was 17 or 18 years old. They are my favorite gifts to give to newlyweds. I have NEVER been burned through one. I don't even use store bought ones anymore:) The last time I made some I made a longer rectangular shaped one to use under hot cookie sheets and 9x13 casserole dishes. I love 'em! I don't have to use 2 hot pads under those pans anymore. I just roll 'em up & put them away with the square hot pads. I also like to do stripes with this pattern:)
ReplyDeleteNow that's what I call a tutorial. Clear directions and clear pictures. Bless you.
ReplyDeleteThese are so lovely! Thank you for the detailed instructions. :)
ReplyDeleteThanks for the wonderful instructions - I have been trying to figure out this pattern for a long time, and just couldn't do it! So happy to finally find it - my grandmother and aunt made these all the time...from little coasters to huge hot pads... my hand is cramping from trying to catch the right loop - but I'm sure I'll get the hang of it eventually. Your photos are so helpful!
ReplyDeleteDeb, I'm so glad to be able to connect you to this pattern. It really is my favorite hot pad, and it sounds like your family agrees. ;o)
ReplyDeleteThank you so much for the instructions and beautiful pictures for this great pot holder. I received several of these hotpads from my husband's grandmother 46 years ago. I have been trying to figure out the pattern for years as they were wearing out. I had asked all of the aunts and no one could remember how their mother did the pattern. That is all she could crochet when her eyes were failing. She found the loops by touch, I guess, every stitch perfect. Now I can finally make some for my daughters.
ReplyDeleteIsn't it wonderful how this pattern connects to people. I'm really so glad!
ReplyDeleteYour photo instructions are terrific. While I've made double sided pot holders using two squares, joined, this is a superior technique. As hard as one tries, there always seem to be slight size or shape variations in squares which are not noticeable in an afghan of many pieces joined together, but obvious [to my eye, at least] in small objects on top of one another. Thank you !!!
ReplyDeleteMimi
I tried this last night and your instructions were wonderful. Thank you so much for sharing this! I've posted it about it on my blog today just to share with everyone I know. Thanks!
ReplyDeleteDeedra @ Favorite Little Princess
http://favoritelittleprincess.blogspot.com/2012/06/crocheted-hot-pad.html
could you please let me know what color she used i would like to get the some color to make it for a friend ok thank,s ms, lynette a, miller at millerlynette6@gmail.com
DeleteThis is a great tutorial for this technique! I found you via Pinterest, and included a link to this page on my blog this morning. :) http://bit.ly/N9O88u
ReplyDeleteI love the look of this and plan to try this very soon. I have pre read your instructions and they seem easy enough to follow. Thanks for sharing photos as it always helps. Great tutorial.
ReplyDeleteGreat tutorial and a very nice project that I hope to try real soon.
ReplyDeleteHey hun,
ReplyDeleteJust wanted to let you know that I featured this on my blog this morning. I would love it if you could check it out and grab my button :)
http://mammymade.blogspot.com/2012/08/mint-stuff-ive-seen-21.html
- Adele @ Mammy Made
Thanks for sharing this great pattern! I've already started making one and your instructions make it a breeze!
ReplyDeleteKathleen,
ReplyDeleteJust finished my first "Grandma Leona's hot pad". What a wonderful pattern! Thanks for great instructions & pics.
Thank you, thank you, thank you! I used to make these and loved them, and then I forgot how to do it, and couldn't find a pattern anywhere! Thank you! I'm making one right now to give as a hostess gift tomorrow.
ReplyDeleteThank you so much for a wonderful hot pad pattern. I just love the finished project. Would like to add your pattern to My Favorites on my blog stitch4ever.com. I want to insure that these beautiful artistic techniques are passed on to our "little" ones!!
ReplyDeleteGreat technique, a lot faster than making two sides. The picture tutorial is great, also. This is my favorite way to demonstrate a pattern.
ReplyDeleteThank you so much!!! I am a just learning to crochet. This was my first "real" project! Your tutorial was so good, I was able to create a finished hot pad. It is not perfect, but I am very pleased with my first project.
ReplyDeleteI am going to go try it .much easier and faster than making 2 parts and sewing or crocheting together. thank you so much for the free pattern for this hotpad, Kathleen. always lovethem when they are free and thank you for explaining it so well. that is not always the case even when you purchase a pattern. thank you so much again and have na happy New Year All ruth
ReplyDeleteI love this! It's stitches up so thick and even, the results are beautiful. Much preferable to either stitching two pieces together or working with two strands. I used Peaches and Cream cotton yarn in the yellow and white ombre. Hanging on some bright hooks, they double as homey kitchen decor!
ReplyDeleteI found a hot pad in this fashion that my Mom had started before she died, it was half finished, still had her hook in the middle of the row through 2 stitches. Finishing it was easy, figuring out how to start a new one was difficult, because the first couple of rows always looked so wrong. I stuck with it and then made dozens of these things to give away as gifts, they were my go-to gifts for years along with a couple of matching washcloths. Awesome tutorial, thanks for posting.
ReplyDeleteThank you! I made two for my kitchen, and I loved them! Thanks for sharing, and for a well written, easy to follow step-by-step tutorial.
ReplyDeleteSomeone made these for me as a wedding gift. I have been looking for the pattern since and am so happy to have found this post! The pictures are so helpful by the way :)
ReplyDeleteLittle-miss-stitcher.blogspot.com
If not for your wonderful tutorial, I would have never been able to do this pattern. Somewhere along an end, I realized I am very grateful to you!
ReplyDeleteGreat tutorial. I've completed one and started another. Blogged about it and linked back to you. www.fourmilesnorthofnowhere.blogspot.com
ReplyDeleteanother Kathleen
awesome tutorial! they make really great hotpads. NO BURN THROUGH!
ReplyDeleteNice blog,great tutorial and an awesome technique.....thanks for sharing.
ReplyDeleteHappy Sunday!
Luna
MY Crochet,Mis Tejidos by Luna
www.alunamistejidos.com
What a beautiful tutorial. May I cross post? Incidentally, this stitch is known as a "Thermal Crochet Stitch" and I've been seeing it pop up a lot recently. It was just featured In Crochet Today!, January 2014 "Let It Snow" edition, on page 45 (I believe). They used it to make a hanging wall organizer. It appears to be excellent for things which require extra bulk or stiffness, since, like a Tapestry Crochet stitch, you wind up with a doubled-weight fabric. I wish I'd spotted your tutorial weeks ago while I was trying to learn it. Learning this stitch from a written pattern was not easy!
ReplyDeleteAlso called the Siberian Stitch!
DeleteJust found this via pinterest... Very clear instruction!! I absolutely love that you deciphered it for us thank you!! They're so awesome I've been making them since I found you.. I can't stop!!
ReplyDeleteThank you for the clear instructions! Such an interesting stitch. I couldn't help but try, and your instructions work for double crochet as well. Makes for a slightly less dense, but still sturdy fabric. I wonder how treble crochet would work out? Or half double? or... :D
ReplyDeleteI really loved your pattern - I did my pot holder in Chunky yarn and it worked out really well. I've linked your pattern to my blog (www.crafthippy.com) - I hope you don't mind. Jane x
ReplyDeleteHi! Saw other tutorials on this stitch, but liked yours the best. Soooo I linked to this page in both my blog and a pattern I designed. If that's not okay let me know! I absolutely fell in love with this stitch and will also be making the pot holder!!!!! Here's the direct link to the blog post: http://txmommylady.blogspot.com/2014/03/door-guardian.html
ReplyDeleteThanks for the great instructions! This pattern will get a lot of use.
ReplyDeletewooow a very clear tutorial !! I knew this with slip stitch.... thank you very much for sharing !! greetings Leelou
ReplyDeletethx for the tutorial, great work !
ReplyDeleteEasiest I have ever done, if your stitches are correct the back/top lines up with the bottom and the hook slides right through and it's so simple. Thank You!
ReplyDeleteHi. Thanks for the clear instructions. I have fallen in love with this stitch. I think a few lines of this stitch will make a firm base for my crochet jewellery
ReplyDeleteJust discovered this post through a review by Little Miss Stitcher. Pinning, and am a new subscriber to your blog :)
ReplyDeleteAlexandra
EyeLoveKnots.blogspot.com
Welcome to the blog, Alexandra! i hope you find useful things here.
DeleteThank you so much for this pattern. My folks asked me to replicate a pair of pot holders that they had been given that they really liked to use. I am relatively new to crocheting so I had never seen this type of stitch before. Thank goodness for Pinterest which is where I found your pattern. I quickly made three of these for them and they were thrilled with them! Thanks again!
ReplyDeleteI'm so glad you found the pattern, Terri! Welcome to my blog.
DeletePurely by accident, I was playing around on coming up with my own stitches or patterns. I came up with this exact thing. I've made hundreds of hot pads. Given as gifts or sold them. I make mine from the regular red heart yarn. I've even gone as far as to make them big enough to be used for place mats, or pads to set big sized cooking pots on.
ReplyDeleteI too made this up (by accident) when I wanted to make a saddle blanket cover that was heavier/stiffer. It certainly was a bigger project, but I too have made many, many potholders, place mats & such items using this technique as well. I've also discovered that it works well using a half double crochet also. I usually make my potholders a slight bit smaller (chain 23 with G-hook) unless to use to set something hot on it, as I got tired of the edges getting burned. I also make some a bit smaller & close the end and one side for use on my cast iron skillet handles. I love them just like everyone else on here. :) I'm glad someone finally posted this
DeleteThanks for this great pattern! I had been shopping for some soft hot pads, and couldn't find any. So my husband said - why don't you make some? These are perfect. One tip that helped me, I use a stitch marker on the last stitch of each row, it sure makes it easier to find that stitch on the return row. Also, my grandma's name was Leontina! So very close :)
ReplyDeleteHi! I really want to try this, but is it an American SC or a British SC?! Thanks in advance :)
ReplyDeleteHi Lil! American stitches. I hope you can get your mind around it.
ReplyDeleteHi Lil! American stitches. I hope you can get your mind around it.
ReplyDeleteBest potholder ever! Can you imagine making it in wool and then felting it? And a blanket? Felted? Or not? Either way, you would never feel the cold through that! Or to use as a picnic blanket. The damp would never get through!
ReplyDeleteHaha! It is a great potholder! I can imagine a felted potholder, but can't imagine a blanket, especially felted!
DeleteIf you use a large hook like an N or O it comes out looking kinda like a thermal blanket.
Deletehi, I'm currently making an afghan using a J hook and another one (random variegated cotton yarns) with a K hook.. it is fun and easy pattern.. I have also made several hot pads and made some larger hot pads also..
DeleteI love the pattern & instructions seem very clear and easy to follow. I am going to try making one this week! I hope I can get it!! I LOVE the colors of the yarn you used!! Do you know the name of the yarn/color?
ReplyDeleteGood luck on the project Anita! I hope it works out well. I'm sorry that I cannot help you with the color of the yarn. It was Peaches&Creme but it was so long ago that I don't have a label any longer. I haven't seen this variegated color for some time. It may have been discontinued.
DeleteI have been using your tutorial and bernat blanket yarn to make the absolute warmest most comfy blankets possible, without holes most crochet patterns leave die to the thickness of the yarn; for myself and family. Truly will be family treasures. Thankyou so much for the persistence and amazing tutorial. I use the same tutorial for hotpads, potholders and handle cozies for cast iron skillets.
ReplyDeleteYou are very welcome. Your blankets sound very interesting - I'm sure they are warm and thick. I frankly don't like holes in my afghans either!
DeleteJust wondering if you've ever done this with a different color on either side?
ReplyDeleteJust wondering if you've done this with a different color on either side?
ReplyDeleteI have not Ashely. I'm not sure that would work because the way the double stitch works, it lays across both sides at once. I think the color would show on both sides whether you wanted it to or not. You could certainly do a stripe however! If you try it, be sure to let us know how it worked for you.
ReplyDeleteLove this. Started it during the super bowl. Did get finished but am looking forward to finishing it tomorrow. Planning on making some as gifts... Thank you again.
ReplyDeleteJust saw a post about using this site a blanket... Sounds warm. I bet a scarf or of this would be cozy too. So many possibilities!
Oh, and I think the name should be changed to Miss Abigail's favorite crochet hot pad pattern... 😉😊
ReplyDeleteI started this pattern today and I just love the results. Thank you so much for sharing the pattern. I intend to make many for Christmas gifts (2 per person).
ReplyDeleteThanks for this pattern , I love making hot pads /pot holders as gifts for friends and family , making them this way saves time instead of having to make two sides and sewing them together. Once again thanks for pattern and pictures.
ReplyDeleteMiss Abigail, this is a wonderfully written and photographed pattern. I tried another similar pattern and it was difficult to follow. I stitch very tightly so I went up to a size H/5.0 and it made it a lot easier for me.
ReplyDeleteThank you again. I look forward to looking through your site further.
I'm so glad the tutorial was helpful! Enjoy the archives!
Deletehi my name is ms, lynette a, miller and i was wonding what color it is i would like to see if i can buy the color in a craft store it a reall nice color ok thank,s for your time ms, lynette a, miller
ReplyDeletehi my name is ms, lynette a, miller and i was woning where can i get this color that you made out of the hot pad i would like to buy the color so i can make it for my mother she would like this color a lot thank you for your tim,e ms, lynette a, miller at millerlynette6@gmail.com
ReplyDeleteI'm sorry, Lynette, that this color has been discontinued. Lily Sugar and Cream's "Country Sage" would be a good substitute. It is a little warmer in tone and has a gold added as well, but I think it would be very pretty.
DeleteI saw this pattern on line but instructions were difficult to follow. The sides would either grow wider or smaller until I figured out that last stitch you warned about. Also your advice to count every row is critical! I wish i had seen your tutorial years ago. Now they are my favorite hostess gift, newlywed gift, etc. They can also be embroidered with initials, etc. Using counted cross stitch in squares.
ReplyDeleteI'm so pleased that the photos and tips were helpful to you! I love the idea of cross-stitch.
DeleteKathleen, Any chance of making this in a circle? I would love to make some to go under teapots and think round would look better. I have made 2 of these so far and absolutely love this pattern!!
ReplyDeleteA round would be fabulous, wouldn't it? I'm going to have to ponder it, but I would think the "method" could be applied to any pattern for a single-crochet round. There would probably have to be a kind of seam as one made the "rise" to the next row, unless you did a spiral pattern. Or, perhaps one could do a kind of hexagon to make the seam appear more deliberate. A hexagon shape would be more attractive under a tea pot than a square and possibly easier to incorporate the increase. Interesting to think about.
DeleteI did a round one using this type of technique once, just experimenting for the fun of it and liked it, but didn't keep notes and, unfortunately no longer have it as I gave it as a gift. I should've kept good notes, because it came out quite nice.
DeleteI come back to this pattern over and over again. Thanks!
ReplyDeleteYou're welcome, Winona! Me too - there are fancier ones, but this really is my favorite.
DeleteI have made 2 now, and I love them. Happy with no seams. Thanks for sharing!
DeleteCan’t wait to try this. Question: are these hot pads the same as the ones you taken trays out of the oven and place straight on to? Can the wool take the heat without burning?
ReplyDeleteYes, Rachael! I use 100% cotton yarn and it can certainly take the heat of a pan out of the oven. 100% wool yarn will take the heat even better. If you use a yarn with acrylic in it, the hot pad will eventually melt some and look shiny...
DeleteI was making hotpads with this stitch and thought it would make a nice jacket for the cooler weather. I worked at it a while with a top down pattern for a sweater. Eventually I completed one and have had many compliments on it.
ReplyDeleteI used Sugar & Cream cotton for the jacket
DeleteMarlys
Oh, I made mitts also.
ReplyDeleteMarlys