Showing posts with label embroidery. Show all posts

Wednesday, April 15, 2020

A Peek Inside - More Embroidered Pillowcases

I love hand embroidery. It's very relaxing to me! The tips of my fingers do suffer from the pricks of the needle, however. I guess you just have to put up with that in order to produce such a lovely result.


Sunday, April 5, 2020

A Peek Inside - Pretty Hand Embroidered Pillowcases

These pretty pillowcases were embroidered by Miss Doris, one of Abigail's older friends. The embroidery is so carefully done, so beautifully stitched.


Miss Doris was a longtime member of the Stanley Homemakers Club - the women's club that Abigail was born into. Doris contributed several things to Abigail's hope chest over the years. She was an expert at hand embroidery and made several sets of dishtowels for Abby.


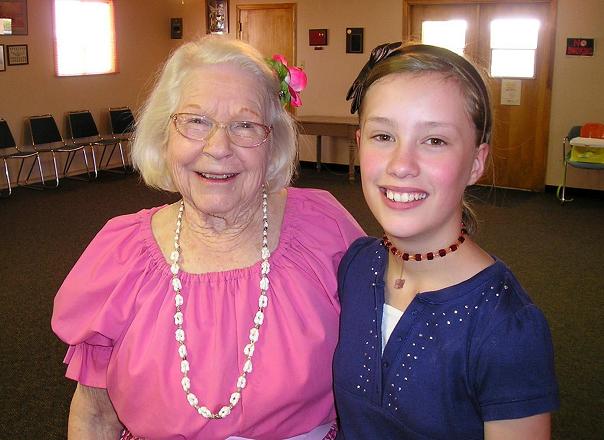
This picture was taken in 2011 when Abby was 13 years old. Doris was such a friend to me and spoiled Abby as much as she could. Doris passed away a few days ago from the consequence of age and, while I am happy that she is released from this life and joins her beloved J.C., I am also sad to live in a world without her in it. She was truly a homemaker and I'm so glad Abby has so many things in her hope chest that will remind her of memories of Miss Doris. 


Tuesday, March 31, 2020

Rick-Rack Handtowels - Green and Blue Set

I finished off these hand towels yesterday. It was a simple thing to sew a fabric strip down and trim it with rick rack. Easy peasy! I will admit the embroidered french knots took a bit of time, but, as I was listening to the news anyway, it was not a hardship.


If you are looking for an easier way to attach the rick rack look at this tutorial. It is still embroidery, but much quicker and more simple than french knots.

Tuesday, February 13, 2018

Valentines Towels

I'm adding these two hand towels to the Valentines kitchen set in Miss Abigail's hope chest. The colors were super hard to photograph, but the towels are quite beautiful.

I ran into the toile print cotton fabric some time ago and it called to me, so this towel is hand sewn and decorated with the embroidered rick rack trim. The dark red plaid is a Dunroven House towel and I just used a simple running stitch to embellish it a bit. Here are a couple of close pictures.
 You might remember that this towel also has the dotted rick rack technique applied.

I used a thicker perle cotton thread for the lighter stitches and it has a more raised impression than the darker, six strand embroidery cotton, which lays more flat. I like how that turned out.


If you're interested this post describes what is currently packed away in the hope chest for celebrating Valentines Day.

Thursday, August 25, 2016

Tips for Using Iron-On Emroidery Transfers


While I love embroidery - the stitching part, that is, I don't much like all the decisions about design and the preparation before stitching. I especially don't like the design transfer step, but it has to be done. Iron-on transfers seem to be the easiest way to get the design on the fabric, except when you can't get a good transfer, then it's just frustrating! The following tips come from my own hard-won experience. I hope they help. Some of these tips seem obvious, unless you are a beginner - then nothing is obvious.

First of all, follow the directions for the transfer. Each type is a little different, so follow the instructions the pattern company gives you. With one *exception, which appears below.

  • Use a good iron. Sometimes old irons develop hot spots and won't deliver the heat evenly over the plate. You probably won't notice it if you're sliding the iron back and forth over fabric, but it is a problem when you want a even transfer. A classic, dry iron with flat sole plate actually works the best.

  • If you only have a steam iron, don't use steam! Turn the steam off and even empty the water from the reservoir. Steam will cause the lines to be blurry or thick and you want clean, crisp lines. Get rid of the steam.

  • Put the dial on the proper setting, as per instructions, and let the iron heat completely.

  • Check to make sure the iron temperature won't harm the fabric. Most transfers direct a high temperature, usually cotton or wool. Test the fabric in an inconspicuous area to see if it can tolerate the temperature.

  • Speaking of tests, there is a test design on the pattern page for a reason. If you use the test design on a scrap of the same kind of fabric, you can determine how long to hold the iron in place to get a good transfer. Since you want to get it right the first time on your project, you'll get better results if you use the test design and gain some valuable information. Depending on how dark the test transfer is, you can adjust the amount of time you leave the iron on the paper.

  • Press the fabric first to remove any wrinkles and make a smooth surface for the transfer. Pre-warmed fabric will take the transfer much quicker and more evenly.

  • Use your fingers to hold the paper in place. Obviously, keep your fingers away from the iron, but your fingers are better than pins. Why? Because the thickness of the pin creates space between the paper and the fabric and your transfer will be patchy. Seriously, your fingers do a better job - just be sure to keep the paper from shifting.

  • Place the iron in one position over the design until the ink transfers. But don't leave it on any longer than you have to as this creates a dark transfer with more ink than you really need. Keep placing the iron over the design until it is transferred. *Some directions say to move the iron back and forth on the paper. This is likely so that the heat doesn't "burn" the transfer too dark or darker in one place. The problem with moving the iron, though, is that the paper can shift ever so slightly. This makes for blurry lines and, particularly with a cross-stitch pattern, the movement can distort the design. I think it is better to hold, lift and place the iron on a new section, rather than sliding the iron back and forth. If you'll use the test pattern, you can determine the length of time to hold the iron, without causing problems.

  • Be very careful not to shift the paper! Before you move the iron to a new spot, carefully lift an edge of the paper to see if the transfer has taken place.

  • Use a padded hard surface. The ironing board works unless it has a nice cushy cover. Cushy again creates thick, blurry lines. If you do a lot of embroidery, you might want to make a surface from a thin board covered with wool felt. (Don't use acrylic craft felt as it will melt at high heat.) Or, use a very thin cotton batting, like Warm n Natural, covered again with a muslin top. This creates an ideal surface for the transfers and you won't ruin your pretty ironing board cover. In a pinch, I use a scrap piece of foam core board that I covered with a couple of old dishtowels.

  • If you choose to use your ironing board, protect the cover somehow, even with an old cotton dishtowel. The ink will likely come through and you don't want to spoil your cover. I sometimes think I can be careful or quick and I so often have a bleed through onto the cover. Seriously, just protect it to begin with.

  • You may not even realize that the ink is likely permanent. Sometimes it will fade with time, or wash out eventually, if the fabric is 100% natural fiber, but if there is any synthetic fiber in the fabric, the ink cannot be removed.

  • Remember that all of the ink on the pattern page is transfer ink. I mention this so that you can be sure to cut off any lines that you don't want to appear on your design. Even the words and directions. Cut those off so that you don't accidentally transfer them to your project. Also check for smear marks from the design being folded and stored or other, unwanted lines of any kind.

  • Cut the paper away from the design close to the edges. This makes it easier to position the design on the fabric. You'll know better where the edges are and get the design positioned just right.

  • Go for as light a transfer as you can manage. Obviously, you need to be able to see the pattern, but thin, crisp lines are better than heavy dark lines. It is harder to cover up thick lines and a thick, underlying color of ink will make your embroidery look muddy.

  • If you are working with 100% natural fabric, don't transfer the design until you're ready to embroider the piece. Sometimes the transfer will fade a little and it may then be harder to see. Keep the project folded and away from bright light until you finish the embroidery.

Do any of you have experience or other tips to share about this process?

Monday, March 14, 2016

Threaded Running Stitch Monogrammed Dishtowel


This is another very easy, very quick embroidered dishtowel for the hope chest. The project takes just minutes to complete. I used the simple running stitch along the hemmed outside edge of the dishtowel and then threaded a second color back and forth through the stitches. This is called threaded running stitch and it is so easy to do! And, since we will soon be entering the spring bridal shower season, the towel, along with the ruffly dish scrubby (tutorial here) and a nice wooden spoon would make the perfect gift for an upcoming bridal shower!

The monogram is cross-stitched using an iron-on transfer.


The stitch size is fairly large on this towel so I used all six strands of cotton embroidery thread for the running stitch on the edge. If you make the stitch smaller in size you should use three or maybe four strands.


The only trick to this stitch is to use a tapestry style needle when you do the threading so that you don't pick up any fabric as you push the need under the running stitch. This second thread shows up only on the top. The running stitch continues to show on the back of the towel, so the back looks pretty as well.


I love the way the towel looks and I really love how quickly I could get the embroidery finished. You may have noticed that I favor quick projects when it comes to kitchen linens. There are a couple of reasons why this is. A kitchen towel is used hard and it obviously will show the wear after some time. I want Abigail to be comfortable using these towels for everyday. If I put too much effort into such a practical hope chest item, she might be tempted to think it too pretty to use and leave it in the hope chest. I would hate for that to happen. So, if I can make it quickly, the article will seem more practical and more utilitarian, rather than merely decorative. I'm not sure that will be the case, but that is my thinking anyway. Of course I am extra happy when the article is both quick and beautiful!


Friday, February 26, 2016

Running Stitch Daisy Dishtowels


If you are looking for a quick project for the hope chest, you can't beat running stitch embroidery. The running stitch is usually the first stitch learned by a beginning embroiderer because it is so easy to manage and gives a fast finish to the design. You can stitch it using the "poke and stab" method, bringing the needle up and down through the fabric in separate motions, or by gathering two or three stitches at once on the needle in one continuous motion. This second method is most efficient, but may be a little harder to manage for children who are learning to use a needle for the first time.


Simple, coloring book style designs are fun to use with this stitch. This daisy was just a doodle for me. I'm sure that you could also draw a simple daisy-like flower to stitch or find one in a child's coloring book. I drew it out on scratch paper first and then used a transfer pen to trace the design on the flour-sack dish towel. I wanted to use a light colored floss for these towels, but a darker, more contrasting color will actually show up best. There are several tutorials on the Internet to teach you how to make this stitch. Mary Corbet's tutorial at Needle 'n Thread is a good one.


You are really only minutes away from a pretty dishtowel for the hope chest or even your own kitchen drawer. Give it a try!

Saturday, February 6, 2016

Sew on Saturday: Valentine Hand Towel


I quickly hand-stitched this holiday towel for the Valentine kitchen set this morning. I like the simple running stitch across the plain bands in the terry cloth. The trims for the heart came out of my scrap basket. While this towel is intended for the hope chest, I think it would be just as pretty as a guest towel in the powder room. Hmmm. A different motif maybe...I think I will make another one...

Friday, January 29, 2016

Tutorial: Hand Embroidered Tea Towel


Here is another quick project for the hope chest. I hand embroidered a pretty border near the bottom of two gingham tea towels, using a woven variation of the super easy running stitch. To make a set for yourself or to use as a gift, you'll need the following materials:

I love the heavy Dunroven gingham plain weave hand towels. You can often buy these at quilt stores and they are very high quality towels - worthy of your hand embroidery. You will also need a skein of 6-strand cotton embroidery floss, a skein of perle cotton in a contrasting color, a crewel-style embroidery needle, and a blunt tapestry needle.


From the skein of embroidery floss, measure a length that is 2.75 times the width of the towel. Thread the crewel embroidery needle with all six strands of floss. Tie a knot in one end of the thread. Bring the needle up on the back side of the towel in the side hem near where you want to begin the border.


Bring the needle through to the front side of the towel in one corner of the gingham weave. Use a running stitch and follow along the edge of the gingham weave, taking a "bite" of two squares at one time.


When you reach the opposite side of the towel count up three squares and bring your needle through the side hem to the selected row. Use the running stitch to come back across the towel, BUT this time the stitches will be alternated (or stepped) with the row below. You'll have to create this stepped effect or the weaving won't work. Where the thread went under two squares on the previous row, the thread will be on top of those two squares on this row. This creates the alternate effect.


When you reach the beginning point, push the needle through to the back side of the towel. Take two or three small back stitches to secure the thread, then "lose" the thread in the hem and clip it off.


From the perle cotton, measure a long length of thread that is about 4 times the width of the towel. Thread the tapestry needle and tie a knot in the thread. As you did before, bring the needle up near where you need to begin and "lose" the knot in the side hem. You can see that I began my first stitch near the edge of the top running stitch. I slid the needle through that first running stitch, then took a small stitch near the lower edge to position my thread to pull up through the next running stitch on the bottom row.


Weave the thread through each running stitch, top and bottom, alternating rows and returning to catch the previous stitch.


When you reach the opposite side, push the needle to the back. As you did before, take 2 or 3 small backstitches to secure the thread and then "lose" the thread in the side hem. Clip it off.


The finished border.


Saturday, January 23, 2016

Quick Valentine Ragged Edge Dishtowel


I love using pretty dish towels, especially around holidays! This cute Valentine dish towel is such a quick and easy project that you can be done in less than 30 minutes! You could make it for the hope chest or keep it for your own kitchen. I love hope chest projects like this for a couple of reasons.

First, the technique is simple and fast. Just cut a ragged edge shape and quickly applique to the towel with the straightforward running stitch. Second, there are no complicated materials or tools. All you need  is a plain cotton dish towel, an embroidery needle, cotton thread to contrast with a scrap of cotton fabric, and pinking shears or regular sewing shears to cut the shape. The cost is minimal. If you keep a fabric scrap bag, the cost is limited to the towel and the thread. Nice. Finally, the most inexperienced sewist can make this project, so it's a great project for someone needing to practice using a needle and thread.

Many of you won't even need instructions for such a project, but I'll give them for those who do. First, determine how big you want your applique and cut a heart shape from paper. Use the towel and adjust the size if necessary.


Press any wrinkles out of the fabric scrap. Use a pencil to trace around the shape on the wrong side of the fabric. Use pinking shears (or regular fabric scissors) to cut the shape from the fabric. Pinking shears will give a nice evenly ragged edge after washing. Regular shears will give a more primitive ragged edge that will take several times washing to achieve.


Arrange and pin the fabric heart to the dishtowel. You can place it in the corner, as I did, or in the center of one side. Pin the shape well so that it doesn't shift as you do your stitching. If you are using this project for a child, you might use many small safety pins rather than straight pins so that little fingers don't get poked! Measure the cotton embroidery thread so that you have enough thread to go all the way around the shape, plus five or six inches more. Divide the thread so that you have two lengths with three strands in each length. Then thread the needle and knot the thread at one end. Start at the bottom and use an even running stitch all around the heart, keeping about 1/8 - inch or so from the edge. You want to be far enough away from the edge that it frays a little in the wash, but close enough that the shape is securely sewn.


When you reach the beginning point bring the needle out on the back of the towel. Take three small back stitches to secure the thread and then tie a small knot. Pull the knot through the towel fabric, pull the towel back just a bit to clip the thread and then "lose" the end of the thread in between the towel and the applique. This will keep the back of the towel neat.


Thread the needle with the second length of thread and tie a knot at one end. Push the needle into the towel between the towel and the applique at some point away from where you want to begin stitching. Again, pull the knot through the towel to "lose" it under the fabric. Then push the needle through to the front where you will begin a second row of stitching.


Make a second row of stitching about 1/4 - inch away from the first row. Try to keep the stitching evenly spaced.


Once you've completed a second row of stitching, tie off your thread and you're finished! The back of the towel should look as neat as the front. Wash and dry the towel to fray the edges.


Related Posts Plugin for WordPress, Blogger...