Hello everyone! I know I have been missing in action for almost a year. What can I say! I just have been busy and blogging just hasn't been in the cards. But, things are slowing down a bit and I have a number of things to show you...but first - thank you for missing me!
Just a bit of an update and news. Miss Abigail had a great year at the community college this last year. She did very well in her classes and learned well how to drive in roundabouts. There were FIVE roundabouts on the way to school and after she got her driver's license she had to be independent in her 40 mile commute everyday. Independence is great for Abigail, but it was a little hard on me. My own mother declined in her health from about October of last year, fell and broke her hip in January and then passed away in March. All of this was huge for me! I'm finally getting more used to doing without her, but even as I thought I expected her inevitable passing, it really rocked my foundations. So transitions all around for us this last year. I also enrolled in an online class in January to study Permaculture and am very proud to have my Permaculture Design Certificate now. I won't go into that here...perhaps another day.
On to the rag rug! Even though I haven't been around here on the blog, I still have had projects going for the hope chest. This rug is one. Abigail is now preparing to leave home this year for college. She will be attending an out-of-state school in Arizona - another step towards her independence. We are in the process of choosing which things out of her hope chest she will take to brighten up her apartment. The floors in her room are tile, so this rug will be a blessing. I hope she will enjoy the bright, scrappy colors.
This is what is called an Amish Knot Rug and this tutorial is for an oval style. It is sometimes called a Toothbrush Rug because folks modified an old toothbrush to use as the tool. It is simply made with fabric scraps and "half-hitch" knots. This type of rag rug is very easy once you get started, but making the initial few rounds can be a little confusing and seem awkward. There are a number of videos on YouTube if you think these instructions are insufficient. Sometimes we learn better by actively seeing something done. You can also find directions online for a round rug if that style is what you prefer. I'll start with what you need to make the oval rug.

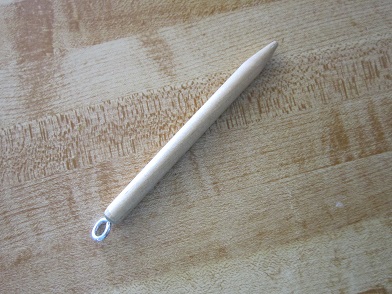
This is the tool I made to carry the fabric through the knots. I cut a 1/4-inch dowel down to 4 inches, sanded it smooth and sharpened one end to a gentle point. I used a small sturdy screw eye in the other end to carry the fabric. It is basically a large needle and one could even use a big paper clip, a very large safety pin or any other similar "tool."

You'll need MANY strips of scrap fabric, both muslin and various prints. I used 100% cotton fabrics, leftover from my many fabric projects. I wish I could give you yardage, but because I used scraps there is no way to tell. I just know you will need a lot! I didn't mix T-shirts or knit fabrics in with the cotton, nor did I use cotton blends as I wanted it to wash well and not distort with too many different fabric types. If I had been making a rug for myself, I may not have been as picky as to the fabric. The muslin strips are used as the "core" strips for the rug and the printed strips are knotted over the core. My strips measure 2.5 inches wide. This makes a nice thick rug. If you wish for a thinner rug, you can reduce the width. The strips will be sewn or knotted together, end to end, as you proceed to make the rug.

Begin by knotting the initial two strips together. Make two small slits about 1 inch from the end of each strip. Overlap the slits and, from underneath, bring one end of a strip up through both slits and gently pull until the knot is formed. (If you would rather, you can also sew the strips together.)
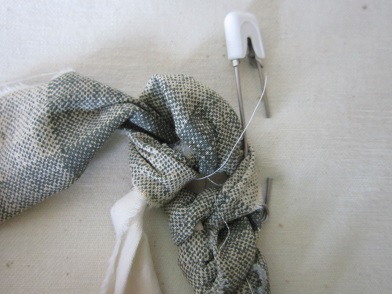
Attach the strips to a firm surface - I used a large safety pin and the ironing board. This anchor helps in the beginning as you begin to form the knots.
Begin making half-hitch knots down the length of the muslin core strip.
A word here about size. This initial length determines the size of your
rug. The measurement needs to be 1/3 of the desired finished size. So if
you want a rug that is 60 inches long, then you should make knots along
the length of the core until you reach a measurement of 20 inches. Then
you will turn and go down the other side. As with all such handmade projects, these measurements are not exact!
When you reach the desired length, turn and pin the bottom of the strip to the top. Because this rug will be an oval, I need to make an increase to come around the curve at the end. Make a second knot in the last knot you made. Make another knot around the core strip and turn.
Now put two knots in the same space as the opposite double knots, enclosing the core strip within the knots. This creates the turn and the end curve of the rug.
Now, make the same half-hitch knots in each knot back down the length of the rug. It is a little awkward to turn this initial curve. Just keep trying and remember to keep things a little loose around the top. The whole strip is going to want to twist. Don't worry about this and pin it down, if necessary, to help keeps things straight. I like to use my left hand to hold the core as I pull the long printed strip through the fabric. Don't actually pull on the core as that might distort the rug, just hold on to it so that it doesn't bunch up as the knot forms.
When you get to the bottom of the strip you'll need to create the second curve. In the second to the last knot, place to half-hitch knots. Then put one knot in the last hole.
Curving the core strip around the end, turn the rug and make two knots again in the hole opposite of the other double. Pin the end again, if that helps keep things straight.
As you make this next knot, starting down the side, place a knot around the core from the last round. This will snug the space.
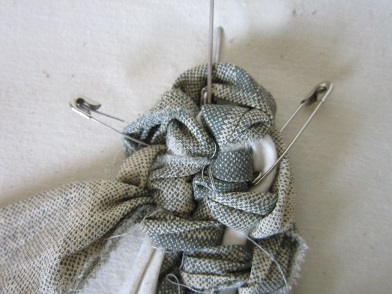
Before you continue, mark the double knots with large safety pins. This will indicate the beginning of the curve on each round. You will make these double knots to increase each round and can make addition doubles only on the end curves of the rug. You will never make a double along the sides as this would distort the rug. These pin markers will keep you on track.
Having marked the doubles, resume making knots in the outside row as you go down the side.
You will eventually run out of fabric on your "needle." Just add another strip, using the knot method, or sewing the two together. I like to sew the strips because I find it easier to pull through the holes, but many people just use the more convenient knot attachment.
At this end curve you will again place two half-hitch knots in the space before the end space. Place one loose knot in the end space, turn, and then two more knots in the space opposite the others. Mark these double knot spaces as you did before.
Continue making knots down the length of the side and when you reach the markers, put two knots in that space and repin the marker.
You can make single or two knots as you go around the curve each time. You'll be able to tell if you need to put a double knot in a space if the curve pulls up or seems distorted. Be gentle with the core strip. Keep it loose as you go around the curve. If the rug seems distorted, it may be that you are pulling the core strip to tight. Continue to add rounds, remembering to increase with double knots in the correct spaces and adding additional doubles, if needed, as you round the curve. It just keeps getting bigger and bigger.
When the rug gets too big for your lap, lay it on the kitchen counter and work standing up. The bigger it gets, the easier it will be to make the knots and the rug will stay flatter. You'll need to adjust the tension of knots as you go and flatten the rounds with your fingers. If the rug is getting distorted, remember to keep the core strip loose. At one point, I steamed the rug as if I were blocking a crochet project, and that helped it to lay flat.
Finish the rug on the curve, just before you go down the side. Cut the
core and then make a couple of knots a little tighter to cover the end.
"Thread" the end under a stitch or two in the previous row, cut the end,
and sew securely under a knot.