
I especially like this scalloped net crochet edging for a kitchen hand towel. It has become one of my go-to edgings because it looks a little bit fancy, but is still quite easy and quick. This simple pattern makes a very nice edge on a pillowcase as well.
Materials:
Kitchen towel
#10 size crochet cotton (I used DMC Cebelia for this project)
Size 7 (1.65 mm) steel crochet hook (USA)
Tapestry needle
Begin by marking the foundation on the towel. This edging has 5 rows, an odd number, so you can mark and begin with the right side of the towel facing you. I usually put the marks 3/8-inch apart. I made a simple cardboard template to help me mark. It is much easier to see than a ruler. Use a marking pen with removable or disappearing ink. You will want to have an even number of spaces across the towel. Depending on the total width of the piece, you may need to adjust the width of the spaces so that you come out even.

Push a hole through the edge of the towel with an embroiderer's awl. Push the awl through the holes and keep ahead of your crochet about 6 or 7 holes. If you make too many hole at once, they will just close before you can get to them. No use wasting your time. If your towel has a looser weave in the hem, you may not have to use an awl. Sometimes you can just push the hook through the fabric at the mark. There are also special "sharpened" crochet hooks that you can use to pierce the fabric as well. Since I have an awl, I use it.


Foundation Row: Cast on in the first mark at the right side and chain 3. Put a (sc, ch 4) in each hole across the front of the towel, ending with a sc in the last mark at the left edge of the towel. Chain 2 and turn.

Row 1: Sc in the first ch-4 space. Ch 4. (Sc, ch 4) in each ch-4 space across, ending with a sc in the last ch-4 space. Chain 3 and sc in the cast on stitch. Chain 2 and turn.

Row 2: Sc in the first ch-3 space, ch 4. (Sc, ch 4) in each ch-4 space across, ending with a sc in the last ch-2 space. Ch 2 and turn.


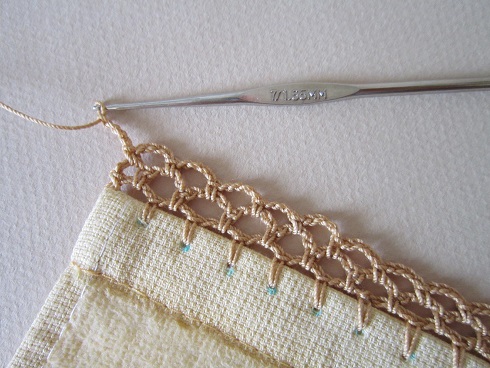
Row 3: Sc in first ch-2 space. Ch 4. (Sc, ch 4) in each ch-4 space across, ending with a sc in the last ch-2 space. Ch 2 and turn.

Row 4: Sc in the first ch-4 space. *Make 7 dc in the next ch-4 space. Sc in the next space. Repeat from * across to the last ch-2 space. Sc in this last space and fasten off.


Weave in the ends. I use a tapestry needle to weave down the stitches of the end rows.

At the bottom of the stitches I push the needle into the towel and along the hem of the towel for about four to six inches and then bring the thread up out of the towel.

Then I pull it a little to create some tension and clip the thread so that it pulls back into the hem of the towel. This creates a "lost thread" in the hem and I don't have to worry about it.

The finished edging is pretty don't you think?

If you like this edging, you may also like my "Posies Edging" tutorial. Posies is also scalloped, but the scallops are smaller and more shallow. The overall look is a bit more blocky.


