
Filet crochet is a method of forming picture designs with regular crochet stitches worked in solid blocks and open spaces. Filet crochet is a lovely technique and it’s easy to learn. Filet pieces are very appropriate in a hope chest. You could make framed pictures or wall hangings, pillows, table runners and toppers, doilies, coasters, edgings for all kinds of linens, and even window curtains. I want to show you how to make a small patch that I recently applied to a Christmas hand towel. I hope you’ll give this a try.
Traditional filet is a style of thread crochet and uses a steel hook with fine cotton thread. On this piece, I’ve used a size 9 steel hook and size 10 cotton thread. The simplest designs are made with the chain stitch and the double crochet stitch. Rather than written, row by row instructions, filet crochet is worked from a printed chart of blank spaces and solid squares. I’ve included four simple Christmas chart designs as a JPG image that you can print. Look for the pattern at the end of the post.
The dark gray squares of the chart indicate a filled square, the blank spaces are open blocks. An open block of filet crochet is made with a double crochet, chain-2 and a double crochet. A filled block is made with four double crochets. Each block shares a stitch with neighboring blocks.You’ll probably want to include at least one or two spaces of open rows around the edge of the design.
With any filet pattern, to find the number of chain stitches for the foundation row, count the squares at the widest part of the design, including any border squares. Each of the designs I’ve charted have a count of 11, including a border row all around. Multiply that number by 3 (33). When working from filet charts, if the first block of a row is an open block, you add 6 to the total number of chains and work the first double crochet into the 9th chain from the hook. If the first block is a filled square, you add 4 to the total and work the first double crochet into the 5th chain from the hook. These designs have an open block at the beginning of the foundation row. 6 added to 33 equals 39.

Chain 39 and put the first double crochet into the 9th chain from the hook. * Chain 2. Skip the next 2 chains. Double crochet in the next chain. Repeat from * across to the end, with a double crochet in the final chain. This makes a row of 11 empty blocks, our first border row.
Before we leave this initial row, I need to tell you something more about working from charts. Each odd numbered row is read and worked from the right side to the left. You just follow the picture. But when you turn to do the even rows, you are working from the back side, which means that you need to read and follow the chart from the left side to the right. The picture won’t turn out right unless you are careful to make the odd rows right to left and the even rows left to right. I’m using the snowman chart for this tutorial, partly because it is exactly the same both ways. It will turn out right, even if you get mixed up.

Because the second row begins with an empty block, chain 5 and turn. Double crochet in the top of the next double crochet. Chain 2. Double crochet in the top of the next double crochet. This creates two empty blocks, which is what the chart indicates. (Remember to read the squares from the left on this row. If this instruction remains confusing, just think of it as looking at the chart through the back of the paper. Maybe that will help you visualize how the process works.)

There are now seven filled spaces indicated by the chart. The first filled block is made with two additional double crochets into the space below and a double crochet in the top of the double crochet from the row below. Most people work into the middle of the ch-2 space because it is quicker and much easier. Some meticulous people work into the chains of the ch-2 space because it gives a crisper edge to the square. You can decide whichever method you want to use. I’ve crocheted into the chain stitches with this design because it is so small and there aren’t that many open spaces within the filled blocks. If I do a large filet piece, with many open spaces, I readily crochet into the space to save time and aggravation. There are no filet “police” waiting to judge your work, so make yourself happy. Just work the same, throughout the piece.

The filled blocks share a double crochet on one side, so the initial filled block has four double crochets and the remaining filled blocks have three each. Does that make sense? Work double crochets into the tops of the stitches below until you’ve covered seven blocks. Chain 2, double crochet (to make a space), chain 2. Put the final double crochet into the third chain of the turning chain 5. This makes the final space on this row. Chain five to turn. Remember that when the next row begins with a space, you always chain five to turn. You always end a row with a double crochet in the third chain of this turning chain 5.


The fourth row has the first open space within a filled block. Make this with a ch 2, skipping two double crochets and then double crochet into the next stitch. Then, just carry on with the filled blocks and blank spaces.


The final row should all be empty spaces to create the bit of border around the design.

Many filet pieces are crocheted without an edging, but it is nice to add one. I’ll show you how to add a very simple edging worked with single crochet and the picot stitch. Without fastening off, chain 3. Make a picot with a slip stitch into the bottom of the chain. Work 3 single crochets into this first space and then again, chain 3.


Make (3 sc, picot) in each space down the side of the filet piece.

Turn the corner with (3 sc, picot, 3 sc, picot).

Continue the edging all around the piece.

End with a slip stitch in the bottom of the first picot. Leave a 2-inch tail and clip the thread.

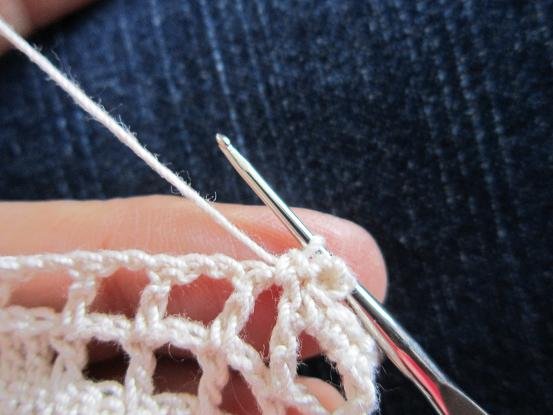
Use a tapestry needle to weave in the ends of the thread. Work on the back side of the piece and weave first in one direction and then reverse for a short space. Make sure the thread doesn’t show on the right side of the piece.

Block your finished work by spreading it on a flat surface with the right side up. Smooth the piece to the correct size. If necessary, use glass head pins to make it square. Hold a steam iron above the piece and let the steam penetrate for a few minutes. Then let the piece dry thoroughly.

I centered the patch at the bottom of a terry hand towel and hand stitched around the edging. In general, filet crochet looks best with some kind of contrasting background in order to notice and appreciate the picture. This ecru colored block, on the contrasting red towel, looks great. If you plan other filet pieces for your hope chest, using some kind of background behind or under the filet piece will make the design more obvious. Here is the chart. Merry Christmas from Miss Abigail’s Hope Chest.

That is so CUTE! Maybe even I could do this! I'll have to keep this in mind, thanks for the directions too.
ReplyDeleteThank you so much for doing this tutorial. I have not yet tried this technique, but one of these days.....
ReplyDeleteHello, This is absolutely divine! Thanks for sharing. I am new to crochet. Maybe I could also try my hand at this. Your instructions and pictures are so clear!
ReplyDeleteThese are so beautiful!
ReplyDeleteI'm glad you like this! I hope you'll give it a try. It isn't hard.
ReplyDeleteThis is awesome. Thank you for taking the time for posting this. I think putting these on felt will make for nice Christmas decorations.
ReplyDeleteMelanie
These are so cute!!!!...and they have lots of holiday vintage appeal, too :) :) I've never tried filet crochet. However I have done fancy doilies before :) :) Thanks for the excellent step-by-step photos :) :) Those are extremely helpful ;) :) Love and hugs from the ocean shores of California, Heather :)
ReplyDeleteI just have to share with you my extreme joy at finding your blog! I have a 12 year old daughter that we have bought a hope chest for this Christmas. She has made several pieces already with her grandmother, but I have been searching for other projects she can try. After browsing your site with a cup of tea, I can hardly wait to try some myself! Thank you, thank you, thank you for the time and effort you put into this. You are truly an answer to my prayer. Love seeing beautiful Miss Abigail in the pictures, too! Merry Christmas to you and your family! Lisa
ReplyDeleteSuch a helpful and informative tutorial. It looks lovely! Wishing you a Merry Christmas! blessings,Kathleen
ReplyDeleteThank you so much for this tutorial with the host of pictures. I've never quite understood filet crochet, but I think I can do it now.
ReplyDeleteVickie