Thursday, March 28, 2013

Happy Easter


My father used to say "life is real." As I get older, I'm coming to understand more fully what he was talking about. I've been in Idaho helping my mom. Miss Abigail is at home, taking on the responsibilities I left to her. Life is such a cycle. As I watch my mother age and become more dependent and less capable of taking care of everyday things, I feel such an overwhelming feeling of love and gratitude for all that she did for so many years. Life is real.

This picture was taken on Easter morning when I was either two or three years old. I am the little blond on the left with the frilly hat. My mom always arranged new clothes for us at Easter--not always a hat, but always a pair of white gloves for the girls.

At this season, I'm so thankful for the blessings I have. Life is real and I am blessed.

I'm currently not posting much. I've just got other things...

Wednesday, March 13, 2013

Tutorial - Tunisian Crochet Dishcloth


Tunisian crochet is enjoying a kind of revival right now. I haven't done Tunisian crochet since I was a young girl and had almost forgotten how. But I ran into my afghan hook not long ago and decided to see if I could remember. Naturally I experimented with a dishcloth for the kitchen set I'm currently working on.

The Tunisian stitch is also know as the afghan stitch and each row consists of two parts. First you pick up all the loops and hold them on the hook. When you reach the end of the foundation chain, you work the stitches back off the hook, two at a time. Because you keep all the stitches on the hook during the first part of the row, you have to use a special hook for this method. The afghan hook looks a lot like a knitting needle. It has a stop on one end and the crochet hook is on the other end. If you would like to try it, all you'll need is the special hook and some cotton worsted weight yarn.


Row 1: Chain 30. Insert hook in the second chain from hook, yarn over and draw up the loop. Holding all the loops on the hook, draw up a loop in each chain across. DO NOT TURN.


Yarn over, draw through the first loop on the hook. *yarn over, draw through the next 2 loops on the hook. Repeat from * all the way across until 1 loop remains. The last loop will always be the first loop for the next row.


Row 2: Skip the first vertical bar (the last stitch of the previous row.) *Insert hook in the next vertical bar, yarn over, draw through and keep the loop on the hook.


Keeping all the loops on the hook, repeat from * across. DO NOT TURN. Yarn over, draw through the first loop on the hook. **Yarn over, draw through the next 2 loops on the hook. Repeat from ** back across until 1 loop remains.


You can see in the picture that the beginning row wants to curl and might not look correct early on. Not to worry. As you work additional rows, the yarn gets pushed into place and the pretty squares begin to appear. I pinned it down so that you could see how it will look. That first row always seems to want to curl.


You can see that the fabric is now looking nice and even. These regular squares are what is so distinctive about the Tunisian Simple Stitch. Repeat Row 2 until the fabric measures square.

Last Row: Skip the first vertical bar as usual. Insert hook in the next vertical bar, yarn over and draw through both loops on the hook. Insert hook in next vertical bar and complete a slip stitch. Slip stitch in each vertical bar across. Fasten off. Weave in the clipped ends.

Edging: (Note: If you wish to put the edging on, you may or may not use the last row. This next picture shows a last row. However, it is just as easy to fasten off at the end of the last regular Tunisian row and put the single crochet in under the vertical bars as you come around that last edge.) Cast on a second color two stitches down from the corner. Put a single crochet in each stitch around the edge, with a (sc, ch, sc) in each corner. When you reach the beginning stitch, slip stitch and fasten off.


You can end the edging at this point or add an additional ruffled edge. Cast on original color somewhere in the middle of a side. Chain 3.


Skip next stitch and slip stitch in the next stitch. Repeat this all the way around. Add 1 to the ch 3 as you turn the corners. Slip stitch to the beginning chain and fasten off. Weave in all the clipped ends.

Monday, March 11, 2013

New Lambs


Miss Abigail is enjoying the new babies that are being born on our homestead. There are six lambs born so far and more coming in April. Enjoy the pictures!


Friday, February 22, 2013

Susan's Hope Chest

Yesterday I found the sweetest e-mail in my inbox. Susan shared with me some of her memories of creating her hope chest as a young woman. I immediately asked if I could share these memories and she graciously agreed.

My parents gave me a Lane cedar chest for Christmas in 1961.  As a young girl, I wasn't quite sure what I wanted to do with the cedar chest.  Later that day, my grandmother gave me her mother's crystal pickle dish.  As a thirteen year old girl, I thought that dish was the most beautiful and sophisticated thing I'd ever seen.  Then I knew what I wanted to do with my hope chest. 

My grandmother taught me to knit and crochet.  My mother taught me to paint and sew.  I scoured the local Newberry's and Woolworth's stores for the newest Aunt Martha's patterns.  The time spent making items with these two wonderful women gave me so much more than pillowcases and dish towels.  They taught me life lessons that have been part of my life every day since.  It is heart warming to see the two of you doing the same thing - dreaming and creating for a wonderful future.

When I married in 1977, my hope chest was full of my treasures.  I still have many of my linens.  As they become too stained or worn to use, I carefully wash and iron each item and return it to the old Lane cedar chest.  Once in a while, I sit on the floor and go through the chest and remember the days spent making these dear treasures. 

Susan also reported on her current projects.

You ladies have inspired me to start crafting again.  I am re-making some of my old favorites.  My goal is to copy one project a month  from my original hope chest such as a set of pillow cases or kitchen set.  I will make two of each item, one for a gift and one for my family.  In January I made a blue kitchen set with white snowflakes embroidered on the towels.

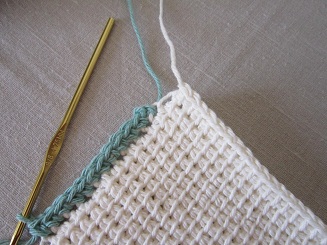
For February I copied a set of pillow cases from my originals.  I made them a little bigger than standard size because we like large pillows.  They are a pale blue with a four inch navy blue crocheted border with satin ribbons woven through the open areas.  I seem to remember that the originals seemed to take a very, very long time to complete.  I'm not sure whether I've learned to crochet faster or I have developed more patience!

I am excited to share my March project.  My grandmother and her sisters made me a wonderful gift for my hope chest.  They got together and copied their favorite recipes  They hand wrote the cards and arranged by food type  in a wooden recipe box.  In those days we called it a "kitchen box".  Almost all the recipes came from family and friends.  They added wonderful comments on the back of some of the recipes.  Some were very simple and sweet such as, "I made this squash casserole for Davis on our first anniversary, June 16th, 1919."  Some of the comments were really funny as on Nora Nash's Chocolate Pound Cake recipe, "Mrs. Nash gave me this.  She always refuses to share her recipes.  I don't know why she likes me."  For my March project, I plan to put together a family cookbook containing all of these favorite recipes.  Since my technical skills are low to non-existent, my son's girlfriend has offered to help me with the technical part.  I plan on making a fabric covered binders.  The recipes will be printed on decorative paper.  We will include photographs of some of the women who contributed the recipes, scan copies of the original handwritten recipes with their notes and l will write a short biography and include stories that I remember about each lady. 

Its sad that these lovely women are gone.  Each of them lived lives of dedication and commitment.  They raised wonderful families, made warm and loving homes and served their church and community with strong and loving hearts.

You all can't imagine how happy I was to read about Susan's hope chest. I am so happy that others continue to see the value of this kind of project. And, I'm looking forward to hearing more from Susan in the future as she reports on her monthly projects. If any of you would like to contribute your memories, ideas or current projects in a guest post on the blog, please contact me at the email address in the sidebar. I would love to hear from you!

Friday, February 15, 2013

A Peek Inside - Embroidered Crib Sheet


After embroidering a crib sheet for a baby gift recently, I completed this second sheet for Abigail's hope chest. I love "vintage looking" baby patterns. This one is an Aunt Martha's pattern and since we raise sheep, I thought the lamb was particularly appropriate. I've also been sewing those self-binding baby blankets. They make such a darling and quick baby gift! (pdf directions and a tutorial.) I bought flannel for both girlie and boyish sets for the hope chest, but these aren't finished yet. Soon, I hope!

Monday, February 11, 2013

Valentine Cookie Stencils


Every year, Miss Abigail and I enjoy a whole day of making handmade valentines together. Along with the card making, we also eat chocolate and decorate sugar cut-out cookies. I found these cookie stencils on sale in Hobby Lobby some time ago and look forward to trying them out with Abigail this year. The stencils can go into the hope chest along with more fun memories of making our traditional decorated sugar cookies.

Thursday, February 7, 2013

A Peek Inside - Cluny Lace Edged Dishtowels


I have lately been working on the aqua/brown/cream kitchen set and can now add these pretty cluny lace edged dishtowels. They might seem just a little fancy for kitchen work, but I like how they look. Just a simple running embroidery stitch applied to attach the lace to the edge of the top and bottom hem.


So far, in this set, I have the  brown twist dishcloths completed, along with the waffle-weave handtowels and now these lace edged dishtowels.


Related Posts Plugin for WordPress, Blogger...