Friday, February 25, 2011

Vintage Design - Ruffled Crocheted Dishmop


This vintage design could have been in my mother’s hope chest. How much more fun it would be to wash the dishes with this charming little scrubbie! I love vintage household items. The pattern for this dishmop appeared in an old newspaper. Here is a link for the original pattern. These old patterns were sometimes very brief! The writer assumed that the reader had enough crochet experience to understand what may come next, without having to write all of it out. In case you don’t have that experience, I’ve added some additional directions to the original pattern. I certainly don’t claim to be the designer, I just want you to be able to understand what the pattern actually means for you to do. The dish mop is not hard to make, but it becomes a wee bit unwieldy as you crochet. You may need to be patient, and just keep pushing the previous stitches aside.

Ruffled Crocheted Dishmop

I used one ball of yellow cotton thread, size 3. I used a size US0/2.55mm (Susan Bates) steel hook. The edging used several yards of green thread of the same size. I considered the project after row 6 and ended up pulling that row out. I thought that it just seemed too thick and ruffly, and I didn’t want the dish mop to mildew before it could dry out. So, I added the final row 7 to row 5 and called it good. With a smaller sized thread, I would probably want to keep row 6.

(abbreviations: ch=chain, dc=double crochet, sl st=slip stitch, sc=single crochet)

Foundation: Chain 10. Join with a slip stitch to the first chain to form a ring. Row 1: Chain 3. Make (dc, ch 1) 29 times in ring. (Catch the thread end under the stitches, then clip.) Join with a sl st in the top of the ch 3 at beginning of the round. (Ch 3 counts as the 1st dc of each row) (30 dc) Row 2: Chain 3. Make (dc, ch 1, dc, ch 1) in each ch 1 space around. Join with a sl st in the top of the ch 3. (60 dc.) Rows 3 through 5: Repeat row 2. (120 dc) (240 dc) (480 dc) Leaving a 3" tail, clip the thread and pull through the loop to finish off this color. Row 6: Add a contrasting color with the chain 3. Make (dc, ch 1) in each ch 1 space around. Join with a sl st in the top of the ch 3. Finish off this color as before. (480 dc) Row 7: Add the main color with a chain 2. Make (sc, ch 1) in each ch 1 space around. Join with a slip stitch in top of ch 2. Fasten off as before and weave in all the thread ends. Hanging Loop: With main color, join between any stitch in the starting ring with a chain 15. Join with a sl st on the opposite side of the ring. Turn. Make (1 sc, 22 dc, 1 sc) over the ch 15. With the edging color, if desired, make 1 sc in each stitch around the hanging loop. Fasten off and weave in the thread ends.

I sometimes wonder if ours is the only household left in America still doing the dishes by hand. Our small kitchen just doesn’t have room for a dishwasher. Doing dishes is not such a chore when I can use pretty dishcloths and dishtowels, and this little dishmop is positively darling. Miss Abigail definitely gets one or two of these in her hope chest.


Edit: If you like this little dish mop, you may be interested in a second rewrite of the pattern, more suited to worsted weight "kitchen cotton" yarn. View that post and get the pattern here. --km

Friday, February 18, 2011

Granny Square Dishcloth - My Favorite


This tutorial shows a slightly different way to make a granny square dishcloth. It is my favorite method because it works to “hide” that initial chain that counts as the first dc in each round.


As Abigail mentioned, you need 100% cotton yarn. I like Lily’s Sugar and Cream because it is widely available and reasonably priced. Lion brand yarn has a wonderful hand, but it is more expensive. Use a size "G" hook.


Round 1: Chain 4. Join with a slip stitch in the first chain to make a ring. Chain 5.


Make 3 dc in ring.


Ch 2. Make (3 dc, ch 2) twice more in the ring, catching the loose thread end.


2 dc in ring. Make a slip stitch in the 3rd chain of the chain 5 at the beginning of the round.


Slip stitch in the next chain also and then chain 5 to begin a new round.


3 dc in the space at the bottom of the chain 5.


* Ch 1. Skip the next 3 dc, (3 dc, ch2, 3 dc) in the next corner space.


Repeat from * twice more.


Ch 1. (Skip the next 3 dc. Put 2 dc in the space at the bottom of the chain 5 from the beginning of the round. Slip stitch in the 3rd chain of the ch 5.


Slip Stitch in the next chain and then chain 5, as before.


Round 2: Put 3 dc at the bottom of the chain 5. Ch 1. Skip next 3 dc. 3 dc in the next space.


Ch 1. Skip the next 3 dc, (3 dc, ch 2, 3 dc) in the corner space.


* (Ch 1, 3 dc) in the next space. Chain 1. (3 dc, ch 2, 3 dc) in the corner space. Repeat from * around.


Ch 1. 2 dc in the space at the bottom of the beginning ch 5. Sl st in 3rd ch of ch 5. Sl st in the next ch also and then ch 5, as before.


Round 3 and more: Begin the round as in previous rounds with (3 dc, ch 1) in the space immediately below the chain 5. Make (3 dc, ch 1) in each space across the sides and (3 dc, ch 2, 3 dc, ch 1) in each corner space. To close the last corner, put 2 dc in the space at the bottom of the chain 5 from the beginning of the round. Slip stitch in the 3rd chain of the ch 5, and in the next chain. Chain 5 to start a new round.

Finish by closing the last corner with 2 dc in the space at the bottom of the chain 5. Slip stitch in the 3rd chain of the chain 5. Cut the thread and pull through. Weave in the end.

I usually do about 7 rounds, including the initial round in the ring. But you can keep going if you like a bigger size. After the last round, you can stop, as Abigail did, and do a loose single crochet in each stitch around the entire dishcloth, to make a more finished edge. I want to show you how I like to finish a granny square dishcloth.


I change colors on round 7 and do this last round with the edging color.


To start the edging round, instead of a chain 5, I chain 4. Then, I put 2 dc in the corner space immediately at the bottom of the chain, as before. Ch 1 and one more dc in the same space.


* Skip next dc. Dc in next 2 dc. Dc in the space. Repeat from * across to the space that turns the corner. (1 dc, c 1, 2 dc, c 1, 1 dc) goes in the corner space.


Repeat from * across the sides, turning the corners as explained until you read the beginning chain 4. Finish off.  You can stop at this point also, but I like to add a further lacy edging in the same color as the middle of the granny square.


Add color with a chain 4 between the 2 dc in the corner. Skip dc. Slip stitch in the next space. * (Ch 4. Skip next stitch, sl st in the next st). (The photo actually shows a single crochet in this stitch. I sometimes do this on the corners because it makes the edge lie better at the corner. But you can just do slip stitches if it is easier to remember.) Repeat from * all the way around, making sure a slip stitch goes into each corner, between the 2 dc. Put the last slip st next to the beginning chain 4. Finish off and weave in all the ends.

I like to "block" my crochet. It just looks so much more finished and pretty. I adjust and square up all the stitches and pull the lacy loops out a bit. Then I hold the steam iron just barely over the cloth and let the steam flow for a minute or two. Then, let it dry in place.

Friday, February 11, 2011

Crocheted Dishcloths


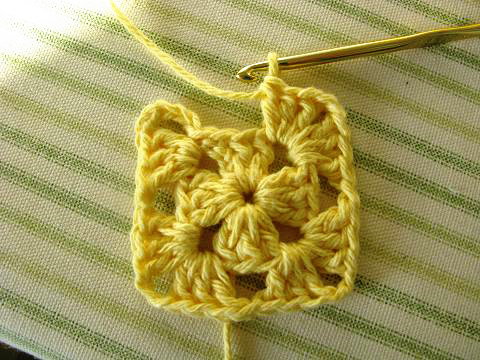
I made this granny square dishcloth for a 4-H project. It took about two days to make and I think it will be useful to put in my hope chest.

My mom and I like crocheted dishcloths better than commercial dishcloths because they last a very long time, absorb water better, and are sometimes prettier. My mom has made lots of crocheted dishcloths for our household. She makes them for wedding gifts, and she has made quite a few sets for my hope chest. If you make them too big or too thick, it is hard to squeeze the water out. You have to hang them up to dry or they will smell bad.

Crocheted dishcloths are really very easy to make. You just need to have the skills and materials. I learned how to make a granny square from the 4-H project. My mom was the leader for the project. You need to use 100% cotton yarn because this type of yarn absorbs water into the fiber. Acrylic yarn doesn’t, so it won’t work for dishcloths. You can buy cotton yarn at Walmart and Hobby Lobby. Use either a "G" size or an "F" size crochet hook.

You also need time to crochet. It helps if you like to do it. Crochet is not my favorite thing to do. I get kind of restless because it seems to take a long time. Mom says I just need more practice. When I see all the pretty things you can make with crochet, it makes me want to stick with it.

Respectfully submitted by Miss Abigail.

A note from Kathleen:

There are a couple of ways to make a granny square. Abigail’s pretty dishcloth is made using the granny square pattern required by her 4-H crochet project. I instructed her to add a final row of single crochet in each stitch around to make a bit more of a finished edge.

You can find directions for making a granny square in many places. Just add however many rounds you wish until the size is just right. The patterns usually read something like this:

Round 1: Chain 4 to 6 and join with a slip stitch in the first chain to make a ring. Chain 3. (This chain counts as the first dc stitch.) Make 2 dc in the ring, catching in the loose thread end. (ch 2, 3 dc) in ring. Repeat (ch 2, 3 dc) twice more. Ch 2 and join with a slip stitch to the top of the starting ch 3.

Round 2: Chain 3. Make 2 dc in the corner space (immediately below the chain three). Ch 1. Make (3 dc, ch 2, 3 dc, ch 1) in the next corner space. Repeat (3 dc, ch 2, 3 dc, ch 1) twice more. Make 3 dc in the next (first) corner space. Ch 2 and join with a slip stitch to the top of the starting ch 3.

Round 3 and more: Repeat the same pattern. (ch 3, 2 dc, ch 1) in the corner space. This makes the initial corner. Put a group of (3 dc, ch 1) in each space across the side. In the corner spaces, put (3 dc, ch 2, 3 dc, ch 1). Begin the rounds and close the last corner as in round 2.

edit: Tipnut has several links for more crocheted dishcloth patterns. Tipnut is such a great internet resource! -km

edit: Here is a link to a later post that shows an easy scalloped edging for this pattern. -km

Friday, February 4, 2011

Everyday Beauty


Once you fall in love with the idea of making a home, you find infinite pleasure in making it suitable, comfortable and even beautiful.  But, too often we put away our beautiful things because, well, they are too beautiful. “This is too nice to use for just everyday,” we say. We’ll save it for the holidays or when guests come to visit, and content ourselves with the plain and practical for everyday.  But our home is the space that encircles both our body and our spirit. It ought to be beautiful. No matter where we live, even in a temporary situation, a home is something we can create with the currency of beauty.

Why should you use a dishrag when you can easily use a dishcloth? Why should you use a dust rag when you can easily use a dust cloth? Truly, it is just as easy to use a towel that has, in some way, been made beautiful as it is to use a plain one, or one that is worn out or ugly. Of course, my home is more than those physical objects that surround me, but I find that my happiness is greater when I see, use, and enjoy everyday things that are beautiful. My everyday attitude is much improved.

Lest you get the wrong impression, I’ve used my share of rags, plastic cups and worn out blankets. But, I’m becoming wiser to my own happiness. It doesn’t take much to add a little beauty to everyday things. It does take a deliberate choice to actually use them.

If you own a pair of plain (white or printed) pillowcases, I challenge you to pull them out and use the following tutorial to add some simple, everyday beauty to your home.


Materials: Besides the pillowcases, you need a package of rick-rack trim, 6-ply cotton embroidery thread, two small embellishments, and a needle.


Measure the rick-rack trim, cut and pin it around the hem of the pillowcase.


Measure a length of thread three times the width of the pillowcase and cut. Use all 6 plys and thread the needle. Knot the thread.


Fold a bit under the end of the trim and bring the needle up in the corner. Make a tacking stitch. Do this on both the top and bottom edge.


Bring the needle up at the inside edge of the trim.


Take a small stitch, within the inside edge of the rick-rack trim. Take another stitch on the inside edge diagonal to your other stitch. Stitch, back and forth, within the inside edges of the rick-rack trim all the way across. The thread lays across the trim, tacking it securely to the pillowcase.


Work these small stitches in each wave across the length of the trim. Make the stitch smooth and snug, but don’t pull too tightly or the fabric will pucker.


When you come to the end of the trim, take another small tacking stitch on the top edge to secure the end and make it neat.


Tack down the bottom edge as well, and tie off the thread securely.


Sew on the embellishment. A ribbon rose, a button, or an applique would also make a cute decoration.


You are finished. Now use them. You’ll feel like a queen!

Friday, January 28, 2011

A Hope Chest Philosophy


A longing for home is one of the deepest, most fundamental desires of the human soul. For as long as humans have sought shelter, we have also sought to make that shelter more comfortable and even beautiful. In spite of modern rhetoric regarding the role of women, and the pressure exerted by our society to offer our daughters the opportunity to be whatever they might dream of being, hope for a happy, comfortable home is a value that should not be discarded as old-fashioned.

Creating a home that fulfills such a deep, emotional need takes conscious thought and deliberate effort. In the midst of everyday pressures and modern influence, such desire and effort might be postponed or even discarded in favor of other choices. Sadly, if there is a lack of time and a lack of positive commitment to homemaking tasks, there may also be a parallel lack in the emotional comfort of a home. Many, many people simply make do with much less than would be comfortable, let alone pleasant or delightful.

The hope chest represents that deliberate choice to prepare, even ahead of time, a comforting home. It is a physical act that reflects a desire to provide for the future. But, preparing for the future is also a traditional value that has too often been discarded by an immature attitude that believes all good things will come to us as needed. Surely, the wedding guests will provide gifts! Surely, whatever is lacking can be found at the department store, in Grandma’s basement or even the thrift store. This may, indeed, be the case for some young women, but a hope chest is more than the physical items that are stored inside. Beyond the collection of recipes and cookware is the mastery of their use. Behind the careful embroidery on the pillowcases is the recognition that beauty adds cheer and satisfaction to our life. From the woven potholders and knitted dishcloths to the crocheted lace and patchwork quilts, a hope chest simply reveals hands that are trained to do things. And, behind the preparing and collecting is the satisfaction of having what you desire, instead of making do with what is available.

We don’t always know what our future holds. But some kind of home will be part of it. You can make it what you want it to be; what you hope it will be. That is the purpose of a hope chest.

Saturday, January 22, 2011

The Search for a Quality Dish Towel


In my youth, almost every girl, who had a hope chest, had a least one set of embroidered dish towels. If you are going to spend the effort to embroider on a dishtowel, I would strongly urge you to take a bit of trouble, before you begin, to find a worthy towel. Embroidery is much more difficult if the foundation fabric is poor.

Most of the flour sack dishtowels commonly found in stores are hardly worth the effort to embroider them. They are too often thin, and too loosely woven. They also don’t wash well and collect lint from other items in the wash. Compared to the towels I used for embroidery as a young woman, these are miserable imitations. They are white, and that is about all I can say for them.

As a result, I have been on an 8-year odyssey to find a reliable, reasonable source for suitable dishtowels. What do I look for? What do I recommend?

I first look for 100% cotton fiber with a good twist to the threads. Most of us know that, to be properly absorbent, a towel has to be 100% natural fiber. Of course, linen makes a wonderful dish towel, if you can afford it. But, cotton is pretty great as well, and much more reasonably priced. I try to buy fiber that is untreated by finishes. The twist in the threads also makes a difference. If the fiber twist is slack, the fabric is weaker and will wear out more quickly. It is less smooth in appearance and sometimes the fibers will pill. If the fiber twist is too tight, the towel will not be absorbent. Like Goldilocks, it has to be "just right."

I also look for a tight weave. Most flour sack towels have a plain, over-under weave. I gently stretch the fabric over the pad of my finger. If I can see any of my finger between the threads, I put the towel down and keep looking. Sometimes I can see the threads pull apart. Completely unsuitable. I often think of how glad I am not to have to carry flour in a bag made from that!

As I look at the fabric in a towel, I consider the embroidery stitches I commonly use. I know that, to be able to make an attractive satin stitch, I need the fabric to be tightly woven. Otherwise, the edges of the stitch will look ragged. When I make a french knot, I don’t want the knot to pull right through the fabric. Some embroidery designs have small elements and tight curves. These require small, or even tiny stitches. Such stitches are impossible on a loosely woven fabric.

I always check the local stores. Sometimes I come across a set of dish towels that are good enough, but not often. I once found a set of four towels under the Martha Stewart label at K-Mart. Sadly, they were not reliable from package to package or from store to store. Sometimes those you find at Sam’s Club are adequate, but sometimes they are like cheesecloth.You may have better luck at your local stores. I can make three good online recommendations.

The “fabric grade” flour sack towel at The Towel Place.com is a wonderful towel, perfect for embroidery. They are hemmed on all four sides and more on-grain than many others I’ve seen. They actually fold up squarely! These are like the towels I remember. However, these towels are largely beyond my purse. The towels themselves are a little pricey. A set of 6 is $19.99. But the shipping is so high that it essentially doubles the cost. You may consider the cost worth the quality, especially for a special set made for the hope chest. These are truly outstanding towels. You can buy a sample, if you wish, to compare them to lesser towels, but the shipping will kill you. ;o)

My second recommendation is the flour sack towels from Herrschners.com. I recently ordered another set and was pleased that the quality is still superior. The weave is tight and better than almost anything else out there. These towels are very suitable for embroidery. The price has just increased a bit recently, but the largest size is $15.99 for a set of 7. The towels are hemmed on all four sides, but like most other flour sack towels, they are not on-grain. This means that they don’t hang or fold straight. So, I buy the largest size, cut them to square them up and re-hem. This seems like a lot of work, but it makes a nicer set. Sometimes I add a colorful, calico border, as long as I’m going to the extra effort. Herrschners will also send you a print catalog, with all kinds of embroidery and yarn projects.

UPDATE - November 14, 2017: I have finally found the towel I LOVE! Mary's Kitchen Flour Sack Towels are my new go-to towel for hand embroidery and all other crafting for the hope chest. The quality is super! The fabric is tightly woven, sturdy - thick enough but not too thick. The towels are completely suitable for hand embroidery and all my other favorite methods of decorative treatments like stenciling, fabric painting and sewing. The quality weave is also absorbent, and the price is completely affordable! In fact, the price is lower than any other comparable towel that I can find on the market. The first 11 towels cost just $1.99 each, but buying a dozen (or more) will get each towel reduced to $1.69 each! And the best news is that the shipping is also very reasonable. Bonus - these towels are pre-washed and pre-shrunk so I can start crafting immediately! AND - they have that nice corner hanging strip. I am seriously happy to have access to these fabulous towels. Hooray!

Some people really don’t mind what towels they use, but I simply have to have a decent towel. If you have another reliable source for good, flour sack dish towels, please share that information in the comments. I’ll love you forever!

Saturday, January 15, 2011

A Peek Inside - Purple Dish Towels


These dishtowels began Miss Abigail’s hope chest. I made them when she was only four years old. Creating items for a daughter’s hope chest is something I’ve always wanted to do. Rearing three older sons had created a strong male identity in our family and I was anxious to begin such a female-oriented project. Since hand-embroidered kitchen towels were a traditional item in a hope chest, it seemed fitting to begin with dish towels.

Once everything is assembled and prepared, I love to embroider. But, setting up a new embroidery project can feel somewhat like an ordeal. I always have a hard time choosing between all my options! This pattern is one of the Aunt Martha’s series from the Colonial Pattern Company. I chose the purple color so the dishes would look like lovely amethyst Depression Glass.

I have many, many iron-on transfers. I haven’t used them all and probably cannot. I just love to sort through the envelopes and consider the designs and imagine the wonderful possibilities. I have more designs saved on my computer and even more tagged in favorite places on the Internet. You can see my favorite spots listed in the Resources on the sidebar. Miss Abigail could never use all the linen I dream about embroidering. I need new dishtowels in my own kitchen, but am backed up in my gift-giving obligations as well. Alas, embroidery is so time consuming!


Related Posts Plugin for WordPress, Blogger...