Here is another quick project for the hope chest. I hand embroidered a pretty border near the bottom of two gingham tea towels, using a woven variation of the super easy running stitch. To make a set for yourself or to use as a gift, you'll need the following materials:
I love the heavy Dunroven gingham plain weave hand towels. You can often buy these at quilt stores and they are very high quality towels - worthy of your hand embroidery. You will also need a skein of 6-strand cotton embroidery floss, a skein of perle cotton in a contrasting color, a crewel-style embroidery needle, and a blunt tapestry needle.
From the skein of embroidery floss, measure a length that is 2.75 times the width of the towel. Thread the crewel embroidery needle with all six strands of floss. Tie a knot in one end of the thread. Bring the needle up on the back side of the towel in the side hem near where you want to begin the border.
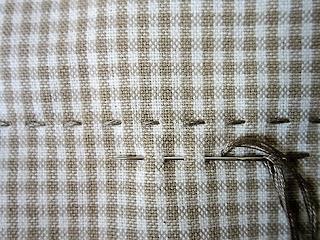
Bring the needle through to the front side of the towel in one corner of the gingham weave. Use a running stitch and follow along the edge of the gingham weave, taking a "bite" of two squares at one time.
When you reach the opposite side of the towel count up three squares and bring your needle through the side hem to the selected row. Use the running stitch to come back across the towel, BUT this time the stitches will be alternated (or stepped) with the row below. You'll have to create this stepped effect or the weaving won't work. Where the thread went under two squares on the previous row, the thread will be on top of those two squares on this row. This creates the alternate effect.
When you reach the beginning point, push the needle through to the back side of the towel. Take two or three small back stitches to secure the thread, then "lose" the thread in the hem and clip it off.
From the perle cotton, measure a long length of thread that is about 4 times the width of the towel. Thread the tapestry needle and tie a knot in the thread. As you did before, bring the needle up near where you need to begin and "lose" the knot in the side hem. You can see that I began my first stitch near the edge of the top running stitch. I slid the needle through that first running stitch, then took a small stitch near the lower edge to position my thread to pull up through the next running stitch on the bottom row.
Weave the thread through each running stitch, top and bottom, alternating rows and returning to catch the previous stitch.
When you reach the opposite side, push the needle to the back. As you did before, take 2 or 3 small backstitches to secure the thread and then "lose" the thread in the side hem. Clip it off.
The finished border.


That is so pretty ~ great idea. Thanks for the picture tutorial ~ most times I need to see something to understand instead of just reading it! donna
ReplyDeleteThese are so simple yet beautiful.
ReplyDeleteI hope you'll try making a towel - it is such an easy project.
ReplyDeleteKathleen, How cute this is! What size pearl cotton do you use? Thank you Angela
ReplyDeleteThis thread was thrifted, Angela, and didn't have a label. But it looks very close to my DMC size 5.
DeleteI can't wait to get the supplies! Thanks for the fun idea.
ReplyDeleteWhat a delightful result! Thanks for this grand idea.
ReplyDelete*hugs*
Kelley~
So pretty, and so simple! A set of these would make a nice quick gift.
ReplyDelete