
I especially like this scalloped net crochet edging for a kitchen hand towel. It has become one of my go-to edgings because it looks a little bit fancy, but is still quite easy and quick. This simple pattern makes a very nice edge on a pillowcase as well.
Materials:
Kitchen towel
#10 size crochet cotton (I used DMC Cebelia for this project)
Size 7 (1.65 mm) steel crochet hook (USA)
Tapestry needle
Begin by marking the foundation on the towel. This edging has 5 rows, an odd number, so you can mark and begin with the right side of the towel facing you. I usually put the marks 3/8-inch apart. I made a simple cardboard template to help me mark. It is much easier to see than a ruler. Use a marking pen with removable or disappearing ink. You will want to have an even number of spaces across the towel. Depending on the total width of the piece, you may need to adjust the width of the spaces so that you come out even.

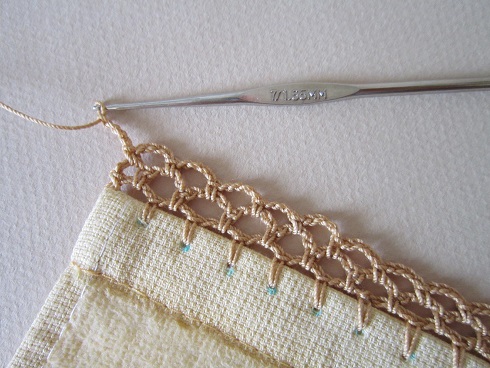
Push a hole through the edge of the towel with an embroiderer's awl. Push the awl through the holes and keep ahead of your crochet about 6 or 7 holes. If you make too many hole at once, they will just close before you can get to them. No use wasting your time. If your towel has a looser weave in the hem, you may not have to use an awl. Sometimes you can just push the hook through the fabric at the mark. There are also special "sharpened" crochet hooks that you can use to pierce the fabric as well. Since I have an awl, I use it.


Foundation Row: Cast on in the first mark at the right side and chain 3. Put a (sc, ch 4) in each hole across the front of the towel, ending with a sc in the last mark at the left edge of the towel. Chain 2 and turn.

Row 1: Sc in the first ch-4 space. Ch 4. (Sc, ch 4) in each ch-4 space across, ending with a sc in the last ch-4 space. Chain 3 and sc in the cast on stitch. Chain 2 and turn.

Row 2: Sc in the first ch-3 space, ch 4. (Sc, ch 4) in each ch-4 space across, ending with a sc in the last ch-2 space. Ch 2 and turn.


Row 3: Sc in first ch-2 space. Ch 4. (Sc, ch 4) in each ch-4 space across, ending with a sc in the last ch-2 space. Ch 2 and turn.

Row 4: Sc in the first ch-4 space. *Make 7 dc in the next ch-4 space. Sc in the next space. Repeat from * across to the last ch-2 space. Sc in this last space and fasten off.


Weave in the ends. I use a tapestry needle to weave down the stitches of the end rows.

At the bottom of the stitches I push the needle into the towel and along the hem of the towel for about four to six inches and then bring the thread up out of the towel.

Then I pull it a little to create some tension and clip the thread so that it pulls back into the hem of the towel. This creates a "lost thread" in the hem and I don't have to worry about it.

The finished edging is pretty don't you think?

If you like this edging, you may also like my "Posies Edging" tutorial. Posies is also scalloped, but the scallops are smaller and more shallow. The overall look is a bit more blocky.
So pretty! I think this would work on a baby's burp cloth too. Thanks so much for sharing.
ReplyDeleteOh yes, burp cloths would be a quick project and this pattern would likely lay nicely, even after all the washes, because the scallops are so dense.
DeleteGorgeous!
ReplyDeleteThank you Donna! I hope you'll give it a try.
DeleteHi there! I found you through a pin on Pinterest and wanted to thank you for the tutorials. I've crocheted for many years and love seeing what others are doing. Love that you're promoting the hope chest, too.
ReplyDeleteHave a lovely week!
Toni
Welcome to the blog, Toni! Pinterest is a wonderful place and I'm glad it led you here. I will look forward to your comments.
DeleteBeautiful!! I love waking up to see what you post next. You are so talented and an inspiration to all us crafters. Your Granddaughter is lucky to have you.
ReplyDeleteWhat a sweet thing to say, Heather. Thanks! (BTW, Miss Abigail is actually my daughter - but don't feel silly as the whole world is fooled by my gray hair and granny crochet. I am a proud grandma of 8. Abby is the last little chick at home and born to an old mama.)
ReplyDeleteI am so sorry, my apologies! My husband is the youngest of 8 and his mom was 45 when she had him also. Nothing wrong with that though. I look forward to your future posts, now to see if I can crochet around a towel :)
DeleteI love it! I bought a Easter printed kitchen towel the other day. Now I'm thinking that it needs this edging added. :)
ReplyDeleteI hope you'll try it Kath!
DeleteAww.. looks lovely! And easy to make :) Thanks for sharing !
ReplyDeleteThanks, Anna. It is pretty easy. 5 rows total takes a little longer than some patterns, but 3 rows of netting makes it go fast.
DeleteKathleen,
ReplyDeleteI LOVE this and this is exactly why I want to learn to crochet. I love the look that this adds to towels, pillow cases, hankerchiefs. My mom use to crochet around hankerchiefs, but I never learned how. What a mistake I made! I have some of the hankerchiefs and now with your tutorial, in honor of my sweet momma....I will master this! Thank you.
I am so glad to inspire such determination Tawn! I also admired my Grandmother, who did a lot of thread crochet and was a master quilter besides. I really wanted to learn and master it as well. It clicks eventually. You'll be able to do it and then you'll be tempted to put crocheted lace on everything!
DeleteJust a thought about the handkerchiefs...I'm not sure you were thinking about using this particular pattern, but I think it might be a little heavy, especially with a #10 thread. Those dc scallops are dense! Perfect for a towel or pillowcase, but heavy for a handkerchief, and I'm afraid you may be disappointed. I would use the zig-zag edging to begin with or one of the garden series edgings. Or, I have another pattern that I will post later this month that is a little more lacy and would work better. I would suggest that you move down to a #20 thread, but that size thread is even thinner and harder to learn on. But, if you try this tutorial on a couple of towels, it may be that you think it will work, and then you'll know for the handkerchief. Also, you may notice that the handkerchief is already hemstitched. So, on the foundation row, just skip a couple of these pre-made holes (3) to make the chain-4 span between the initial single crochets. Good luck. Please let me help however I can.
I think I will try on tea towels, first. I do fairly well on yarn with a larger crochet hook. My "problems" come in when trying to use a small hook and #10 thread. Thank you again...and now to try!
DeleteJust simply gorgeous... esp. for the bees. I love the look & choice of colors. Thank you for this tutorial. Will be using it.
ReplyDeleteJust read your comment above re handkerchief's. Thank you for all the info. This sure helps us; I love working with thread since that is what my grandmother taught me. Thanks again.
ReplyDeleteMy pleasure Mariana. I'm glad you have a project in mind.
DeleteBeautiful! I'm enjoying your craft/crochet month. :) Something I randomly noticed -- a lot of your edgings are crocheted directly to the towel. Do you prefer that to making an edging and then attaching it? Towels always seem to wear out much faster than edging in this house and I like to "recycle" as much as possible.
ReplyDeleteYes Rosey, I do prefer to just crochet directly to the towel, in general. The benefit is that the process is much quicker than making the lace and hand-sewing it on. But you are absolutely right when you point out that the sad fact is that the lace will be discarded along with the worn-out towel. Crocheted lace is extremely durable and will far outlast the towel. However, kitchen towels vary a lot in their general measurements, so the process of unpicking the hand stitching, fitting the lace to a new towel and then re-sewing the lace by hand may truly be more work than crocheting a new edging. So, with kitchen towels, I mostly use patterns that are quick to crochet and try to remember that my work will bring happiness during the time in use and let it go. Because of the length around two pillowcases, and because the size of pillowcases remains fairly constant, it may be worth creating a foundation row of chain stitches and then attaching the lace separately so that it could be recycled. This would be especially true if you used a good thread, like Cebelia, to begin with.
DeleteI really like this edging which I found on a Pinterest link. I'd like to try it as a napkin edging, but I'm so rusty. How do I turn the corners? Do you have a tutorial for that?
ReplyDeleteNo, I'm sorry Sheryl, I don't have a tutorial for turning the corner. Because of the initial netting, make sure to adjust the foundation marking so that there is a chain-4 that goes around the corner -(mark it so that two stitches are close together at the corner - one on each side and the chain-4 that rounds the corner. If you keep a chain-4 always in the corner, then on the last scallop row you can just add additional DC stitches to make a large enough scallop in the corner that it curves around and then you'll be ready to crochet down the next side. I hope that makes some sense. Some experimentation will help, I think. Sorry I don't have pictures for that.
Delete