Friday, July 10, 2015

Tutorial: Folded Fabric Hot Pads


I stumbled on a sample of these pretty folded fabric hot pads and thought they would be a perfect quick project for the hope chest. They are really easy. You'll need: 1/4 yd of color/print A, 1/4 yd of color/print B, 1/4 yd of Insul-Brite, thread to match primary fabric, 2 buttons to match, rotary cutter, ruler and mat. This is a great project to use with scraps as well, as long as they are at least 9" square. Five different fabrics would be just as cute as the co-ordinated pair I've made here.
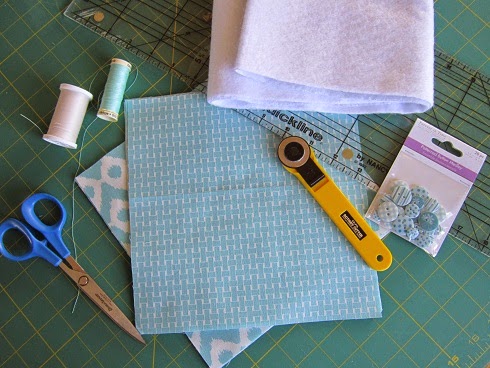

Once you have your materials, cut 5 (8 1/2-inch) squares from each fabric and 2 (8 1/2-inch) squares from the Insul-Brite. Iron 4 squares from each fabric in half, making a total of 8 rectangles.


Now you'll make a stack. Place the square of Insul-Brite batting on the bottom. Place an 8 1/2-inch square with the right side up on top of the batting. Place one folded rectangle (A) across the top of the stack, with the cut edge to the top and the fold toward the middle. Stack a second folded rectangle (B) with the cut edge toward the right of the stack and the fold toward the middle. Place the third rectangle (A) on the stack with the cut edge to the bottom.


Place the last (fourth) rectangle (B) on the top of the stack with the cut edge facing to the left. Tuck the top of the fourth rectangle under the left edge of the first rectangle. The rectangles will appear woven together with the cut edges on the outside and the folded edges coming to a point in the center.


Pin the edges and corners well.


Make sure to pin carefully at the point where the folds come together. They shouldn't overlap.


Sew carefully all around the edge of the hot pad, using a 1/2-inch seam allowance. You can use a walking foot if you wish - I didn't.


Cut the excess fabric from the corners and trim the seams so that the corners will turn more easily.


Turn the hot pad right side out. Use a point to make sure the corners are pushed completely out.


Press the hot pad so that it lays nice and flat. Topstitch 1/2-inch around the outside edges and sew a button at the center to help secure the center folded point.


Sunday, June 14, 2015

In My Workbasket: Pillowcases & Trims


So I am always on the lookout for pretty cotton fabric to make pillowcases. The fabric has to have just the right "hand." It needs to feel good on my face and still be pretty. While I love crisp, white pillowcases, I also really like printed ones, especially ones that I have decorated with crochet edgings. I have quite a stack of prints now and have several lengths of crocheted edgings as well. Now I just have to put them together...

When I crochet an edging before I have a pillowcase for it, it is helpful to remember that there are two types of edging patterns. One type develops from one end and is crocheted to a desired length and then you stop. When I use this type of pattern, I crochet the edging to a standard length plus an inch or so. This pattern type allows some flexibility later when I'm sewing the edging to the finished pillowcase. I can just unravel a bit from the end if I need to. The other type of edging pattern is crocheted into a pre-measured foundation chain. You can see that three of the edgings in the picture are crocheted into a foundation chain. Because I made these ahead and this type of pattern requires a finished measurement, I will now have to make the pillowcase to fit the edging. That isn't a problem, in this case, but it is something to be aware of.

BTW, before you ask, I don't worry too much about whether the print matches anything else in the hope chest. I have never had a matching bed "set." All the beds in our house are covered with handmade scrappy quilts or miscellaneous blankets. It is a real farmhouse, meaning nothing matches and everything is used. But pretty is still important to me. I hope Abigail has absorbed that value to the degree that she can find use for such extra pillowcases. They will certainly match the scrappy quilts I plan to make for her hope chest.

Thursday, June 4, 2015

Tiny Sewists: A Review

photo by Jenn at http://www.ajennuinelife.com/
I am so impressed with a blog sewing series that I recently stumbled on. It's called Tiny Sewists. This is a series of blog posts from a mom, Jenn at A Jennuine Life, teaching her young daughter, Arden, to sew. Arden is not yet 5 years old at the time of this series, so those of you who want to get started with very young children should appreciate the slow and steady pace of the series. I've linked to her first lesson which is about choosing a machine and getting started. Just look for the "Tiny Sewists" label on the sidebar of the blog for the rest of the series. The first three lessons help Arden get acquainted with the machine without a needle and progress to an actual pillowcase project in lesson 7 and on to curved seams and pins by lesson 11.

This series isn't a sewing curriculum. It is more of an outline of lessons, a report of how Jenn progressed with her teaching. If you need a script of what to say or detailed step-by-step beginning curriculum, you'll need to look for additional help. But her project lessons are posted as tutorials and they are very well done. Jenn's meaningful projects still require her adult help for some steps. Measuring and cutting, for example, are not completed by the child. So, simpler projects would need to be found for independent sewing, but overall, the series is a nice introduction for the youngest of our children. The series certainly brings a young child to the point of understanding and accessing the usual beginning instructional material. Well done, Jenn!

The series ends with a promise of more posts as Jenn and Arden sew together. Although she hasn't posted more in this series, there is plenty of other interesting sewing going on at Jenn's blog.

Friday, May 29, 2015

Training Hands


     The hope chest: what image does this conjure in your mind? Maybe you think of a big wooden chest with kitchen linens, china, silverware and the like in it. Or maybe it's that big heavy box full of crocheted potholders and embroidered dishtowels your mom turns out by the dozen. That's what the hope chest is at a glance, a storage box for things you'll use later in your future home, but upon further inspection you'll find it's a lot more than that- it's a whole philosophy about being ready for a family and a home of your own. Here at the Mower house we call it the art of training your hands.

     My mom has been trying from about kindergarten on to help me develop certain skills and train my hands to perform them. I was born into 4-H, a youth program which has a lot of projects geared toward home economics. There are cooking, baking, sewing, crochet, embroidery, and scrapbooking projects- and I've done them all. It has taken a while to learn to do these things. When I was younger I was a little afraid of all the equipment, like the sewing machine, and the iron, and needles. Over time, though, I've gotten better and better and now have a veritable wardrobe of skills that will help me later in life. I know how to feed people. I can follow a pattern and sew things. Even the crafts projects have taught me some odds and ends about beautifying things (I think I could probably stencil every wall in the house if I wanted to.) I am becoming ready for future life and I have confidence because I have been training my hands all these years.

     So it turns out that the hope chest isn't just a box to store material goods for when you need them later in life. You need more than dishcloths and silverware to be ready to be on your own. You need to know certain skills as well. I think it is a lot better to go into married life with confidence than to go into it without a clue as to what you are doing. Training my hands now has helped develop that confidence and peace of mind, which will ultimately help me have a happy home.
 
Respectfully submitted by Miss Abigail

Monday, May 25, 2015

A Peek Inside: Pretty Doilies


I've mentioned before that I belong to a ladies club and that Miss Abigail has been an informal member since she was born. In fact, though we don't do formal membership at all anymore, Abby is as much a part of the club now as anyone. Both she and I have been gifted many lovely things over the years and some of these gifts are in her hope chest, in honor of or in memory of these special ladies.

These lovely hand-crocheted doilies were made by Miss Sheila, a wonderfully talented woman who has always been so interested in Abigail. I should have put something alongside them to help you understand the size better. They are both about 7-9 inches in diameter. Just the right size to place under a vase of flowers. It is so nice to have these beautiful accessories in the hope chest.


Monday, May 18, 2015

Tutorial: Pink Crumpled Stitch Hot Pads


I'm still slowly working on the Pink & Brown kitchen set. This is a second set of hot pads.

Crumpled Stitch Hot pads
Worsted weight cotton yarn
Size "G" hook

Chain 26.

Row 1: Sc in second ch from hook and in each chain stitch across. (25 sc) Mark this side as the right side. Ch 1 and turn.
Row 2: Sc in first sc. *dc in next sc, sc in next sc. Repeat from * across. (25 stitches) Ch 1 and turn.
Row 3: Sc in first sc. *dc in next dc, sc in next sc. Repeat from * across. Ch 1 and turn.
Rows 4-19: Repeat row 3.
Row 20: Sc in each stitch across. Fasten off.

Repeat pattern 3 more times to make a total of 4 pieces.

Edging:
Row 1: Hold two pieces together, back to back, with the last row worked at the top. Working through both pieces at once, join with a sc in the first sc of the top right corner. 2 sc in same stitch – corner made. *sc in each stitch across to last stitch. (23 stitches) 3 sc in last stitch – corner made. Sc evenly down side, through both thicknesses, working in ends of rows and spaces. Put 2 sc in some spaces for a total of 23 sc. 3 sc in next stitch – corner made. Repeat from * around the remaining sides. Slip stitch in first sc.
Row 2: Ch 3. 2 dc in second sc of corner. Corner made sc in next stitch. Dc in next stitch. Alternate these stitches (sc and dc) around all sides with 3 dc in second sc of each corner to round corners. Slip stitch in first ch 3. Fasten off.  Hanging Loop (optional): If you wish, before fastening off, you can chain 12, then slip stitch in each chain stitch around loop. Fasten off and weave in the end.

Here are the same pattern directions with pictures:


Sc in second ch from hook and in each chain stitch across. (25 sc)


Sc in first sc. *dc in next sc, sc in next sc. Repeat from * across. (25 stitches) Ch 1 and turn.  Sc in first sc. *dc in next dc, sc in next sc. Repeat from * across. Ch 1 and turn. Repeat for pattern.


On the final row, sc in each stitch across. Fasten off.


Hold two pieces together, back to back, with the last row worked at the top. Working through both pieces at once, join with a sc in the first sc of the top right corner. 2 sc in same stitch – corner made. *sc in each stitch across to last stitch. (23 stitches)


3 sc in last stitch – corner made.


Sc evenly down side, through both thicknesses, working in ends of rows and spaces. Put 2 sc in some spaces for a total of 23 sc.


3 sc in next stitch – corner made. Repeat from * around the remaining sides.


Slip stitch in first sc.


Ch 3. 2 dc in second sc of corner. Corner made sc in next stitch. Dc in next stitch. Alternate these stitches (sc and dc) around all sides with 3 dc in second sc of each corner to round corners. Slip stitch in first ch 3. Fasten off.


If you wish, before fastening off, you can chain 12, then attach with a slip stitch on opposite side to create a hanging loop.


Slip stitch in each chain on the hanging loop to make it slightly thicker and stronger.


Fasten off and weave in all the ends.


Thursday, May 7, 2015

A Peek Inside: Aunt Bertha's Kitchen Set


Will there be items in her hope chest that Miss Abigail will never use? Probably.

I have a large and loving family. There were six aunts that lived close by as I grew up. These aunts were wonderful models of homemaking skills and I learned a lot from each of them. Three of the aunts are still living and are very elderly. Around the time of my birthday, a few years ago now, I picked up a package in the mail. It was from my Aunt Bertha. Inside the package were these wonderful hotpads and the embellished dishtowel, along with a note that told me how much she loved me and appreciated all of our shared experiences.

My Aunt Bertha is a very talented woman and I've never been able to use the gift as she intended that I should. I will perhaps one day, but in the meantime, I just like to get them out and look at them and remember my lovely aunt. There are a couple of things that I made for my own hope chest that I never used. I get as much pleasure out of their prettiness and the effort it took to make them as I would in using them. But even as I say that, I hope that Miss Abigail will use the things I am making. I'm making LOTS, just to ensure that she will have enough to use. There are enough that some could be gifted as my sweet aunt did, and some leftover for grandchildren. I'm sure that there will be things that Abigail will only bring out for special occasions and maybe one of two that she will just save to look at. But I hope she will use and reuse and wear out most of her hope chest.

One of my favorite activities, on a lazy afternoon, is to go to antique stores and poke around. I am always drawn to the linens. There are piles of wonderful hand crafted linens to sort through. I always wonder about why they were made and love to guess whether the crafter made them for a hope chest. I like to see signs of them being used. I think it sad when I come upon a perfect, unused pair of pillowcases or tablecloth or monogrammed napkins. There is such a lot of work involved to have the item remain unused and stored away in the dark of a chest or drawer.

Do any of you have items that you acquired for your home and yet have never used? Do you think it a shame, as I do? When do we reach the point of allowing ourselves to use our beautiful things? I really do try and hope you do as well.

BTW, the dishtowel is embellished with a simple fabric border along with the pretty peaches iron-on transfer. My aunt also used the ever-popular single-crochet diagonal pattern for the hot pads. Just google it (single-crochet diagonal hot pads) for lots of directions and tutorials.
Related Posts Plugin for WordPress, Blogger...