Showing posts with label sewing. Show all posts
Saturday, April 11, 2020
Tuesday, August 16, 2016
Tutorial: Microwave Baked Potato Bag
You may not know that August 19th is National Potato Day! So this tutorial is just in time to celebrate potatoes. I love them all ways, especially scalloped, but I also like them baked.
On my last trip to Idaho to see my mom, I bought potato print fabric to make a microwave baked potato bag for Miss Abigail's hope chest. You couldn't find a better print for this kitchen item and it will be perfect to remind her of family "roots." I grew up on an Idaho potato farm! While you may not be able to find the potato print fabric, here's the tutorial so that you can make a bag with any other cotton print. Just make sure the materials are 100% cotton so that you don't have problems with the microwave. Directions for using the baking bag are at the end of the post.
Materials: 2 pieces of 100% cotton fabric, 1 piece thin 100% cotton batting, basic sewing supplies, including 100% cotton thread.
Measure and cut both pieces of fabric and the batting 9 x 21 inches.
Place both pieces of fabric, with right sides together, on top of the cotton batting. Use a 1/4-inch seam and stitch across each short end.
Turn the fabric right sides out. The batting will be between the pieces of fabric. Press. Top stitch across each end, about 1/2-inch from the edge.
Arrange the bag with the outside fabric facing up. Fold the top down about 3 inches and pin on the edge. Fold the bottom up and overlap the top by about 1 inch. Pin securely.
Use a 1/4-inch seam to sew both sides.
Finish the seam edges with a zig-zag stitch or use a serger.
Turn the bag right side out and press well.
Finished!
Microwave potato baking bags are designed for use in a microwave to cook any type of baked potato, including sweet potatoes. The bag works best with 2 or 3 regular Russet potatoes. Simply wash the potatoes and leave them damp. Don't pierce holes in the potatoes. Tuck the potatoes into the bag and close the flap. Cook on high, 6-10 minutes, depending on the number & size of the potatoes, and the power of the microwave. You can also interrupt the baking halfway through and turn the potatoes over, but it isn't necessary. Sweet potatoes will need about 30 seconds to 1 minute longer than regular white potatoes. You'll have to adjust the time for smaller round "salad" potatoes. After cooking, remove the potatoes. Be careful of steam as you open the flap! Simply let the bag air dry. Remember to let the bag cool completely before using it again and remember to use caution and proper supervision. The bag is machine washable, but don't use fabric softener or other additives.
On my last trip to Idaho to see my mom, I bought potato print fabric to make a microwave baked potato bag for Miss Abigail's hope chest. You couldn't find a better print for this kitchen item and it will be perfect to remind her of family "roots." I grew up on an Idaho potato farm! While you may not be able to find the potato print fabric, here's the tutorial so that you can make a bag with any other cotton print. Just make sure the materials are 100% cotton so that you don't have problems with the microwave. Directions for using the baking bag are at the end of the post.
Materials: 2 pieces of 100% cotton fabric, 1 piece thin 100% cotton batting, basic sewing supplies, including 100% cotton thread.
Measure and cut both pieces of fabric and the batting 9 x 21 inches.
Place both pieces of fabric, with right sides together, on top of the cotton batting. Use a 1/4-inch seam and stitch across each short end.
Turn the fabric right sides out. The batting will be between the pieces of fabric. Press. Top stitch across each end, about 1/2-inch from the edge.
Arrange the bag with the outside fabric facing up. Fold the top down about 3 inches and pin on the edge. Fold the bottom up and overlap the top by about 1 inch. Pin securely.
Use a 1/4-inch seam to sew both sides.
Finish the seam edges with a zig-zag stitch or use a serger.
Turn the bag right side out and press well.
Finished!
Microwave potato baking bags are designed for use in a microwave to cook any type of baked potato, including sweet potatoes. The bag works best with 2 or 3 regular Russet potatoes. Simply wash the potatoes and leave them damp. Don't pierce holes in the potatoes. Tuck the potatoes into the bag and close the flap. Cook on high, 6-10 minutes, depending on the number & size of the potatoes, and the power of the microwave. You can also interrupt the baking halfway through and turn the potatoes over, but it isn't necessary. Sweet potatoes will need about 30 seconds to 1 minute longer than regular white potatoes. You'll have to adjust the time for smaller round "salad" potatoes. After cooking, remove the potatoes. Be careful of steam as you open the flap! Simply let the bag air dry. Remember to let the bag cool completely before using it again and remember to use caution and proper supervision. The bag is machine washable, but don't use fabric softener or other additives.
Saturday, March 12, 2016
Sew on Saturday: Envelope for Pink & Brown Set
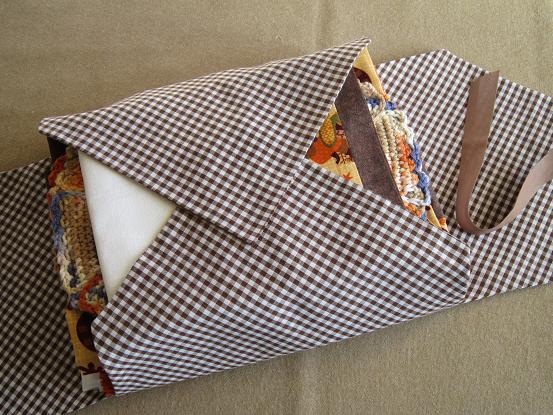
Here is the fabric envelope I made to keep the Pink & Brown kitchen set together in the hope chest. I call this an envelope because I don't know what else to call it. I need some kind of article to keep everything in a set from shifting around and becoming disorganized as we stir around in the hope chest. I began to solve the problem by tying things together with ribbons, but I find that ribbons are totally inadequate for the job! I've done this envelope thing a number of different ways for a few of the different sets that I've completed so far. Not all of the completed sets have an envelope yet; some are still just tied with ribbons. But, I'm on a quest for the perfect style.
For example, the envelope for the Thanksgiving set has four radiating arms that fold over the linens and tie together on top. I included a tag made from a scrap of the apron fabric. This gives Miss Abigail a reminder as to what is inside the packet without having to undo the bow. I like how it looks and how it completely encloses the set, but it is a little hard to measure and construct.
The envelope for the Brown & Aqua set is a wide fabric rectangular "ribbon" and closes with buttonholes and 5 different buttons on the top of the stack. The sides are open so that contents are easily seen and I like that aspect. It is much easier to construct. This envelope has an embroidered monogram. I posted a tutorial explaining this style.
I like the fabric ribbon style because I find that I like the open sides. I'm such a visual person and enjoy seeing at least a peek of the linens that are included in the set.
For the Pink & Brown set I thought about making another ribbon style, but ended up adjusting make it very easy. First, I measured the stack of linens. It was 34 inches around the stack. I cut a piece of matching fabric 18-inches by 40-inches to give me enough fabric for hems and overlap. On the short end, I folded over 1/4-inch and pressed. Then measured and sewed a 2 1/2-inch hem. I did this for both short ends of the fabric strip.
Then, on the long sides, I again measured and pressed a 1/4-inch fold and pressed again at 3/4-inch for a casing down the length of the sides. I left this casing open at both ends for the ribbons.
I measured two ribbons 39-inches long and pulled them through the casing with a large safety pin. Be sure to pin one end of the ribbon so that it doesn't accidentally pull through before you are ready to gather it up.
Finally, I placed the stack of linens in the middle of the fabric and just folded the ends over the top. I gathered the ribbons and tied them to enclose then linens and secure the envelope. I think it works pretty well. I like that there is a bit of fabric down the sides to keep things from shifting. It was also much easier to make than any of the other styles. It is much more plain, though, I should have put some lace on there at least! Hmmm. Maybe I'm just getting lazy in my old age. If I can find some time I may go back and add something. Well, regardless of how plain it is, the envelope will keep the linens in this set together in the hope chest, while allowing one to easily see what's inside. Mission accomplished.
Saturday, February 20, 2016
Sew on Saturday: Pink & Brown Floral Apron
I always plan for aprons as part of the kitchen sets that I'm making for the hope chest. But for some reason, I put off making them. I have several cute patterns and I have a hard time choosing which pattern to use. The pattern for this apron is Butterick #5263 and I like it very much. I did not use the full lining the pattern called for. Instead, I just purchased bias tape and attached it as a faced hem to finish all the edges.
I took the opportunity to show Miss Abigail how to sew a nice curve on the pocket. In case you don't know, I will mention it to you. Just make a gathering stitch along the curve and pull it up a little bit. This creates a natural curve and then you can press it before pinning the pocket to be sewn. This is much, much easier than trying to press the curve without the fabric being gathered.
Completing this apron finishes the Pink&Brown kitchen set for the hope chest. I'm off to take pictures and will post the finished set next week. I hope you'll check back.
Sunday, June 14, 2015
In My Workbasket: Pillowcases & Trims
So I am always on the lookout for pretty cotton fabric to make pillowcases. The fabric has to have just the right "hand." It needs to feel good on my face and still be pretty. While I love crisp, white pillowcases, I also really like printed ones, especially ones that I have decorated with crochet edgings. I have quite a stack of prints now and have several lengths of crocheted edgings as well. Now I just have to put them together...
When I crochet an edging before I have a pillowcase for it, it is helpful to remember that there are two types of edging patterns. One type develops from one end and is crocheted to a desired length and then you stop. When I use this type of pattern, I crochet the edging to a standard length plus an inch or so. This pattern type allows some flexibility later when I'm sewing the edging to the finished pillowcase. I can just unravel a bit from the end if I need to. The other type of edging pattern is crocheted into a pre-measured foundation chain. You can see that three of the edgings in the picture are crocheted into a foundation chain. Because I made these ahead and this type of pattern requires a finished measurement, I will now have to make the pillowcase to fit the edging. That isn't a problem, in this case, but it is something to be aware of.
BTW, before you ask, I don't worry too much about whether the print matches anything else in the hope chest. I have never had a matching bed "set." All the beds in our house are covered with handmade scrappy quilts or miscellaneous blankets. It is a real farmhouse, meaning nothing matches and everything is used. But pretty is still important to me. I hope Abigail has absorbed that value to the degree that she can find use for such extra pillowcases. They will certainly match the scrappy quilts I plan to make for her hope chest.
Saturday, January 31, 2015
Celebrating "Inspire Your Heart With Art" Day
I had not heard of this minor holiday before this year. It causes me to think about all the ways art and creativity have blessed my life. My mother is the single most important creative influence in my life. She expressed her artistry constantly in our home. She always had some music playing -beautiful, rapturous music, like Rachmaninoff, that just made my soul soar. All the pretty things around me were the work of her hands. Things like the painted kitchen cupboards, my hand-sewn dresses, the living room drapes, the watercolors on the wall, the artful arrangement of knick-knacks on the lamp table, the flower garden and even the molded Jello were all the result of her constant effort to bring beauty into our lives. She always had a project of some kind going and one project just bubbled constantly into the next. With such an example, I could not help but be creative myself!
We all live a life of which beauty is a part. While we are all not named as artists, each of us responds in some way to that which is beautiful. Many of us see a necessity of keeping beauty around us. Vibrant color, fascinating form and designs, exciting textures and patterns seem to fill some part of our soul. In my mind an artist is simply one who makes beauty visible (and certainly audible or tactile) and thereby holds onto the beautiful for a little longer.
I became aware of "Inspire Your Heart With Art" Day when a reader associated with an artist named Patience Brewster invited me to consider some way in which I could celebrate this day and encourage others to bring art more fully into their daily lives. Of course I went immediately to the Patience Brewster site and was tickled to view her pages of whimsical ornaments and figurines - and wouldn't you know, she even has some designs embroidered on tea towels!
So I am responding to the invitation by posting a picture of the sweatshirt I recently remodeled. I think it turned out pretty cute. I wanted to bring a little bit of color and warmth into the middle of winter. I created a tutorial and posted it over on our Hyer Homestead blog. I am celebrating today by listening to some rapturous music and thinking of my mom while I paint some recycled glass jars meant for the pantry we are creating in our laundry room. I know that so many of you all are creative and artistic because I stalk your blogs and find inspiration in what you are doing. So, join the celebration! Think about how you can bring art, even ordinary, homey art more fully into your life. You never know who you will inspire.
Tuesday, December 30, 2014
Tutorial - Fabric Border Dishtowels
Fabric borders are a simple, quick embellishment for dishtowels for the hope chest. This tutorial shows how to make a simple thick/thin border. Because I wanted to use this pretty border print, the contrast is subtle in these towels, but more apparent with other, more contrasting, fabric choices.
Materials for TWO towels: 1/4 yd. of 44-45" fabric A, 1/4 yd. 44-45" contrasting fabric B, matching thread, two flour sack dishtowels, tape measure, scissors, rotary cutter, ruler and mat, pins, iron and ironing board.
First, cut the hem from the bottom end of the towel. From both fabric A and fabric B, cut one 5" strip and one 2 1/4" strip. Measure the width of both towels from side to side. Trim a wide strip and a contrasting narrow strip to fit each towel width, plus 1 inch. You'll have to measure each towel because they will vary in width.
I'll continue to give directions for one towel. Just repeat with the opposite fabrics on the second towel. Press 1/2 inch along the top of the narrow strip.
With the right sides together, fold the larger strip in half. Use a 1/2" seam allowance to sew across both short ends. Clip the corners and trim the seam allowance. Turn right side out and press.
Pin the larger strip to the cut edge of the wrong side of the towel, aligning the side edges.
Pin the cut edge of the narrow contrasting strip atop the rest with 1/2" overlapping the edges on each side.
Sew the layers together, using a 1/2" seam allowance.
Fold the towel up and press the seam. This is the back of the towel.
Turn the towel to the front side and press the narrow strip up. Tuck the 1/2" overlap around the seam at the edge and press and pin the narrow strip across the front side of the towel. You may need to adjust a little to make the edges flush and neat.
Edgestitch around the three sides of the narrow strip, pivoting at each corner. Be careful to keep the seam line neat and straight and as close to the edge as possible.
Press the towel and clip any loose threads.
And it is finished!
Subscribe to:
Posts (Atom)