Just thought I would show you my recent, very last minute gift idea. I needed wrapping for a gift for a cook. I had purchased a specialty snowflake cake pan but wanted to add a handmade touch as well. I thought a stenciled dishtowel would fit both requirements nicely. I always have blank dishtowels handy! I first used Tulip spray fabric paint to spritz a blue blizzard in the background. Then I used a thin plastic snowflake stencil and a couple of different colors of Tulip soft fabric paint to stenciled several snowflakes around the edges and in the corners of the dishtowel. This fabric paint dries very quickly and I was able to wrap the gift after just four hours. Now I think I want to do a snowflake set for the hope chest!
Showing posts with label stenciling. Show all posts
Wednesday, December 18, 2013
Stenciled Snowflake Dishtowel
Just thought I would show you my recent, very last minute gift idea. I needed wrapping for a gift for a cook. I had purchased a specialty snowflake cake pan but wanted to add a handmade touch as well. I thought a stenciled dishtowel would fit both requirements nicely. I always have blank dishtowels handy! I first used Tulip spray fabric paint to spritz a blue blizzard in the background. Then I used a thin plastic snowflake stencil and a couple of different colors of Tulip soft fabric paint to stenciled several snowflakes around the edges and in the corners of the dishtowel. This fabric paint dries very quickly and I was able to wrap the gift after just four hours. Now I think I want to do a snowflake set for the hope chest!
Thursday, October 4, 2012
Stenciled Dish Towel
You see a lot of stenciling on the blog because it is so easy and quick to do and I think the results are so fun! I made a set of dishtowels recently to include in a wedding gift and I thought I would show you how I did it. Miss Abigail wrote a more basic tutorial on stenciling for beginners, if you need to see the actual technique.
Start by washing and drying the dishtowel. This removes any sizing or starch from the towel and allows the paint to penetrate into the fibers of the cloth. If you skip this step, the paint will likely fade much faster. Place a piece of cardboard or tin foil beneath the dishtowel, to prevent the paint from soaking through to the table. I use the Tulip soft fabric paint and whatever stencil strikes my fancy.
Use a just barely damp sea sponge and dab it lightly into green fabric paint. Lightly dab the sponge onto the towel to create a foliage background for the flowers that will come on top.
Add just a tiny bit of darker green to give the background some dimension. Use just a tiny bit!
Use the stencil to add flowers and leaves in a design across the foliage background. I blended two tints of the same shade while the paint was still wet to give the flowers a little dimension as well. I also added just a few dabs of a purple color between the flowers. Let this much dry. The directions for the fabric paint will give you the proper length of time.
After the flowers were dry, I stenciled smaller flower "centers" on top of the main flowers. I also used the end of the paintbrush, dipped in the paint and a very tiny brush to add further details and highlights to the flowers. Finally, I used another stencil with two colors to add the word.
Stenciling is really not hard to do and it makes me feel so artistic! So many projects for the hope chest can be stenciled. Dishtowels, of course, and pillowcases -you just need to be creative.
Wednesday, October 3, 2012
Stenciled Daisy Potholders
These pretty blue hot pads were a prize at a recent bridal shower. Seeing the possibility to add to the daisy kitchen set, Miss Abigail stenciled a large white daisy in the corner of each and then used a black fine-tip Sharpie permanent marker to embellish the flower with squiggly black lines around the edges of the petals. Dots circling the yellow center finished them off. Quick and easy! Stenciling is so handy.
Thursday, February 16, 2012
Valentine Dishtowel
This year, for our regular Valentine making day, Miss Abigail invited a younger friend to join us. I was a little concerned that Avery might get a bit bored with making valentines, one after another, all day long. So, I planned a couple of extra activities for the girls. We started the day by making Valentine dishtowels for the hope chest. I have reasoned that, someday, Abigail will make Valentine cut-out cookies with her children, just as she and I have done together. I think it would be fun to use a special holiday kitchen set, so this is the start of that set. Eventually, we'll try to add an apron and a set of hot pads for the hot cookie pans, and, of course, some cookie cutters. I will admit that I am also being a little sneaky. I'm hoping that Avery will have had fun making the dishtowel and that she will want to be a hope chest "buddy" and come back to do other things with us.
So, we made the dishtowels first, so that the paint could dry while we were doing other things. The girls used a washable glue stick to hold one of the paper heart doilies to the dishtowel. Then they used a just damp sponge with fabric paint, dabbing the paint over the doily. The edges are simply "feathered" by the sponge - no need to be too precise. The girls did the large doily first. Later, after the paint dried, they layered and sponged a second, smaller doily on top of the first. I think they turned out great!
Tuesday, May 3, 2011
Mom's Stenciled Linen Luncheon Cloth
In honor of Mother's Day I wanted to show you another treasure. This stenciled linen luncheon cloth was made by my mother for her own hope chest, many many years ago. She gave it to me because I loved those cheerful yellow daffodils. I've always been impressed with what my mother can do, she is talented and capable in so many different ways. In this case, mom simply frayed the edges of a length of linen and stenciled the pattern on each corner. Mom used a darker color to shade and add dimension to the large flowers. She also stenciled in the corner of the small napkins. There were four napkins at one time, but one must have been lost or ruined.
Ladies from my mother and grandmother's generation used to entertain their friends at luncheons, teas or card parties. These small luncheon cloths were made to fit a card table or another small table. The hostess would plan and serve a light luncheon or other light refreshments. The menu was simple, usually two courses. The hostess always laid a nice table with a beautiful luncheon cloth and cocktail-sized napkins.
Stenciling is an easy, lovely way to embellish fabric items for a hope chest. Miss Abigail posted a simple tutorial about stenciling on fabric. See this post if you would like to try.
Monday, March 14, 2011
Stenciling Tutorial - Ladybug Hot Pads
In case you want to make a set of cute stenciled hot pads, this is how to do it.
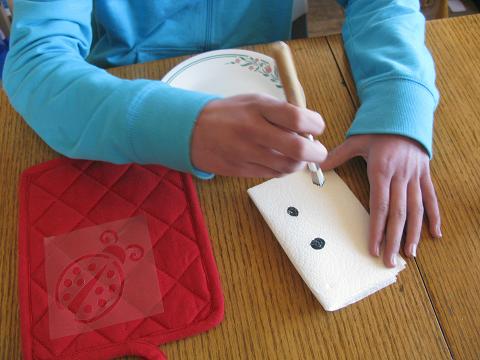
1. Gather supplies. You will need a set of blank hotpads, fabric paint, a stencil, a stencil brush, a plate and a paper towel.
2. Decide on the design. I decided to have one lady bug come up from one corner and one ladybug going down from one corner.
3. Place the stencil on the fabric. You can use tape to keep it in place, or in some places you can buy an adhesive stencil which sticks down on its own. I’m using an adhesive stencil because it makes the edges so sharp. Push down in all the corners and edges.
4. Put some paint on a washable plate. Dab the brush into the paint and then dab some off on the paper towel.
5. Pounce the brush up and down all over the stencil. Make sure to get the paint in all the corners and curves. Be careful not to use to much paint because then the paint goes under the edge of the stencil.
Sometimes you can do a gentle swirling motion in a kind of circle to get in the corners. But be careful not to get the paint under the edges.
6. It is a good idea to use tape on the outside edges so that the paint doesn’t go off the edge of the stencil. Mom says this is called masking. You can mask off any part of the design that you don’t want paint to go.
8. Set the hotpads in a safe place to dry. The instructions on the paint will tell you how long to let them dry.
9. Because the red and black colors looked kind of flat, my mom suggested that I give it a little more pizazz by adding white highlights. I used a tiny paint brush and just a bit of white fabric paint. You can see how much more it pops. It is nice to have to some white on these hotpads because then it will match later in a set if there is white in the towels and dishcloths.
Now the question is how to trim the hotpads. Shall I use black rick-rack with white thread or white lace with a black chain stitch? I could use white rick-rack and black embroidery or even a flower applique. What do you think?
Respectfully submitted by Miss Abigail.
Thursday, March 10, 2011
Stenciled Hot Pads
I made these hot pads to match the dishcloth I wrote about. They are made with a stenciled design. A stencil is a sheet of plastic or paper or metal with a cut-out picture. It is used with ink, paint, or dye to transfer the picture onto another surface. You can stencil on almost anything! You can stencil on walls, tables, clothing, furniture, boxes - even paper like greeting cards, notebooks and stationery. A stencil can be used more than once to repeat the design.
I made my hot pads for a 4-H project. Stenciling was one of the techniques included in the project. My mom helped me learn how to do it. At first it was hard because if you use too much paint, it gets goopy and leaks under the edges of the stencil. But now that I have some skill, it is easier. Taping the stencil helps keep it from sliding all over. Holding the stencil tightly down on the surface or using an adhesive stencil is another good trick because this keeps the paint from going under the edge and sharp edges are very important in stenciling.
I also stenciled on this tote bag.
and I stenciled puppy paw prints on these pants. ;o)
Stenciling is a very handy skill in making things for a future home. You can stencil on hot pads, pillow cases, couch pillows, curtains, towels, place mats - even your clothes. It is quick, easy and fun!
The stenciled hot pads, together with my crocheted dishcloth, will make a nice set for my hope chest.
Respectfully submitted by Miss Abigail.
Subscribe to:
Posts (Atom)