Showing posts with label christmas ornaments. Show all posts

Tuesday, December 12, 2017

Christmas Ornaments 2017


 One of Miss Abigail's favorite books is Anne of Green Gables by L.M. Montgomery. She has whole passages memorized and pleases herself re-reading her favorite parts again and again. I found this darling Anne character ornament on Etsy from a maker who is a friend of mine and I snapped it up immediately! Her shop is called House of Worry Dolls and she is a sweet young mom trying to make a little extra money.


Abby also loves nature and wildlife and this ombre ceramic deer fits her classic style very well.


Finally, I ran into another young Pueblo crafter who was selling these handmade ceramic ornaments at a small craft fair I recently attended. They were painted with traditional tribal symbols. This will be just another little reminder of her home state, no matter where she lives in the future.

Miss Abigail has a great collection of ornaments in her hope chest. I'm sure she will add to it in the coming years. Check the Christmas label to see the others we've collected and made together.


Sunday, December 9, 2012

A Peek Inside - Embroidered Snowflake Ornament


This gorgeous snowflake was created with a embroidery machine. I saw it at a crafts show and spent quite a lot of time visiting with the woman who made it. I took her card and hope she is still in business if I'm ever ready to have monogramming done on towels for the hope chest. She used stabilizer on a stiff gorgette fabric and then cut away the fabric. Brilliant!


This second stocking ornament is just as cute. I love craft shows and creative people. You just never know what you'll find!

Saturday, December 8, 2012

A Peek Inside - Rocking Horse Ornament


2011 blessed our family with two new grandchildren. I bought ornaments for them last year and couldn't resist adding this one for Miss Abigail's hope chest. I like to imagine her children hanging this on some future Christmas tree.

Friday, December 7, 2012

A Peek Inside - Peridot Wreath Ornament


I made this pretty peridot wreath ornament for the hope chest collection this year. I strung peridot chips on three strands of wire, with red glass beads at intervals. Then I twisted the strands together into a wreath and added the jewelry cap on top.

Thursday, December 6, 2012

A Peek Inside - Clay Angel Ornament


Maybe you can tell that I like angels? This beautiful painted clay angel reminded me a little of Miss Abigail.

Wednesday, December 5, 2012

A Peek Inside - Yo-Yo Angel Ornament

This yo-yo angel was created a couple of years ago with the ladies of the Stanley Homemakers Club. We often do crafts together and Miss Abigail always enjoys these meetings.

Tuesday, December 4, 2012

Monday, December 3, 2012

A Peek Inside - Santo Domingo Pottery Star Ornament


Each day this week I'll post a peek at ornaments in Miss Abigail's hope chest. This handmade star was made by craftspeople of the Santo Domingo Pueblo. The pueblos of New Mexico are well known for their pottery and each pueblo has traditional designs. This dragonfly is typical of Santo Domingo. Hopefully, this ornament will bring Miss Abigail happy memories of growing up in the culture of New Mexico.

Saturday, December 1, 2012

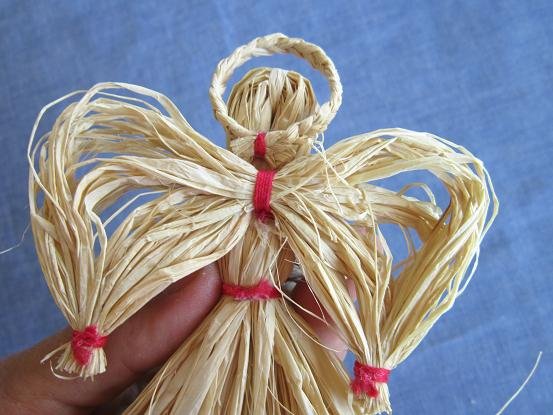
Tutorial - Raffia Angel Ornament


 I made this charming raffia angel ornament for Miss Abigail’s hope chest last year. But, because of stormy weather, I couldn’t get to the library to post it. So here is the tutorial, in plenty of time to make one for yourself.


You’ll need a package of raffia, twist ties, and scarlet thread or yarn, scissors and glue.


Separate a small to medium bunch of raffia from the rest of the package. Tie it tightly in the middle of the bunch. This will form the head and body of the angel. Set it aside for the moment.


Take another small bunch of raffia and use a twist tie to hold it together on one end, leaving a bit fluffed at the end. Braid the raffia for several inches. This piece will form the arms and hands, so the length will kind of depend on the size of the angel. Measure it against the “body” of the original bunch. The arms will go around and in front. When you reach the length you desire, use a second twist tie to temporarily hold the braid and cut off the extra raffia. Be sure to leave another bit hanging to give the impression of the hand.


Use the red thread or yarn to wrap the “wrists” and then remove the twist ties. Move the knot to the bottom of the wrists and trim closely. Put a dot of white glue on the knot to help hold it. Set the arm piece aside for the moment.


Take another small bunch of raffia and again tie it off in the middle. This piece will form the wings of the angel.


Separate each side of the wings into four smaller bunches. Do this between your fingers.


Smooth the raffia around your fingers to form the shape of the wing and use the twist tie to hold it temporarily. Repeat on the other side and fuss a little to make both side even with each other. Then use the red thread or yarn as you did with the arm piece to wrap and tie off the ends.


With the knot underneath, fold the original body piece in half and tie around the neck to form a head for your angel. Make a second braided piece and tie in a circle to form a small halo. You should now have each of the pieces shown in the photo: a loose body with a head, a braided arm piece, wings and a halo.


Take the body piece and separate the raffia just under the head and slip the braided arm piece through the separation.


Smooth the raffia around and underneath the arms and tie off a waist.


Braid a length of thread or yarn to make a hanger. Fold it in half and glue it to the back of the head. Glue the halo to the back of the head also, on top of the knot of the hanger. Then glue the wings at the base of the neck.


Bring the arms together at the wrists and glue them. Fluff the skirt at bit and you are finished.

Saturday, November 24, 2012

A Peek Inside - Sewing Angel Christmas Ornament


Every year we add to the collection of Christmas ornaments for Miss Abigail's hope chest. Handmade ornaments are especially prized, particularly when they are actually handmade by Miss Abigail. This very sweet "Sewing Angel" ornament was created by Abigail at our ladies club meeting last week. Isn't she darling?

Billie Lauder, a professional quilter and crafter extraordinaire helped us with this easy project. Billie joined our group some time ago and always has such great ideas for fun things to do. She brought the pieces in a little kit and all we had to do was stack the elements on a long metal pin and twist the end into a loop hanger. The silver metal bobbin is spun with silver thread and the rest of the beads are silver as well. Very clever I think.

Friday, January 20, 2012

Abigail's Ornament


Before I leave Christmas behind completely, I wanted to show the ornament Abigail finished for her hope chest. It was tedious work for her, with all those little beads and sequins, but she is pleased with the result and I think it is lovely! She did all the sequin work and I added the bow.

Friday, December 2, 2011

Tutorial - Puffy Patchwork Ornament


I love these styrofoam patchwork Christmas ornaments. I thought I understood the basic design strategy. You clearly push the edges of small fabric patches into a styrofoam ball, make a ribbon bow for the top and hang it on the tree. But I’ve tried to make this ornament so many times in the past and always tossed my pitiful attempts in the trash.  I’ve never been able to identify what I’m doing wrong. But I keep trying and this is my latest effort.


I'm sharing a basic tutorial, plus what I’ve learned about this ornament. This will make more sense if you actually try to make the ornament.You’ll need very simple materials and tools: a 2.5-inch or 3-inch styrofoam ball, scraps of Christmas fabric, scissors, and a thin table knife or fingernail file. The knife tool needs to be very thin so that you don’t make too wide of a space in the styrofoam. You might want one or two extra balls and some scraps of fabric to practice on! You may also need some clear-drying glue.


Cut the fabric into small squares about 1-inch or 1.5-inches in size. Include a variety of colors. The visual contrast between different fabrics seems to help emphasize the puffy edges.


Begin with two patches with right sides together. Push the edges on one side of the patches into the styrofoam. Try to push the edges of the fabric straight down. Then, open them up and gently smooth the patches.


Continue to add patches this same way. You’ll find that, even though you cut the fabric the same size, your patches don’t always come out even on the ball. I can’t explain this, except that this styrofoam process is way more variable than sewing the fabric! Just keep adding patches. Some will come out square and some will only loosely resemble square. As you come up around the curve, some of the “squares” will need to be more triangular in shape, and you may need to start over, once or twice. But if you redo more than once or twice, the space in the styrofoam becomes too wide, and the fabric won’t stay in the space. If the ball gets too ragged, you may need to begin with a new ball.


You will need to trim excess fabric on some patches to fit the space between two other patches. Just be careful to leave enough fabric to turn a nice edge. Turning the corner is the most difficult part of creating this ornament. This difficulty has always defeated me in the past. There is a lot of fabric in the corner and nowhere for it to go. You can try trimming a little off, but be careful of trimming too much, because it may pull out a few minutes later when you push in the other side of the patch. Then the styrofoam is showing and there is no fabric to fix the problem. You can also try tucking some under, which works sometimes, but not always.


It seems that no matter how careful I am, I always have both edges and corners that pull up or are loose. This year, rather than throwing the ornament away, I decided to simply use a bit of clear-drying glue (Elmer's or Alene's) to keep things where they are supposed to be. I added a tiny bit to some edges that were ragged and put some in the corners that just wouldn’t stay put.


I added the ribbon bow to the top of the ornament and a gold thread hanger. Then I let the whole thing dry overnight, hoping that the glue would truly dry clear. Thankfully, it did. Now that I’ve finally had one sucessful attempt, I may try to do a few more. If anyone knows anything more about the process to make this ornament, I hope you’ll leave a comment. Thanks!

Monday, November 28, 2011

Tutorial - Spiral Beaded Christmas Tree Ornament


The first ornament I’ve made for Miss Abigail’s hope chest this year is a spiral beaded Christmas tree. The design concept is extremely simple, but I’ve used glass beads to make it more sophisticated. Here’s a tutorial in case you want to make one yourself.


Materials needed: round-tip needle-nosed pliers, 30 inches 24-gauge wire, approximately 130 green foil-lined “E” beads (6/0 seed beads), 6 red foil-lined “E” beads (6/0 seed beads), 8 crystal foil-lined “E” beads (6/0 seed beads), 17 crystal 6mm glass beads, 9 red 6mm glass beads, 6 red polka-dot 10mm glass beads.


Begin by rolling a tiny loop at one end of the wire.


String a red “E” bead first, followed by a red 6mm bead and a 10mm polka dot bead. This forms the top of the tree.


String the rest of the beads onto the wire, loosely following the pattern in the photo. The pattern could be variable. You can do whatever you want, provided you have enough beads to play around with. Just put a length of green beads between the colored accent beads, so that there is enough green to give the impression of a tree. Use the larger beads toward the end, where the curve of the spiral is larger. Also, glass beads can get a little heavy, depending on the size, so don’t include too many of these larger, heavier beads. You don't want the weight to pull the spiral out of shape. Leave a good tail on the wire, for the time being, bending it a bit, to keep the beads from falling off.


Bend the initial three beads so that they stand up, then begin coiling the wire into a spiral shape.


Continue coiling the beads, until you reach the end. Try to keep the beads close together, but you may need just a little slack in the wire to adjust for the curve.


Hold the outer rows of beads loosely in one hand and pull up on the top beads to stretch out the ornament. Then simply adjust the spiral to form a nice tree shape. Use the pliers to form another tiny loop at the end of the wire, trimming the excess wire. This loop keeps the beads in place and makes a nice finish for the end of the wire.


Finished. The tiny loop at the top makes it easy to use a regular ornament hook. Or, string gold thread or thin ribbon through the loop and tie the ends together for a hanger.

Shared on Raising Homemaker's Wednesday Link-up .

Wednesday, December 15, 2010

Victorian Lady Ornament


This ornament was made for Abigail's hope chest last year, but I was defeated by how to attach a hanger. So, she has been sitting all year long, waiting for some kind of inspiration to strike. While browsing among the jewelry findings in the bead aisle at the craft store, I saw what is called a "bead cap." It had just enough of a cupped shape to hide the knot in a hanging thread. Perfect! I just used a dab of super glue and she is now finished.


She's very pretty, isn't she?

Sunday, November 28, 2010

More Ornaments for the Hope Chest

This felted wool chile pepper ornament is a treasure that Abigail and I found in October at the Wool Festival in Taos, New Mexico. I just love the way the yarn pulls and twists; it looks just like a crooked chile pepper.


This is a beaded snowflake ornament that I made for Abigail last year.


This is the first ornament Abigail made for her hope chest collection. She used a chenille stem and alternating red and white triangular beads - very easy. We're always looking for fun handmade ornaments to make. Do you have any good suggestions or links to share?

Saturday, November 27, 2010

Punched Tin Christmas Ornament

Each year I help Abigail make an ornament for the Christmas tree. I also make a handmade ornament for her, and we're always on the lookout for special ornaments at craft shows and boutiques. Hopefully, she will have a nice collection of ornaments by the time she gets married. Abigail made this punched tin ornament last year.

We used a recycled metal juice lid, a small sized nail such as a picture brad, a hammer, a scrap of yarn for hanging the ornament and a scrap of adhesive paper to finish the back. We first drew a pattern of a heart (you could use a star, tree, mitten, etc.) in dots on the back of the lid in permanent marker. Be sure to put a wooden board under the lid so that nothing gets ruined when the nail punches through to the other side. We wanted some of the punches (holes) to be larger than others, so we marked these dots a little bolder and used a slightly thicker nail to punch them.

Abigail used the hammer to punch the nail through each dot on the pattern. She used a thicker nail to punch a larger hole in the top of the ornament. She pushed the yarn through this hole and tied it into a bow on the front of the ornament.

We cut a scrap of adhesive paper into a circle to fit inside the back of the ornament. This covered up the markings and made a nice finish for the ornament.

edit: I found a great tutorial for another ornament (magnet or gift tag) using a juice lid. They are easy enough for Abigail and beautiful. Take a look here.
Related Posts Plugin for WordPress, Blogger...