So, I've been to Idaho and had a nice long visit with my mom. Of course, while I was there I made several visits to my very favorite craft store (
this post explains why I would) and found a number of treasures for Miss Abigail's hope chest. My mom is elderly now and so we tend to just sit and visit. This gives me a wonderful opportunity to do handwork. These pretty two-layer flannel receiving blankets are sold in Porter's as a kit project. The pieces are cut and basted and then machine hemstitched around the raw edge. Machine hemstitching creates beautiful, evenly-spaced holes all along the edge of the blanket, which is perfect for crochet.
Hemstitching was originally a hand sewing technique. Actually, it still is. However, in 1893, a hemstitching machine was developed to mimic this hand-stitching. The most common hemstitching machines had a double needle and double bobbins with a sharp
piercer that made holes in the fabric and the two separate needles that
sewed the hole open. The hemstitching machines were produced commercially during the early 1900's and were very popular with home sewers in the 1930's and 40's. There are still some hemstitching machines being manufactured but they now cost thousands of dollars. Lucky you if someone in your family owns an antique machine. They are very sturdy and many are still in use. I don't know who sews the hemstitch on these blankets for the store, but I do know they are produced locally. Since I can't find them anywhere else, I always try to get one when I go to Idaho.

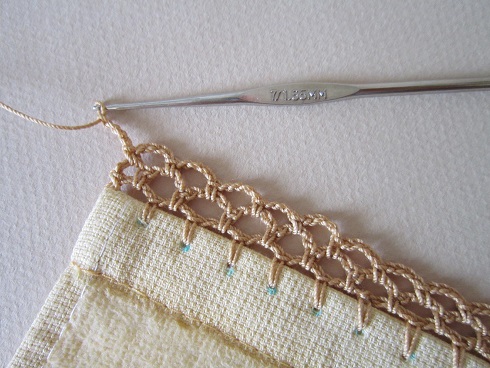
There are lots of different designs and patterns for the edging. I'm going to show you how I made the edging for these blankets. The pattern was on a free flyer hanging near the kits and thread. The pattern is called "Xs and Os" and naturally, I had to change it because I liked a half-double crochet stitch better than a single. For this blue blanket, I used DMC Cebelia thread, size 10, with a size 7 steel crochet hook. The second picture shows a close up of the hemstitched edge.
Xs and Os Crochet Edging (US stitches)
In any hole, cast on with a single crochet. *Skip one hole, half-double crochet in the next hole, chain 3, half-double crochet into the skipped hole. Repeat from *. End with a single crochet in the beginning hole. Fasten off.
As the pattern directs, begin in any hole with a single crochet. Skip the next hole and then make a half-double crochet in the following hole. (Because I wasn't taking pictures of my crocheting in Idaho, this picture shows a continuation of the pattern already begun. Sorry.) Chain three.
Come back and make a half-double crochet in the previously skipped hole. The chain three makes a pretty O and the half-doubles create the X. Just continue the pattern all the way around.
The blue/green blanket was 36-inches square. This pretty purple/green blanket kit is 45-inches square and had a burp cloth included as well. I tried a shiny nylon variegated thread for this blanket, but think I prefer the cotton DMC. Same size thread and hook and the blue.
Short of taking a trip to Rexburg, Idaho, I can't tell you where to
find these blankets. There are some hemstitching businesses online. I
Googled hemstitched baby blankets, and saw a number of choices. When I
do edges without the benefit of hemstitching, I just use the embroidery
awl technique that I
posted about here.
You can try using a single wing needle on your regular zig-zag sewing
machine. Several heritage clothing sites have directions or tutorials
for this technique, or check You tube for
this video
that explains how. The wing needle produces holes that can be closer
together than the machine hemstitching. Perhaps you can adjust the
stitch length or, depending on the crochet pattern you may need to make
adjustments to the pattern. For instance, use a single-crochet for the
Xs and Os pattern instead of the half-double crochet, or skip more than
one hole.
Although I am still working on the Pink and
Brown kitchen set, for some reason, babies are on my mind. I'm glad to
have these blankets finished for the hope chest.