Showing posts with label holidays. Show all posts

Saturday, March 26, 2016

Happy Easter!


A very happy Easter to you all. I love Easter and I especially love what this holiday celebrates - the resurrection of Jesus Christ. I cannot express how much I appreciate His redeeming love and the effect of His gospel in my life. Blessed Savior, Dear Redeemer!

This is a picture of my sweet sister and I on Easter Sunday in 1966. No we aren't twins, but we are just a year apart in age. My sis is older than I. My mom didn't often dress us alike, but when we were young she sometimes indulged that urge. This picture was taken at the home of my grandmother, who was an avid amateur photographer. Can you guess which is me?

Sunday, February 14, 2016

Saturday, February 6, 2016

Sew on Saturday: Valentine Hand Towel


I quickly hand-stitched this holiday towel for the Valentine kitchen set this morning. I like the simple running stitch across the plain bands in the terry cloth. The trims for the heart came out of my scrap basket. While this towel is intended for the hope chest, I think it would be just as pretty as a guest towel in the powder room. Hmmm. A different motif maybe...I think I will make another one...

Saturday, February 14, 2015

Thursday, December 19, 2013

A Peek Inside - Primitive Christmas Star Dishtowels


I've been trying to make a kitchen set for some of the major holidays - so far I have only the Thanksgiving set completely finished, but I'm working on two different Christmas sets, and set for Easter, Valentines and the Fourth of July. I finished these embroidered dishtowels for one Christmas set. You have previously seen the crocheted star dishcloths, the filet crochet hand towels, and the homespun dishtowels in this set. I "tea dyed" these towels to better match the color of the crochet in the other items. The design is one of the primitive series from Aunt Martha- "Bless Our Home" #4010.

Monday, February 11, 2013

Valentine Cookie Stencils


Every year, Miss Abigail and I enjoy a whole day of making handmade valentines together. Along with the card making, we also eat chocolate and decorate sugar cut-out cookies. I found these cookie stencils on sale in Hobby Lobby some time ago and look forward to trying them out with Abigail this year. The stencils can go into the hope chest along with more fun memories of making our traditional decorated sugar cookies.

Saturday, November 24, 2012

A Peek Inside - Sewing Angel Christmas Ornament


Every year we add to the collection of Christmas ornaments for Miss Abigail's hope chest. Handmade ornaments are especially prized, particularly when they are actually handmade by Miss Abigail. This very sweet "Sewing Angel" ornament was created by Abigail at our ladies club meeting last week. Isn't she darling?

Billie Lauder, a professional quilter and crafter extraordinaire helped us with this easy project. Billie joined our group some time ago and always has such great ideas for fun things to do. She brought the pieces in a little kit and all we had to do was stack the elements on a long metal pin and twist the end into a loop hanger. The silver metal bobbin is spun with silver thread and the rest of the beads are silver as well. Very clever I think.

Saturday, November 17, 2012

A Peek Inside - Thanksgiving Recipe Book


Finished! I'm very pleased with how well this little book turned out. Perhaps I should have chosen an album style that could accept more pages, since I had too many recipes to include pages of holiday photos! It was always intended as a recipe book, however, so I will declare myself satisfied. Here are pictures of some of the inside pages:


I added a cooking timetable for Abigail since this will make it easier (someday) for her to get dinner on the table. When I was younger, I worked hard to find recipes that could be made way ahead of time and refrigerated - even the mashed potatoes! I typically do all of the cooking for Thanksgiving dinner, so cooking ahead of time allows me to enjoy the holiday and visit with family and guests. I have more recipes than I could possibly use in one year's feast! I often trade out side dishes from year to year. So, I guess I could exchange photo pages for some of these recipes and make a new dedication page with a photo as well. Or, I could just look for another 5x7 style photo album. Perhaps I'll get around to it someday, but for now this project is finished. I love it when I can cross something off a list!

Thursday, November 8, 2012

Current Project - Thanksgiving Recipe Book


It seems like life is so busy right now that I can’t find much time to work on handmade hope chest projects. Certainly, the time issue is the biggest hurdle anyone has to overcome to create a handmade or heirloom project. I just keep plugging away at all the things I have going, but if you’ve been following me for very long, you know that it takes me quite a while to get something completely finished. I don’t suppose any of you are very different. Eventually I’ll get something finished and can post pictures. In the meantime, I am working on a Thanksgiving Recipes project in the cracks and corners of my free time.

I bought the supplies for this project a year ago. I was working on the Thanksgiving Kitchen Set and thought it would be nice to include a recipe book of all our traditional holiday recipes. I did finish the kitchen things, but ran out of time for the recipe project. So this year I want to finish it. I have all my holiday recipes collected in one notebook and I like having them together in one place. I thought this small photo album would work similarly well for Miss Abigail. I need to re-type the menu and recipes and print them on card stock. Then I plan to “scrapbook” the recipes, along with some past family photos of the holiday. I intend to leave a blank space on some pages for future photos of Abigail as she helps me cook and decorate for Thanksgiving.


Thursday, February 16, 2012

Valentine Dishtowel


This year, for our regular Valentine making day, Miss Abigail invited a younger friend to join us. I was a little concerned that Avery might get a bit bored with making valentines, one after another, all day long. So, I planned a couple of extra activities for the girls. We started the day by making Valentine dishtowels for the hope chest. I have reasoned that, someday, Abigail will make Valentine cut-out cookies with her children, just as she and I have done together. I think it would be fun to use a special holiday kitchen set, so this is the start of that set. Eventually, we'll try to add an apron and a set of hot pads for the hot cookie pans, and, of course, some cookie cutters. I will admit that I am also being a little sneaky. I'm hoping that Avery will have had fun making the dishtowel and that she will want to be a hope chest "buddy" and come back to do other things with us.

So, we made the dishtowels first, so that the paint could dry while we were doing other things. The girls used a washable glue stick to hold one of the paper heart doilies to the dishtowel. Then they used a just damp sponge with fabric paint, dabbing the paint over the doily. The edges are simply "feathered" by the sponge - no need to be too precise. The girls did the large doily first. Later, after the paint dried, they layered and sponged a second, smaller doily on top of the first. I think they turned out great!


Tuesday, February 14, 2012

Handmade Valentines


For some years now, Miss Abigail and I have made valentines to give to our friends. This is one of our favorite "mother-daughter" activities. I have collected lots and lots of snips and scraps and tools and supplies. I keep them from year to year in a special box and try to replenish our stock when things go on sale after the holiday. We always have such a lot of fun. We eat chocolate and practice card making techniques. I think it is such a shame that all our holidays, including Valentines Day, have become so commercialized. I just hate feeling pressured by holiday duty, particularly if it involves buying something expensive enough to reflect my love. So, making a simple, handmade card is my way of resisting the trend. I wish I could hand you a valentine. Just remember that our very best wishes wing their way...Happy Valentines Day!


Sunday, December 4, 2011

Our Advent Tree


There are so many different ways to use the Advent devotional in family worship. I wanted to show you one of the best things our family has done to try to keep Christ in the midst of our Christmas celebrations.

Many years ago, I made a careful study of the Advent scriptures that I thought would be the most meaningful to our family. Though not strictly traditional, I chose twenty-four scriptures that focus on the redemptive Plan of Salvation. (Several of these scriptures come from the Book of Mormon, which our family testifies is a second witness of the Lord Jesus Christ.) Then I used Sculpey clay to make a small ornament that would represent each of these scriptures. You will notice that I had to be pretty creative in my representations - you may not be able to recognize some of these items at a glance, but my children quickly learned to identify the symbol and the teaching that each small object portrays. We also have a small tabletop tree to hang the ornaments on and it sits next to the dining room table during the Christmas season. It really isn’t big enough, or sturdy enough, and every year I try to remember to get a bigger one.

The intention is to have a devotional reading each night and hang the ornament for that day. Honestly, we sometimes don’t have the time in the evening, so some nights we have to double up. There have been some years, when our older boys were teenagers, when we just had to catch everything up on Sunday. But it is still a special tradition to read through these scriptures and to remember the gifts and promises of a loving Heavenly Father.


 1.  yellow singing stars - Job 38:4-7  (morning stars sang together)
2.  globe with clouds - Abraham 4:24-26, Genesis 1 (the creation of the world)
3.  blue stars with moon - Psalms 8 (the Creation Psalm)
4.  apple - Alma 12:22-24 (the fall of Adam)
5.  baby - Luke 2:7-16, Mosiah 3:5 (birth of the Savior)


 After we recognize the birth of our Savior, we take several days to read about His attributes through the “I AM” scriptures.

6.  candle - John 8:12 (I AM the light of the world)
7.  crook - John 10:11 (I AM the good shepherd)
8.  vine - John 15:1 (I AM the vine)
9.  bread - John 6:51 (I AM the bread of life)
10.  door - John 10:9 (I AM the door)
11.  Greek signs - Revelation 22:13 (I AM alpha and omega)


 Then we pick up again with the atoning death of the Savior,  and the assurance of a redemptive plan through the gospel of Jesus Christ.

12.  cross - 1 Ne 11:32-33 (death of the Savior)
13.  empty tomb - Matt 28:1-7 (resurrection of the Savior)
14.  blackness - Isa 60:2 - (apostasy foretold)
15.  angel with trumpet - Revelation 14:6-7 (promise of the restoration)
16.  milk & honey - 2 Ne 26:25 (promise of the gospel of Jesus Christ)


The remaining scriptures help us feel the joy of continued expectation and promise made to the followers of Jesus - to us, to our family! I really love all of these scriptures.

17.  eagle feather - Isa 40:31 (promise of strength as wings of eagles)
18.  hand - Isa 49:15-16 (promise to be remembered in the palm of His hand)
19.  sheaf of wheat - D&C 31:5 (promise to be laden with sheaves)
20.  sheep - Psalm 95:6-7 (promise to be the sheep of His hand)


 21.  trumpet - D&C 45:39-59 (the second coming of Jesus Christ)
22.  book - Revelation 20:12 (promise of a name in the Book of Life)
23.  crown - 1 Pet 5:4 (promise of the Crown of Life)
24.  harp - Isa 35:10 (we will bring songs of everlasting joy)

I would love to hear what you all do with Advent or how you use scriptures or symbols of Christ during the Christmas season.

Miss Abigail is our last child, so this Advent set may go with her as she begins her own family. I have had vague plans to make such a set for my daughters-in-law, but I don’t want to interfere with their own ideas and plans. I’m still kind of new at being a mother-in-law and each of these girls is capable, accomplished and creative. But I can certainly remember having so little time, when my children were small. For a more mature girl, I think that some kind of Advent teaching would be the perfect item to prepare ahead and save in a hope chest for her future home.


Shared on Raising Homemakers Wednesday Link-up

Friday, December 2, 2011

Tutorial - Puffy Patchwork Ornament


I love these styrofoam patchwork Christmas ornaments. I thought I understood the basic design strategy. You clearly push the edges of small fabric patches into a styrofoam ball, make a ribbon bow for the top and hang it on the tree. But I’ve tried to make this ornament so many times in the past and always tossed my pitiful attempts in the trash.  I’ve never been able to identify what I’m doing wrong. But I keep trying and this is my latest effort.


I'm sharing a basic tutorial, plus what I’ve learned about this ornament. This will make more sense if you actually try to make the ornament.You’ll need very simple materials and tools: a 2.5-inch or 3-inch styrofoam ball, scraps of Christmas fabric, scissors, and a thin table knife or fingernail file. The knife tool needs to be very thin so that you don’t make too wide of a space in the styrofoam. You might want one or two extra balls and some scraps of fabric to practice on! You may also need some clear-drying glue.


Cut the fabric into small squares about 1-inch or 1.5-inches in size. Include a variety of colors. The visual contrast between different fabrics seems to help emphasize the puffy edges.


Begin with two patches with right sides together. Push the edges on one side of the patches into the styrofoam. Try to push the edges of the fabric straight down. Then, open them up and gently smooth the patches.


Continue to add patches this same way. You’ll find that, even though you cut the fabric the same size, your patches don’t always come out even on the ball. I can’t explain this, except that this styrofoam process is way more variable than sewing the fabric! Just keep adding patches. Some will come out square and some will only loosely resemble square. As you come up around the curve, some of the “squares” will need to be more triangular in shape, and you may need to start over, once or twice. But if you redo more than once or twice, the space in the styrofoam becomes too wide, and the fabric won’t stay in the space. If the ball gets too ragged, you may need to begin with a new ball.


You will need to trim excess fabric on some patches to fit the space between two other patches. Just be careful to leave enough fabric to turn a nice edge. Turning the corner is the most difficult part of creating this ornament. This difficulty has always defeated me in the past. There is a lot of fabric in the corner and nowhere for it to go. You can try trimming a little off, but be careful of trimming too much, because it may pull out a few minutes later when you push in the other side of the patch. Then the styrofoam is showing and there is no fabric to fix the problem. You can also try tucking some under, which works sometimes, but not always.


It seems that no matter how careful I am, I always have both edges and corners that pull up or are loose. This year, rather than throwing the ornament away, I decided to simply use a bit of clear-drying glue (Elmer's or Alene's) to keep things where they are supposed to be. I added a tiny bit to some edges that were ragged and put some in the corners that just wouldn’t stay put.


I added the ribbon bow to the top of the ornament and a gold thread hanger. Then I let the whole thing dry overnight, hoping that the glue would truly dry clear. Thankfully, it did. Now that I’ve finally had one sucessful attempt, I may try to do a few more. If anyone knows anything more about the process to make this ornament, I hope you’ll leave a comment. Thanks!

Monday, November 28, 2011

Tutorial - Spiral Beaded Christmas Tree Ornament


The first ornament I’ve made for Miss Abigail’s hope chest this year is a spiral beaded Christmas tree. The design concept is extremely simple, but I’ve used glass beads to make it more sophisticated. Here’s a tutorial in case you want to make one yourself.


Materials needed: round-tip needle-nosed pliers, 30 inches 24-gauge wire, approximately 130 green foil-lined “E” beads (6/0 seed beads), 6 red foil-lined “E” beads (6/0 seed beads), 8 crystal foil-lined “E” beads (6/0 seed beads), 17 crystal 6mm glass beads, 9 red 6mm glass beads, 6 red polka-dot 10mm glass beads.


Begin by rolling a tiny loop at one end of the wire.


String a red “E” bead first, followed by a red 6mm bead and a 10mm polka dot bead. This forms the top of the tree.


String the rest of the beads onto the wire, loosely following the pattern in the photo. The pattern could be variable. You can do whatever you want, provided you have enough beads to play around with. Just put a length of green beads between the colored accent beads, so that there is enough green to give the impression of a tree. Use the larger beads toward the end, where the curve of the spiral is larger. Also, glass beads can get a little heavy, depending on the size, so don’t include too many of these larger, heavier beads. You don't want the weight to pull the spiral out of shape. Leave a good tail on the wire, for the time being, bending it a bit, to keep the beads from falling off.


Bend the initial three beads so that they stand up, then begin coiling the wire into a spiral shape.


Continue coiling the beads, until you reach the end. Try to keep the beads close together, but you may need just a little slack in the wire to adjust for the curve.


Hold the outer rows of beads loosely in one hand and pull up on the top beads to stretch out the ornament. Then simply adjust the spiral to form a nice tree shape. Use the pliers to form another tiny loop at the end of the wire, trimming the excess wire. This loop keeps the beads in place and makes a nice finish for the end of the wire.


Finished. The tiny loop at the top makes it easy to use a regular ornament hook. Or, string gold thread or thin ribbon through the loop and tie the ends together for a hanger.

Shared on Raising Homemaker's Wednesday Link-up .

Saturday, November 26, 2011

Chirstmas Workshop


Our Christmas workshop is now officially open! When I ask Miss Abigail what she likes most about Christmas, she always mentions making crafts together. I like this activity too. I think we would have to call it a tradition now, but it certainly didn't start out to be anything as formal as a tradition. It seems like I spend quite a lot of time making things at Christmas and Abigail was always saying, "That looks fun." So I began including easy decorations or simple handmade ornaments that she could work on also. Every year she makes a handmade sign that sits on the table to indicate that the workshop is open. When we clean up for the day, the sign goes in the box of supplies until next the time. Now that Abigail is older and more accomplished in her skills, she can add fun holiday things to her hope chest. When she brings them out at some future time, I hope she will remember our fun workshop days.

We've been working on ornaments the last couple of days. Miss Abigail is making a beautiful sequin ornament and I completed a very easy spiral beaded Christmas tree ornament. I made a tutorial because I know you'll want to make one too. Watch for the post on Monday.

Tuesday, November 22, 2011

Thanksgiving Kitchen Set


I finished the Thanksgiving kitchen set for Miss Abigail’s hope chest - just in time! I always seem to run a little behind on my projects, but this one is ready. Thanksgiving is one of our favorite holidays. I love to cook the dinner and Abigail loves to decorate and set the table, so we make quite a team. I even like to wash the dishes, which I do mostly by myself - at my own request. I just like to take my time and admire my pretty dishes and dry them off with pretty towels. I’m not sure that Abigail will ever love to do the Thanksgiving dishes, but at least she will have the pretty towels.


I started this set with the yarn that Abigail liked so well. These hotpads are truly one of a kind. I wanted something different from my usual favorite, so I loosely followed a hexagonal pattern. The term loose would be an understatement. I got a little creative in the middle of things and then somehow had to make it all work together. I wrestled and wrangled and, in the end, these hotpads turned out pretty well, but I’ll never be able to replicate what I did. They are nice and thick, which is the most important factor.


I tried a circular pattern for the dishcloths in this set. These were quick to make, and I’m happy to have another quick pattern. I started out with the #1 pattern found in a Leisure Arts leaflet called "Dishcloths in the Round,"  but naturally adjusted here and there. I really can't seem to help it. The V-stitch works well for dishcloths, I think. This stitch makes a fabric that is close, but not too dense.


I used two designs from Aunt Martha’s #3995 “Monthly Madness” for the embroidered dishtowels. I loved the designs, but thought they were a bit small, so I enlarged them on a regular copy machine and then traced them with a transfer pen.


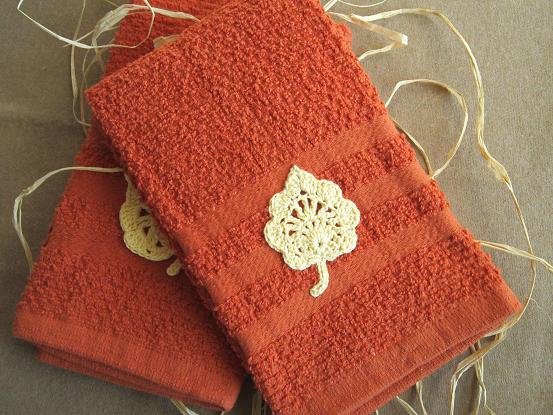
I found a nice color match in these handtowels and added a simple crocheted leaf to the bottom of each towel. The pattern for this scallop-edged leaf comes directly and without deviation from a lovely book, “Crochet Bouquet,” by Suzann Thompson. I used #3 sized cotton thread.


The pattern for the apron is the “Sassy Little Apron” by Cabbage Rose Quilts. Cute.


The last item in this set is another fabric embellished dishtowel. I had extra fabric from the apron and quickly sewed up a towel using the “Retro-Fun” tutorial from Sew4Home. This is a great tutorial. I think I’ve found another dishtowel favorite. I added a simple monogram with chain stitch and lazy daisies.


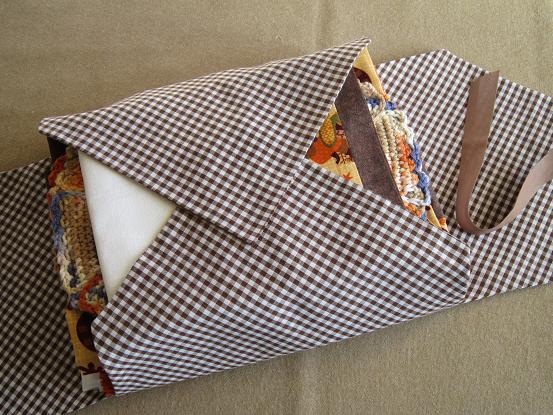
Finally, I made a cover to keep the items together inside the hope chest and then made a tag from the apron fabric to identify this set.


Happy Thanksgiving! I hope you all have a wonderful holiday.
Related Posts Plugin for WordPress, Blogger...