Showing posts with label Abby's kitchen items. Show all posts

Tuesday, August 16, 2016

Tutorial: Microwave Baked Potato Bag

You may not know that August 19th is National Potato Day! So this tutorial is just in time to celebrate potatoes. I love them all ways, especially scalloped, but I also like them baked.

On my last trip to Idaho to see my mom, I bought potato print fabric to make a microwave baked potato bag for Miss Abigail's hope chest. You couldn't find a better print for this kitchen item and it will be perfect to remind her of family "roots." I grew up on an Idaho potato farm! While you may not be able to find the potato print fabric, here's the tutorial so that you can make a bag with any other cotton print. Just make sure the materials are 100% cotton so that you don't have problems with the microwave. Directions for using the baking bag are at the end of the post.

Materials: 2 pieces of 100% cotton fabric, 1 piece thin 100% cotton batting, basic sewing supplies, including 100% cotton thread.

Measure and cut both pieces of fabric and the batting 9 x 21 inches.

 Place both pieces of fabric, with right sides together, on top of the cotton batting. Use a 1/4-inch seam and stitch across each short end.

 Turn the fabric right sides out. The batting will be between the pieces of fabric. Press. Top stitch across each end, about 1/2-inch from the edge.

 Arrange the bag with the outside fabric facing up. Fold the top down about 3 inches and pin on the edge. Fold the bottom up and overlap the top by about 1 inch. Pin securely.

 Use a 1/4-inch seam to sew both sides.

 Finish the seam edges with a zig-zag stitch or use a serger.
 Turn the bag right side out and press well.

 
Finished!

Microwave potato baking bags are designed for use in a microwave to cook any type of baked potato, including sweet potatoes. The bag works best with 2 or 3 regular Russet potatoes. Simply wash the potatoes and leave them damp. Don't pierce holes in the potatoes. Tuck the potatoes into the bag and close the flap. Cook on high, 6-10 minutes, depending on the number & size of the potatoes, and the power of the microwave. You can also interrupt the baking halfway through and turn the potatoes over, but it isn't necessary. Sweet potatoes will need about 30 seconds to 1 minute longer than regular white potatoes. You'll have to adjust the time for smaller round "salad" potatoes. After cooking, remove the potatoes. Be careful of steam as you open the flap! Simply let the bag air dry. Remember to let the bag cool completely before using it again and remember to use caution and proper supervision. The bag is machine washable, but don't use fabric softener or other additives.


Wednesday, January 6, 2016

A Peek Inside - Recipe Book


Miss Abigail received this recipe book for her hope chest in September for her birthday. It is the third recipe book that our club published and I think it is my favorite. There are some really good recipes in here. Abigail didn't have a stable copy yet for her hope chest. I have bought these cookbooks by the stack to use as wedding gifts and if I needed one and didn't have any at the house, I have been known to rob Abby's hope chest and then replace it again with the next purchase. Our good friend Peggy took care of this problem by presenting Abigail with a sweetly inscribed copy, especially intended for the hope chest. Thank you Peggy for circumventing my proclivities.

Peggy has contributed several items to the hope chest, and I think there is something from all the ladies Abby grew up with in there now. I love that Abigail will use these items and remember these wonderful women all through her life. They have been exceptional examples of the term homemaker.


This recipe for Pita Bread Pizza helped Abigail win her first 4-H contest. She was just nine years old and competing officially in 4-H for the first time. There is certainly a lot of water under the 4-H bridge. What a fun memory.

Wednesday, August 12, 2015

Mason Jar Flower Frog


I was so pleased to run into these inexpensive flower frogs! They cleverly fit onto a mason jar. It reminds me of all the times Miss Abigail gathered field and sometimes garden flowers to bring me a bouquet. She could always find a canning jar on the shelf to stuff the flowers into. What a sweet memory! The flowers would fall to the edges though, so the bouquet looked just a little awkward. Moms don't usually care about that, but one of these flower frogs will be just the ticket to help the blooms stand more upright. I'm excited to put these into the hope chest.

edit - I should have mentioned that I purchased these at the JoAnn's store in Albuquerque. Happily, they are also available on Amazon.com.  Link on Amazon --km

Friday, July 10, 2015

Tutorial: Folded Fabric Hot Pads


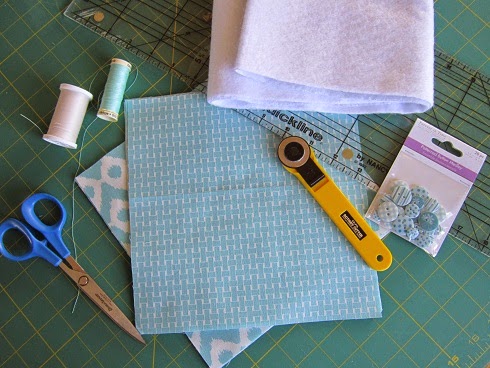
I stumbled on a sample of these pretty folded fabric hot pads and thought they would be a perfect quick project for the hope chest. They are really easy. You'll need: 1/4 yd of color/print A, 1/4 yd of color/print B, 1/4 yd of Insul-Brite, thread to match primary fabric, 2 buttons to match, rotary cutter, ruler and mat. This is a great project to use with scraps as well, as long as they are at least 9" square. Five different fabrics would be just as cute as the co-ordinated pair I've made here.


Once you have your materials, cut 5 (8 1/2-inch) squares from each fabric and 2 (8 1/2-inch) squares from the Insul-Brite. Iron 4 squares from each fabric in half, making a total of 8 rectangles.


Now you'll make a stack. Place the square of Insul-Brite batting on the bottom. Place an 8 1/2-inch square with the right side up on top of the batting. Place one folded rectangle (A) across the top of the stack, with the cut edge to the top and the fold toward the middle. Stack a second folded rectangle (B) with the cut edge toward the right of the stack and the fold toward the middle. Place the third rectangle (A) on the stack with the cut edge to the bottom.


Place the last (fourth) rectangle (B) on the top of the stack with the cut edge facing to the left. Tuck the top of the fourth rectangle under the left edge of the first rectangle. The rectangles will appear woven together with the cut edges on the outside and the folded edges coming to a point in the center.


Pin the edges and corners well.


Make sure to pin carefully at the point where the folds come together. They shouldn't overlap.


Sew carefully all around the edge of the hot pad, using a 1/2-inch seam allowance. You can use a walking foot if you wish - I didn't.


Cut the excess fabric from the corners and trim the seams so that the corners will turn more easily.


Turn the hot pad right side out. Use a point to make sure the corners are pushed completely out.


Press the hot pad so that it lays nice and flat. Topstitch 1/2-inch around the outside edges and sew a button at the center to help secure the center folded point.


Friday, January 25, 2013

A Peek Inside - Garnishing Tools


Miss Abigail recently received this beautiful set of garnishing tools for her hope chest. Of course, she may use them right away and I'm already looking for an instructive book about garnishing. There is a triangular knife in the set that will make zig-zag edges on a cut melon sooo much easier. What a great gift! Many thanks to Miss Isobel!


Related Posts Plugin for WordPress, Blogger...