Tuesday, January 11, 2011
Found One!
I regularly do searches for information about hope chests on the internet. I'm always so disappointed, but not today. :o) Here is a wonderful post about a mom who had a hope chest and has a simple idea for starting one for her daughter. I hope you'll read it and enjoy it. I did.


Saturday, January 8, 2011
An Embroidered Tote Bag

This post describes how to make a nice monogrammed tote bag. I made mine for a 4-H project and the result is beautiful. I’m very happy with how well it turned out.
1. Create a design. It was required for my 4-H project to create an item with an original design. If you do not need to make an original design, you can find one online or look in some iron-on patterns.

2. Transfer your design to the tote bag. I am going to tell you a really neat trick. First cut a square around the design. Next flip it over and with a soft lead pencil, color over the back. Next place the design in the middle of the tote bag and tape it to hold it down. Next, use a stylus and trace carefully along your design, making sure you get it all on. The pressure from the stylus leaves a mark on the fabric from the paper. It was pretty faint on this rough fabric. I traced over the pencil marks with a transfer pen.

3. Embroidering. Now you choose the colors for your design. I used blue for the letter, with pink and yellow for accents. After choosing colors, thread your needle and make a knot so your thread wont pull through. Then embroider the stitches. I used the chain stitch to outline the A. I used the cross-stitch to accent the middle of the monogram and the lazy daisy and the satin stitch on the accent flower.
When you finish, you will have a pretty monogrammed bag to tote books and things in. :o)
Respectfully submitted by Miss Abigail.
(If you need help with stitch instructions please check out the link for the Stitch School Blog on the sidebar --km)
Tuesday, January 4, 2011
Christmas Kitchen Towels

I wanted to share one last Christmas item as we move into the new year. With all the holiday cooking and baking that we do in our house, Miss Abigail and I need lots and lots of dish towels and hand towels. These hand towels were made from large, soft cotton napkins. They are 18" square. I like the smaller size. Because towels get wet and dirty quickly, I can reach for a clean one without creating a large pile of laundry.
Since I wanted to create something quickly, I sewed a purchased cluny lace near the hem on one side of the napkin and made a simple yo-yo decoration. Quick and easy and cute - that's what I like.
Friday, December 31, 2010
Favorite Crocheted Hot Pads

I picked up this free pattern in a favorite craft store. The pattern was called “Grandma Leona’s Hot Pad” and the sample was fabulous. It was nice and thick. It looked simple. However, the directions were really poor. It was as if Grandma Leona dictated them from memory, over the phone, when she was half asleep! Because that sample looked so good, I tried to figure out the directions and gave up a number of times. But I persisted long enough to finally figure out what Grandma Leona meant, and this hot pad really is as great as something from a grandma ought to be.
Here are better directions, I hope! I think you’ll probably see why it was hard to figure out. It doesn’t sound easy, but the pictures ought to help.
Materials: 2 balls, worsted weight, cotton yarn. (each ball makes 1 hot pad) Size G crochet hook.

Gauge: 4 sc = 1"; 6 rows = 1" (When I use a G hook with 26 chain foundation, the hot pad usually measures about 6 3/4 inches. If you like your hot pads bigger, use 28 or 30 chains in the foundation. Then you would be counting 27 or 29 sc stitches in each row)
Foundation: Chain 26.

Row 1: Sc in the second chain from the hook, then sc in each chain across. (25 sc) Chain 1 and turn.

Row 2: Pick up the back loop of the first sc and the bottom loop of the foundation chain opposite, at the same time. Yarn over and pull through the two stitches on the hook, then another yarn over and pull through the two loops remaining on the hook. This makes the first sc of row 1.

Continue to work in both the back loops of the previous row and in the bottom loops on the opposite side. Sc in each st across. (25 sc.)

The last stitch is critical. In the picture, you can see the turning chain from row 1 at the very end of the row. Count to make sure you have 25 sc.
 Again, chain 1 and turn.


Row 3 and continue: Working in the back lps of the stitches in the last row and in the front lps of the stitches of the row before the last row, at the same time, continue to sc in each st across, chain 1 and turn. Continue working the rows in this way until the hot pad measures square.


As you add rows, you will see that the bottom is rounded and that you are making the hot pad double. Each row lays halfway across the previous row. This makes the hot pad nice and thick. Once you get the hang of picking up both stitches, it is as simple and relaxing as most single crochet is.

As I mentioned, you need to be careful to pick up the last stitch in each row. It is small and tight and sometimes difficult to see. If you look carefully at the picture, you can see the last two threads that I need to pick up to make the last stitch. Sometimes, I have to pull the turning stitch of the previous row aside to see where to put the last stitch.

The picture above shows the last stitch on the hook. If the hot pad is not squaring up, it could be that you are not catching that last stitch. Count the sc in each row and you should be okay.
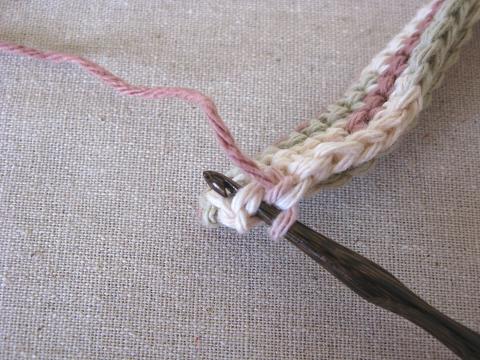
The picture above shows the last stitch on the hook. If the hot pad is not squaring up, it could be that you are not catching that last stitch. Count the sc in each row and you should be okay.

Measure the hot pad as it progresses. When the hot pad is within one row of being square, work the final row.
Final row: Work in both loops of the sc stitch in the previous row as well as the front loop of the sc stitch opposite on the row before the last one, all at the same time. (3 loops and 1 loop on the hook.) Yarn over and pull through the three stitches, then yarn over and pull through the remaining two loops. This makes the sc. Sc in this manner all the way across and complete the last stitch. Do not make a turning chain. If you don’t want a hanging loop, fasten off the yarn and weave in the tail.
Make a hanging loop: Do not fasten off. Directly from the last stitch, chain 12. Work a sc in the last sc in the last row. Chain 1, then slip stitch in each chain of the hanging loop. End with a slip stitch in the last sc you made. Leave about 6 inches for sewing and cut the yarn. Use a yarn needle to sew the yarn end through the bottom of the hanging loop a couple of times to stabilize it and then weave in the remaining yarn.
Wednesday, December 29, 2010
Hot Pad Gifts


These are my favorite hot pads. I make lots of these as gifts and usually put a dishcloth with them. These three sets were made for Christmas gifts. I just wanted to show how pretty they turned out.
Tuesday, December 21, 2010
Have a Very Merry Christmas

Miss Abigail is very happy that we've had some Christmas snow. She is loving it! I am also glad, but loving it a little less. :o) I'm having fun planning new posts for the blog, but am going to take some time to celebrate Christmas. I'll be back soon. I hope you all have a very, merry Christmas!
Saturday, December 18, 2010
"Merry Linens" Gift Set

I finished the "Merry Linens" gift set and wanted to show you all what it all looked like in the end. I crocheted a set of hot pads and a dishcloth and sewed rick-rack on two hand towels as well as embroidering the dishtowel. A recipe book, published by my ladies club, was also part of the gift. I think it all turned out really well.


I think its fun to use special linens like this for holiday cooking and baking. An apron would be nice too! If holiday linens are prepared ahead of time and placed in the hope chest, it would surely make those first holidays away from home more merry.
Subscribe to:
Posts (Atom)
