Tuesday, August 9, 2016

Tutorial: Tucked Tea Towel


This post is a tutorial for another very easy tucked tea towel. The towel requires only straight stitching. Although it is simple and unadorned on the front, it does have a surprise on the back with a finished faced hem using a matching printed cotton fabric.

Materials: 7/8 yard of 100% cotton "bottom weight" or decorator fabric, (2) 1/8 yard of matching 100% cotton print fabric, basic sewing supplies, measuring mat and ruler, disappearing ink pen.


Cut the towel fabric into two pieces and square up ends and edges. Cut the printed facing fabric into 4 strips 2.5 inches by the width of towel.


Pin one strip to each end of the towel, right sides together. Sew 1/4-inch seams on each end.


Press all the seams open.


Fold the long sides in 1/4-inch and press. Fold over again to form a hem. Press and pin.


Stitch close to the edge to finish the sides.


With the towel facing up, use the measuring ruler and place the 2 1/4-inch marking line directly over the seam separating the print facing fabric from the towel fabric. Draw a mark across the width of the towel. If you don't own one of these wonderful rulers, just use a regular ruler and yardstick to measure and mark a line 2 1/4-inches up from the seam.


Turn the towel with the back side up. Fold the facing toward the back with the raw edge towards the middle of the towel. Press carefully. Fold again, completely enclosing the facing within the fold. This step will allow you to catch the raw edge of the facing, making a nice finish on the back. Press along the previously marked line, across the width of the towel. Pin and repeat this step for both ends of each towel.


Decide how large you want your tuck to be and make a mark on the throat plate of the sewing machine in order to guide your seam. I just used the 5/8-inch marking. Sew the tuck across the width of the towel. If you sew with the right side of the towel down, you may want to check your tension before you start sewing to make sure the bottom stitching will look good on the right side of the towel. Repeat for both ends of each towel.


Open up the towel and press well again. The raw edge of the facing will be enclosed in the tuck, making a nice finish on the back of the towel.


Finished!


Monday, August 1, 2016

Removing Ink from Iron-On Transfer


If you've worked much embroidery, you're likely familiar with iron-on transfers. And, you have probably discovered that transfer ink doesn't always wash out, even after several times through the laundry. I've discovered two reasons for this.

First, many people don't know that the transfer ink is considered permanent. However, the content of the fabric does play a role. Transfer ink may eventually wash out, given enough time, if the fabric is 100% cotton. Unfortunately, the ink typically doesn't wash out of a poly/cotton blend - at all, ever. Yikes! Most pillowcases are a blend, even those that are called "cotton-rich." So, if you're using a blend, you need to be extra careful to use a light touch with the iron and then use enough embroidery thread to cover the ink entirely. I have pillowcases that, after thirty-seven years of washing, still show the ink under the slightly threadbare designs. Haha, you're probably wondering why I'm still using those pillowcases! I can only admit to being sentimental. And, remember that fabric was much better in those days and the pillowcases are still useful, if somewhat shabby.

Secondly, when you transfer the ink, sometimes you will end up with a very dark transfer that bleeds through both layers, ruins your ironing board cover and won't wash out. Follow the instructions on the transfer envelope carefully. It does take some practice and "finesse" to get a clear transfer and to know when to quit.  I will post my best tips for using iron-on transfers in a couple of days. I always err on the side of a lighter transfer even though I sometimes end up with spots that I have a hard time seeing.

So, how to remove the ink? That's the subject of this post because Miss Abigail has a particular set of pillowcases for the hope chest that needs an answer to this question. The design is unfinished. That was deliberate, I think. Miss Abigail's grandma just got tired of working the design and wanted to leave the ends. It doesn't take away from the design at all, but there is remaining ink on the fabric. My sweet mother-in-law finally decided she was just finished with embroidery. She doesn't see well anymore and she just doesn't enjoy it. So she passed the last of her unfinished projects on to me, along with tools and threads. This set of pretty pillowcases was in that box. The fabric is a really nice, quality percale blend. So I know I'm going to have a hard time removing the remaining ink from the transfer. In fact, I'm not sure I can get it out at all.

However, because I use a clothesline to dry all of our laundry, I do know one secret -- sunshine. Yup, sunshine fades all kinds of ink! Sadly, there is more experience talking here. So, I'm trying direct sunlight and hope that it will fade the stamped ink. It's worth a shot, but so far it isn't working very well. I could try to finish them, but the threads won't match and that will look awkward. While I know it is probably a lost cause, I'd rather remove the ink somehow.

Does anyone else have experience or suggestions for removing this ink?

Monday, July 11, 2016

Trim on the Apple Dishtowel


As I was again cleaning in the sewing room this morning, I came across some dyed Cluny lace. It seemed like it matched the apple dishtowel that I completed last week. So naturally I stopped cleaning and attached a length of it along the edge with a simple running stitch. I think it adds a nice finishing touch. What do you think?


Friday, July 8, 2016

Social Media - Find Me


Some of you may wonder what I've been up to for the past couple of months, since I haven't been blogging much! Some time ago my husband and I had another "planning meeting" where we assess our goals and see what needs to happen. We have so many changes happening at our house. The biggest change, as it relates to me, is that we decided to expand our sheep business. So I've been on a steep learning curve about building a business and, in particular, social media. This has been hard for me because I am actually not very social in real life. But, needs must. So I've been hard at work on a website and setting up business profiles for Facebook, Instagram and Pinterest.

I've never been very active on Facebook, personally, but am making a concerted effort to be active on our business page. Please look us up if you would like to see what goes on around the farm. If you like our page we can have a conversation!

Instagram intrigues me because I love beautiful pictures, but I'm still trying to learn my way around and find people to follow. If you happen to be on Instagram, please find me! If you'll introduce your profile in a comment, I'll be sure to follow you back. I am most anxious to find people I might already share interests with!

I hope you will come by and visit us somewhere on the web! I'll share the links below. If you can't find me here, you might find me there.

http://www.hyerwools.com/ (especially the blog)
https://www.facebook.com/hyerwools/
https://www.instagram.com/hyerwools/
https://www.pinterest.com/hyerwools/

Tuesday, July 5, 2016

Tutorial: Derwent Inktense Dishtowel


You may remember that I posted some time ago about keeping an art journal. Part of my supplies for the art journal is a small set of Derwent Inktense dry ink blocks. I have known that these could be used on fabric and have wanted to fool around with them and today I did. So here's a tutorial on how to use Inktense color blocks to embellish a plain cotton dishtowel. I can certainly use some more practice, but the project was easy and quick and I think it is a useful technique to decorate items for the hope chest.

As far as materials go, you'll need a set of Inktense Blocks. These are dry, water-activated ink blocks. So you can draw or trace lines on the fabric and then activate the ink with water from a blender pen or a brush. It works just like a watercolor pencil, but the color is much more vibrant and intense. BTW, I have no affiliation - I just like this product. I got my set at Michael's. You will also need a 100% cotton dishtowel. You can draw a freestyle design on the towel, but I used an iron-on transfer because I'm just not that great at drawing. You'll also need a small cup of water to activate the ink and a couple small brushes. A black fine-tip Sharpie marker will be used to trace the original transfer design after the ink has dried. Oh, and you'll need something to protect the work surface since the ink will soak through to the other side.


Wash the towel to remove any sizing and then iron it smooth.


Center the design on the towel and follow the directions to transfer the design.


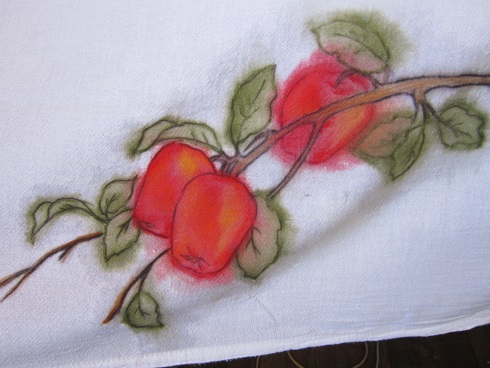
I first used the dark brown ink block to trace the branch of the apple tree. Then I lightly colored the branch with a lighter brown color. I traced the leaves with a dark green, and the apples with the red color. I added some orange to the apples and a bit of yellow as well.


The ink has to be wet in order to activate. Use the brush and a cup of water and "paint" over the lines of ink. The fabric will wick the water outside of the lines. I used a lot of water because I like this effect. You may wish to be more careful.


While the fabric is wet, you can use the block to add more color or use other colors to add shading. The ink goes on very thick when the fabric is already wet. Just use a little more water to make sure this second application of ink is activated and won't wash out later. Brush the ink further into the design to darken and shade the design.


After the ink is dry it becomes permanent. Because the inked lines become so blurred, I used a fine-point Sharpie pen to trace the transfer lines.


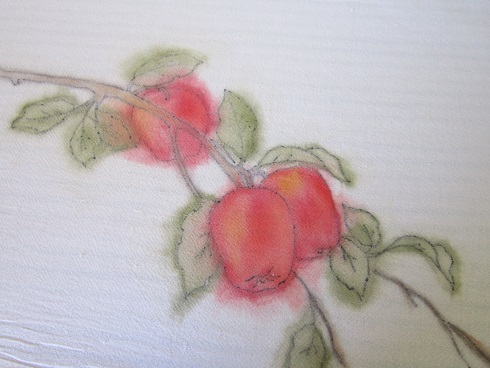
I ironed the towel again to heat set the ink. I know the ink is permanent, but with an item that will be used and washed often, I think the heat set will be a back up option. Even the back looks great!


So here is the finished towel. I've used wax crayons to color on fabric in other projects, but these vibrant Derwent Inktense Blocks are so lovely and work so much better, I believe. I am now planning even more projects! A simple design on a crib sheet would make a cute gift.


Friday, July 1, 2016

Show and Tell: Etched Glass Tumblers


Hi everyone! Miss Abigail here. About a week ago a friend of mine gave me these "etched glass kits" and asked me if I wanted to give it a try (with warnings of "this is acid, so you'll have to be really careful and dextrous.") Judging from the cover of the kits, glass etching looked like one of the coolest and classiest crafts ever!


Fast forward to Wednesday. I opened up the kits to get the party started, and after reading through the instructions and preparing a work space (because protecting the kitchen table is always a good idea, right?) I decided to jump right in. This was going to be awesome!


Isobel was right when she said the etching cream is dangerous. The bottle says that it causes severe burns and damage and may be fatal, and according to ye olde Internet, it is on the same scale as battery acid. How fun. This is why nitrile gloves exist!


So after being warned about the dangers of glass etching cream, I started playing with different designs on the glass tumblers that came in the first kit. I ended up going with a simple double stripe design to start with.


The process of creating your design and taping it onto the glass is pretty easy. You just cut strips of vinyl tape and arrange them how you like on the glass. It's a lot like placing an adhesive stencil - except you're the one creating the stencil with strips of tape. Really, the hardest part is deciding on a design. If you're like me, you can't decide whether to go with this idea or that one. (The etching cream bottle did say "permanent," after all, in bold letters.)


So I decided on a simple newbie design and got to the real work/fun/potential finger-destroying action. I pulled on my nitrile gloves, stirred my bottle of acid cream, and started spreading it over the areas within the tape. It's crazy how similar this is to stenciling. Just think, Abby, years ago you were  a fresh-faced ten-year-old just learning how to paint within the lines. Now you've graduated to using those techniques to make classy tumblers that you can use at dinner parties, or other events that call for fancy glasses.


So after I finished with the etching cream (fingers still intact so far) I had to let it sit for about five minutes, to allow the acid to do its work. Then it was time to rinse it off, wipe away the stubborn remaining globs, dry it and peel away the tape. Aaaaand....


...Ta-da! It looked great! Now I know how one achieves that "frosted" look on a glass. After I finished the other one I put them together in their own little set.


Then I got started on the other kit, which was a pair of glass flutes in need of classy etching. I tried a much more intricate design on those (shamelessly stolen from the cover of the box, because I really liked that design and my first initial happens to be A.) They turned out really nice too, and I think they'll make great little juice glasses. So I'm pretty pleased with how things turned out, and happy that I tried something new. I think we need to go to Walmart now and get more glasses! This glass etching business is definitely something I could get used to.


Wednesday, June 29, 2016

Related Posts Plugin for WordPress, Blogger...