Tuesday, March 1, 2016

Heirloom Recipes: A Hope Chest Legacy


 You may not know that the month of March is designated as Women's History Month. I want to start the celebration by sharing a special family recipe. Recipes can become the most beloved of heirlooms and are so easy to collect and pass down. The perfect addition to a hope chest!

Memories of food are especially compelling and there is something very affecting about owning a handwritten recipe from a mother or grandmother. It actually doesn't even need to be from their hand. The ability to recreate the process, the aroma and especially the taste of an associated food is enough to evoke a heartwarming memory. If you are a cook or if you have ever loved a cook, family recipes are priceless!

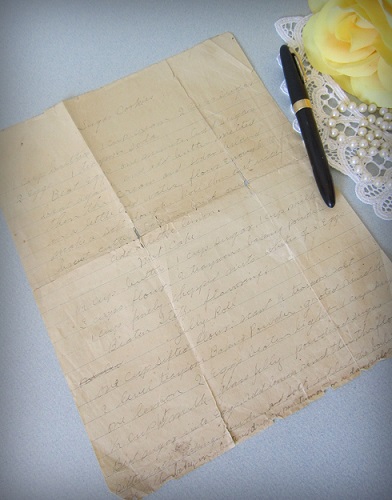
My great grandmother, like most grandmothers, had a recipe for sugar cookies. I think this recipe is probably not particularly special, as sugar cookies go, but the whole family, especially her many grandchildren, loved these cookies. I'm told the lemony flavor (which grandma writes in the recipe almost as an afterthought) was especially delightful. Although I know her only through stories, Great Grandma Anderson was a nurturer and nothing else quite says love and care as a cookie from grandma! But this is also true of a holiday meal or a birthday cake or some other memorable food.

I want Miss Abigail to have our special family recipes. This kind of project does take a little time. It can be tedious to copy out handwritten recipes or even to type them. I've been working on this a little at a time. You may remember that I created a recipe booklet for our Thanksgiving recipes. And Abigail has this recipe book from the club ladies in her hope chest. I'm currently trying to make a larger binder with other everyday recipes that Abigail enjoys. There is a handwritten recipe for yeast dinner rolls from another grandmother who was quite famous for her rolls, and the recipe for our Sunday Night Chocolate Chip Cookies.

If you have an heirloom recipe, be sure document and write the history to go with it. Then share it as widely as possible with those who will treasure the memories it brings. I regularly read a lovely blog called My Ancestors and Me, written by a friend who has a wonderful knack for telling her family stories. She often shares heritage family recipes, but Nancy recently shared the simple story of one recipe that has become special to her family. This post illustrates how easy it is for a recipe to become a heirloom.

handwritten recipe - Marian Bell Anderson (1864-1942)

Just a note about preservation. The recipe pictured above is written on a newsprint-like paper that is literally now falling apart. The handwriting is almost illegible on the paper copy, but I was able to improve that in the digitized copy. I think the paper may be a page from an old school notebook. My father kept his grandmother's recipe in a "banker's" box with his other treasures. I photocopied the recipe onto acid free paper to have a working copy in my files and digitized the document as well so that it can be shared. I now keep the original recipe unmounted with a stiff buffered paper to support it in a mylar sleeve and store it in the dark. Do any of you have handwritten recipes from special members of your family?

Friday, February 26, 2016

Running Stitch Daisy Dishtowels


If you are looking for a quick project for the hope chest, you can't beat running stitch embroidery. The running stitch is usually the first stitch learned by a beginning embroiderer because it is so easy to manage and gives a fast finish to the design. You can stitch it using the "poke and stab" method, bringing the needle up and down through the fabric in separate motions, or by gathering two or three stitches at once on the needle in one continuous motion. This second method is most efficient, but may be a little harder to manage for children who are learning to use a needle for the first time.


Simple, coloring book style designs are fun to use with this stitch. This daisy was just a doodle for me. I'm sure that you could also draw a simple daisy-like flower to stitch or find one in a child's coloring book. I drew it out on scratch paper first and then used a transfer pen to trace the design on the flour-sack dish towel. I wanted to use a light colored floss for these towels, but a darker, more contrasting color will actually show up best. There are several tutorials on the Internet to teach you how to make this stitch. Mary Corbet's tutorial at Needle 'n Thread is a good one.


You are really only minutes away from a pretty dishtowel for the hope chest or even your own kitchen drawer. Give it a try!

Tuesday, February 23, 2016

A Peek Inside: The Pink & Brown Kitchen Set


I have this Pink&Brown Kitchen Set finished for the hope chest. I've been working on it for quite awhile now, so I'm glad to finally get it wrapped up. I can't seem to work on just one set until it is finished. I always have a couple of different sets going at once. But, this one is finished now. Hooray!

Items in this kitchen set (with links to the separate posts):


Saturday, February 20, 2016

Sew on Saturday: Pink & Brown Floral Apron


I always plan for aprons as part of the kitchen sets that I'm making for the hope chest. But for some reason, I put off making them. I have several cute patterns and I have a hard time choosing which pattern to use. The pattern for this apron is Butterick #5263 and I like it very much. I did not use the full lining the pattern called for. Instead, I just purchased bias tape and attached it as a faced hem to finish all the edges.


I took the opportunity to show Miss Abigail how to sew a nice curve on the pocket. In case you don't know, I will mention it to you. Just make a gathering stitch along the curve and pull it up a little bit. This creates a natural curve and then you can press it before pinning the pocket to be sewn. This is much, much easier than trying to press the curve without the fabric being gathered.


Completing this apron finishes the Pink&Brown kitchen set for the hope chest. I'm off to take pictures and will post the finished set next week. I hope you'll check back.

Tuesday, February 16, 2016

Midori Style Junk Journal


Over the past several months, I have become a little obsessed with the concept of junk journals. Depending on who you talk to a junk journal is probably one of two things. It is either a journal made from recycled junk mail, scraps of other useful papers, pages ripped from throwaway books or art magazines, a pretty gift bag or any other paper that would otherwise be "junked" or thrown away. These papers are used as background papers and sometimes altered with paint or other art media to make beautiful handmade books that can be used as journals and photo albums.

The term "junk journal" may also refer to a journal, such as a composition notebook or regular journal, that has been put to use as a sort of glue book or smash book to hold the scraps or "junk" memorabilia of our lives. These items might include fuzzy photos, concert tickets, the receipt from your birthday dinner, a pretty feather found on your anniversary. All the stuff in your sock or office drawer that you don't want to throw away but that is not elegant enough for a photo album.

If you search the Internet and particularly Pinterest with the term "junk journal" you'll see wonderful examples of what I'm trying to describe. I am amazed at such beautiful books. So I wanted to try my hand at making a junk journal. When this little cardboard flyer came in my mail, I knew I had the making of a book cover. My "midori style" junk journal is born.


I covered both the inside and the outside of the flyer with patterned paper from the scrap drawer of my paper stash.


By "midori" style I mean the style of binding for the pages. Midori journals use a set of rubber bands around the spine of the cover. Leaflets or booklets are slipped under the rubber bands to hold them, somewhat loosely and often temporarily, inside the cover. I wrapped cotton string several times around my cover to create a similar binding for my leaflet pages.


I again raided my scrap drawer for pretty patterned paper to use as inside leaflet pages. I embellished the outside of the pages with stickers. The stickers were also leftovers and didn't match from page to page. You can see that the pages are tucked under the strings.


I used chalk to color and soften the edges of the inside pages. These are the pages where I will write notes. Again, you can see the simple way the page slips under the string and is held by the fold in the paper.


I made two envelope pages to hold scraps and memorabilia. The flap of the envelope tucked around the string and into the envelope itself. Then I embellished the outside of the envelope.


My journal is held together on the outside with a plain red rubber band. A matching button is tied to it. The band just slips on and off to hold everything closed. That's it! I love Pinterest! Don't you?


Sunday, February 14, 2016

Friday, February 12, 2016

A Peek Inside: Vintage Ric-Rac Gingham Apron


Kelly was wondering about a how-to on the pretty vintage ric-rac gingham apron shown in Miss Abigail's valentine set. She admired the vintage flair and thought it might be simple enough to make with a little direction. I didn't sew this apron, so I don't have a pattern to share. I thought I could at least take a few close up pictures and explain how I think one could re-create it.

This apron was actually a gift from one of the older ladies in the Stanley Homemaker's Club, of which Abigail and I are members. The Homemaker's Club was officially formed in 1942 as part of the old County Extension club program. We are no longer formally affiliated, but rather meet twice a month for tea and conversation. I love our "show & tell" meetings especially. Abigail was born into the club when most of the ladies were already grandmas and they spoil her flagrantly! Peggy is in her 80's now and this was once her apron, reportedly hand-made by a member of her family. It is probably between 45 to 60 years old. Gingham was especially popular in the 1950's as a domestic fabric. Aprons were often made with gingham and embellished with cross-stitch embroidery and ric-rac.

The half-apron is sewn on a machine, but the bottom hem and the ric-rac are sewn by hand. It is 35-inches wide and 20-inches long, with a deep 3-inch hem. Three rows of medium black ric-rac are offset with two rows of baby black ric-rac. You can see a tutorial of the technique used to apply the ric-rac in this tutorial I wrote about ric-rac pillowcases.


The body of the apron is not gathered to a waistband, but rather has four (.75-inch deep) pleats which narrows the waist to 20 inches. A simple rectangular facing (2.75 x 20-inches) finishes the back and creates a waistband for the apron. The pleats are about 3-inches tall. More ric-rack is applied to the waistband.


The ties measure 2.5 x 27 inches (narrowly hemmed) with the end turned up and tacked into a point. They are attached underneath the facing.


Finally, a pocket, measuring 5.5-inches wide by 5-inches deep is sewn on the right hand side of the apron. It is attached 3-inches down from the bottom of the waistband and 6.25-inches in from the right side hem. Because of the pleats, I'm sure the pocket was attached before the pleats were sewn.


 I agree with Kelly - the apron is darling, and could be re-created with just a little experience with sewing. I'm so pleased that Abigail has this in her hope chest, both to remember Peggy and to dress up a little when she feels like it.

P.S. Please remember that the measurements are finished measurements. One would need to add allowances for seams and hems.

BTW - How do you think ric-rac should be spelled? Rick-rack?
Related Posts Plugin for WordPress, Blogger...